I know that this has been covered here before, that's how I learned how to do it  , but I wanted to share my through-wall skimmer install on my Intex 18' x 48" Ultra Frame AGP.
It was really as easy as it looks, if you are at all considering it, just do it. Take your time, double check everything. I'll admit it, I was very hesitant to take a razor blade to my pool liner!!
I used the Hayward SP1091LX skimmer as many here have had previous success with them.
I drained the pool to about 1" below the skimmer location. I know that some have installed without draining, but I didn't want to take any chances, and the lawn needed some water anyway.
I carefully split the butterfly gasket, then trimmed the leftover material from the split with a sharp razor. This needs to be done carefully.
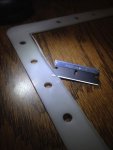
Next I placed the inside flange in its location, leveled it as best I could, and duct taped it in place. I took my Philips screwdriver (and a deep breath) and did this to my new pool:
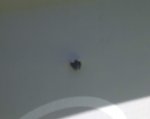
Be sure to support the liner with your fingers as you slowly push the screwdriver through the liner, turning it slowly as you push. I started with the top center hole, then the bottom center hole, then evenly around the outside putting a screw in each hole as I made them to keep the flange in place.
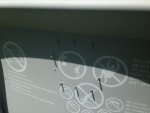
I removed all the screws, then placed the inside gasket against the flange, and passed a screw thru the top center hole to keep the gasket in place. I then screwed the flange/gasket to the liner, putting the screw about 3/4 of the way thru leaving the gasket loose to line up the holes. I went around the flange installing all the screws about a 1/4 of the way thru, being careful to pass thru all the holes in the gasket.
I then mounted the outside gasket over the screws sticking out, then carefully mounted the skimmer starting with the top center screw, then the bottom left & right screws, then the remaining screws evenly across. I went around the screws three or four times, tightening a little at a time evenly. When you finally tighten it down completely be careful you do not distort the flange and gasket. I tightened until I saw the gasket squish out very slightly then backed off until the squish went away. Sorry I didn't get any pics of these steps, I was a one man operation LOL!
Here it is, right after I cut out the liner. You can see in this picture that even though I was very careful to level off the flange, somehow while I punched though the liner I slightly canted the frame. The skimmer seems to work just fine however.
I cut the liner last, after all the plumbing to the skimmer was done.
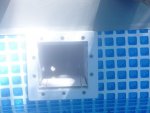
I hard plumbed the skimmer & original suction port using 1-1/2 PVC. I put ball valves for isolation and a union incase I should ever need to disassemble something. I plan to use the original port as a vacuum port now. I connected to the original Intex fitting using the 1-1/2 PVC electrical box adaptor as recommended here at TFP. I used the nut from an older plunger valve because I liked the fact that I could put it on after the cement dried. Also, if you are very careful you can use the gasket from the plunger valve as well, it's a close enough fit but a hair larger than the inside opening of the port. If you are persistent you can get it to stay in the port properly.
I used a Game A2656 40MM X 1-1/2 Short Adapter for the Intex hose hookup.
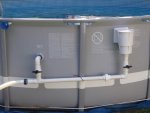
To keep water out of the original suction port (I was not draining that low) I used a 1-1/2" adapter and hose from an old Intex skimmer on the port & and lifted the other end of the hose out of the water. Worked great to keep the connections dry while the cement set. (LOL I just noticed the stick floating by, hence the skimmer install).
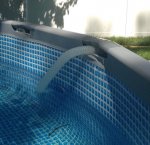
On the Return port side I installed the 1-1/2" Hayward return that came with the skimmer. I though it would be best to have a standard fitting. It has a 3/4" eyeball, but I am going to change it to 1" to lower the filter pressure a bit.
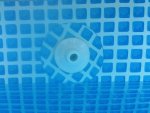
I then hard piped with 1-1/2" PVC and ball valve. I had to get creative with 45's as I ran out of 90's. I used the second 40MM adapter at the other end.
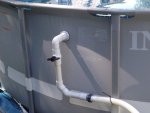
Here it is, all hooked up and refilling while I let the cement dry good!
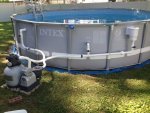
Skimmer works great so far and no leaks!
I hope this helps someone interested in doing this. It was super easy, just take your time. Once the pool was drained it only took me about 3 hours, and that's with double and triple checking everything.
Next, solar heating !!
Dom
It was really as easy as it looks, if you are at all considering it, just do it. Take your time, double check everything. I'll admit it, I was very hesitant to take a razor blade to my pool liner!!
I used the Hayward SP1091LX skimmer as many here have had previous success with them.
I drained the pool to about 1" below the skimmer location. I know that some have installed without draining, but I didn't want to take any chances, and the lawn needed some water anyway.
I carefully split the butterfly gasket, then trimmed the leftover material from the split with a sharp razor. This needs to be done carefully.

Next I placed the inside flange in its location, leveled it as best I could, and duct taped it in place. I took my Philips screwdriver (and a deep breath) and did this to my new pool:

Be sure to support the liner with your fingers as you slowly push the screwdriver through the liner, turning it slowly as you push. I started with the top center hole, then the bottom center hole, then evenly around the outside putting a screw in each hole as I made them to keep the flange in place.

I removed all the screws, then placed the inside gasket against the flange, and passed a screw thru the top center hole to keep the gasket in place. I then screwed the flange/gasket to the liner, putting the screw about 3/4 of the way thru leaving the gasket loose to line up the holes. I went around the flange installing all the screws about a 1/4 of the way thru, being careful to pass thru all the holes in the gasket.
I then mounted the outside gasket over the screws sticking out, then carefully mounted the skimmer starting with the top center screw, then the bottom left & right screws, then the remaining screws evenly across. I went around the screws three or four times, tightening a little at a time evenly. When you finally tighten it down completely be careful you do not distort the flange and gasket. I tightened until I saw the gasket squish out very slightly then backed off until the squish went away. Sorry I didn't get any pics of these steps, I was a one man operation LOL!
Here it is, right after I cut out the liner. You can see in this picture that even though I was very careful to level off the flange, somehow while I punched though the liner I slightly canted the frame. The skimmer seems to work just fine however.
I cut the liner last, after all the plumbing to the skimmer was done.

I hard plumbed the skimmer & original suction port using 1-1/2 PVC. I put ball valves for isolation and a union incase I should ever need to disassemble something. I plan to use the original port as a vacuum port now. I connected to the original Intex fitting using the 1-1/2 PVC electrical box adaptor as recommended here at TFP. I used the nut from an older plunger valve because I liked the fact that I could put it on after the cement dried. Also, if you are very careful you can use the gasket from the plunger valve as well, it's a close enough fit but a hair larger than the inside opening of the port. If you are persistent you can get it to stay in the port properly.
I used a Game A2656 40MM X 1-1/2 Short Adapter for the Intex hose hookup.

To keep water out of the original suction port (I was not draining that low) I used a 1-1/2" adapter and hose from an old Intex skimmer on the port & and lifted the other end of the hose out of the water. Worked great to keep the connections dry while the cement set. (LOL I just noticed the stick floating by, hence the skimmer install).

On the Return port side I installed the 1-1/2" Hayward return that came with the skimmer. I though it would be best to have a standard fitting. It has a 3/4" eyeball, but I am going to change it to 1" to lower the filter pressure a bit.

I then hard piped with 1-1/2" PVC and ball valve. I had to get creative with 45's as I ran out of 90's. I used the second 40MM adapter at the other end.

Here it is, all hooked up and refilling while I let the cement dry good!

Skimmer works great so far and no leaks!
I hope this helps someone interested in doing this. It was super easy, just take your time. Once the pool was drained it only took me about 3 hours, and that's with double and triple checking everything.
Next, solar heating !!
Dom
Last edited:

