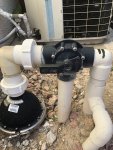
I agree with everything, I just don’t know we’re these by my feet go to for labeling purposes ?Also, if you look closely at the 3-way valves in your system, you’ll see where it’s printed on the housing “Inlet”. Water flows in through that, then depending on the handle setting, out to either sides.
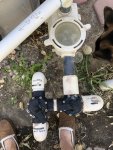
Looking at this picture here....
View attachment 96643
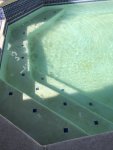
I suspect the pipe right up against your right foot is pulling from the drain in the bottom of the spa.
The other 2 are pulling form the main drain in the pool, and the skimmer.
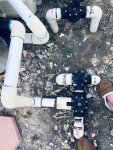
As far as the other valves in the bottom of that pic. One should be going to the returns in the pool, one to the IFC (the black dome area), and the other I’m not sure. Do you have a water feature? Like a waterfall or deck jets?

Can someone help me in labeling my valves from picture's
- Thread starter Serbor
- Start date
You are using an out of date browser. It may not display this or other websites correctly.
You should upgrade or use an alternative browser.
You should upgrade or use an alternative browser.

I fix
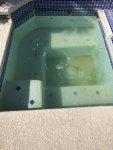
To the right of the dome , I noticed they the shallow end pop ups are working poorly but nothing else
I fixed that sorry for the image error now it’sSet the handle so the “off” on the handle is away from the black dome, and check the pop-ups in the pool & spa to see if they’re working.
Water flows down from the top of the black dome out through the pop-ups in the pool & spa.
To the right of the dome , I noticed they the shallow end pop ups are working poorly but nothing else
Attachments
I’m taking off now, tomorrow I will pull the valve with out the screw and determine we’re off is , then I will post we’re at , but would love to also label the two pipes on my feet, thank you all, but a big thank you to Arizona Bob
Attachments
The screw I never noticed , but I tried rotating clock wise and it never stops, it just keeps rotating, I can if you like take the outer screws out, remove and confirm if it’s broken inside or were the off is for real being that in the event that at one time in the past it came off and put back at wrong position
Do not do that at this time. 99% of the time when you disassemble those valves, you would need to replace the O-Rings and re-lube them. I’m sure you don’t have the parts on hand.
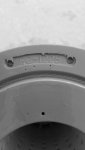
In the image below, it gives you a look at how the valve will look on the inside. Notice how the off position lines up with the door inside the valve. With a proper top screw in place, you would not be able to rotate the handle 360 degrees. You would only be able to rotate left/right 180 degrees.

I’ll follow up tomorrow, as it’s time for some relaxing and adult beverages. Plan on taking some complete pool pictures tomorrow so myself and others can get a handle on what’s going on. 
Dodger
Silver Supporter
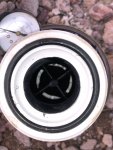
If you want to address cleaning of the Caretaker yourself, the simplest thing might be to inspect/clean the strainer that sits above the valve. If it hasn't been cleaned in years, it could have a bunch of gunk piled up.
Below is the drawing from the manual. Do be careful with the o-ring. To be cautious, you could order a new o-ring before you open it up. You can find various parts at online places here or here.

Below is the drawing from the manual. Do be careful with the o-ring. To be cautious, you could order a new o-ring before you open it up. You can find various parts at online places here or here.
I will order a
Thanks for the advice, I will order a new locking knob.Do not do that at this time. 99% of the time when you disassemble those valves, you would need to replace the O-Rings and re-lube them. I’m sure you don’t have the parts on hand.
In the image below, it gives you a look at how the valve will look on the inside. Notice how the off position lines up with the door inside the valve. With a proper top screw in place, you would not be able to rotate the handle 360 degrees. You would only be able to rotate left/right 180 degrees.
View attachment 96653
Than
thanks , that’s exactly what I will do next.If you want to address cleaning of the Caretaker yourself, the simplest thing might be to inspect/clean the strainer that sits above the valve. If it hasn't been cleaned in years, it could have a bunch of gunk piled up.
Below is the drawing from the manual. Do be careful with the o-ring. To be cautious, you could order a new o-ring before you open it up. You can find various parts at online places here or here.
View attachment 96664
I will
I will do that.
I’ll follow up tomorrow, as it’s time for some relaxing and adult beverages. Plan on taking some complete pool pictures tomorrow so myself and others can get a handle on what’s going on.
I will do that.
- Feb 6, 2015
- 7,851
- Pool Size
- 12300
- Surface
- Plaster
- Chlorine
- Salt Water Generator
- SWG Type
- CircuPool RJ-45 Plus
As Rob said, do not open the Jandy valve at this time.
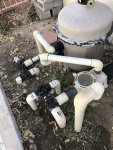
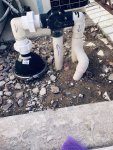
In the pic with the Caretaker water valve dome on the left side -
Chances are the screen in the infloor is probably plugged if it hasn't been cleaned in a while
Let us know what works and what doesn't on the infloor system.
As for the rest of the Jandy valves, you may have to set them and see what they do. On the suction side you can see which valve setting makes the siction side cleaner work, the water drain from the spa, etc. On the pressure side, see whar setting returns water to the spa, the infloor, etc.
Fill out you signature with you pool and equipment specifics. Brand names and model numbers if you can find them. This makes it easier for us to assist you and not continually ask about your pool/equipment specs.
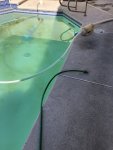
Post a pic of your overall equipment area (everything in one pic) so we get an idea of your equipment layout. Also post a pic of your pool and spa area.
- The handle should only fit on the shaft one way
- Wherever the 'OFF' on the handle points is off
- On the pressure side of the system (after the pump), the word 'INLET' on the cover under the handle should be on the side water is coming from (from the pump)
- On the suction side of the system (before the pump), 'INLET' should be on the side watwr is going to (to the pump)
In the pic with the Caretaker water valve dome on the left side -
- The center pipe going to the Jandy valve has water flowing up to the valve
- The right probably going to pool returns
- The left goes to the Caretaker valve
- With off pointed left, the infloor is off
- With off pointed right, the returns are off
- With off pointed up, you are splitting the flow left and right
- NEVER point off down as that stops water flow completely
- If you want the infloor to work, you have to have the returns totally off - infloor 100% on
Chances are the screen in the infloor is probably plugged if it hasn't been cleaned in a while
- With the pump off and the Jandy valve 'OFF' pointed to the left, open both unions on the left and remove that pipe section - be sure there are no restriction in the pipe from debris
- The screen should be below the union closest to the Caretaker dome - clean it
- You should also open the Caretaker dome to see if the internals are in good working order - clean out any debris. There are parts inside that move to cycle the infloor to numerous zones. Several pop-ups should be up at one time. As they start to close, the next zone will start to open.
- Lube any o-rings on dome lid and unions - reassemble
Let us know what works and what doesn't on the infloor system.
As for the rest of the Jandy valves, you may have to set them and see what they do. On the suction side you can see which valve setting makes the siction side cleaner work, the water drain from the spa, etc. On the pressure side, see whar setting returns water to the spa, the infloor, etc.
Fill out you signature with you pool and equipment specifics. Brand names and model numbers if you can find them. This makes it easier for us to assist you and not continually ask about your pool/equipment specs.
Post a pic of your overall equipment area (everything in one pic) so we get an idea of your equipment layout. Also post a pic of your pool and spa area.
- Feb 6, 2015
- 7,851
- Pool Size
- 12300
- Surface
- Plaster
- Chlorine
- Salt Water Generator
- SWG Type
- CircuPool RJ-45 Plus
One other thing - if the infloor is fully functional and you intend to use it, you will need the main drain to be open at least 30%-40%. With an infloor cleaning system, the main drain is where the debris on the floor is picked up.
The valve off was set correctly as you directed. Once I removed the pipe to the caretaker to clean the screen I found the bad news, there never was a screen, I remember a long time it was leaking and someone rebuilt for me, what I did not know is for 6+ years its been flowing water with out a screen. So I shut the flow to the caretakerOne other thing - if the infloor is fully functional and you intend to use it, you will need the main drain to be open at least 30%-40%. With an infloor cleaning system, the main drain is where the debris on the floor is picked up.
Monday I’m ordering a new caretaker gauge that’s broken and a screen and I will also open the dome and check the inner workings as directed. After that I will do a caretaker test and see if any pop ups work. I will then report back.
If that’s not how you would go about it let me know ? And any special tools to take the dome off ?
Attachments
-
 14883A82-8342-4FCC-9F5A-46B026BC96AB.jpeg367.8 KB · Views: 9
 -
 5E4B6757-7365-4DF4-B191-86099E547777.jpeg441.8 KB · Views: 10
 -
 63A57F82-EED8-47DE-A4DE-CA1E1D314BF3.jpeg387.7 KB · Views: 10
 -
 4EE033C6-05A5-4DD4-9D57-D49D2A8A0C47.jpeg363.5 KB · Views: 11
 -
 FD44C77C-F0A4-4917-986E-E1E6EB443339.jpeg623.4 KB · Views: 14
 -
 C02EA8F6-7F9B-4C1E-8C9A-63C07CADEAE6.jpeg768.3 KB · Views: 14
 -
 F5D54C2F-8E4E-4AA4-BCD2-01092237A345.jpeg627 KB · Views: 15
 -
 E8F77528-2C48-419A-A9D2-52819D8775B5.jpeg827.2 KB · Views: 13
 -
 C408F8C2-0A76-4DFA-8C68-42C53AE0F493.jpeg737.8 KB · Views: 12
Dodger
Silver Supporter
If you are lucky, the missing strainer may not be end up having caused too much of a problem. It is there as a backup to your filter, which should be catching most of what makes it through your pump basket. (Did you say what kind of filter you have?)
I don't think I saw an answer to your question about the manual valve after the filter (8th picture in the post before this.) That valve is controlling the return to either pool (left side) or spa (right side). In the picture, the diverter is in the middle, so that it is roughly 50/50 pool/spa, depending on downstream resistance. For your in-floor to work best, you probably want to close off return to the spa (OFF facing the right, handle hanging over the "Pool" writing.)
The return "Pool and xxxEP" (did it used to say Sweep?) pipe should go into the ground and come up next to the Caretaker. Then you have another manual valve that can give 100% to the Caretaker. That combination is most likely the best configuration for the Caretaker operation.
Side note, what kind of pump do you have - single speed, dual speed, variable speed? Pump settings may be important in dialing in the right settings for your Caretaker.
But also warning you now that there are many opinions from in-floor system owners. Some people here have abandoned it for cleaning and gone to a robot, both from a cost and effectiveness point of view.
The last step downstream to get your Caretaker working is to make sure the pop-ups are functional. They need enough pressure beneath them, but the spring in them can also get cranky, and if any debris made it in there, that can clog the water pressure underneath.
I would do this step last, but if you are purchasing parts from an online site, consider also purchasing a pop-up removal tool. This plastic removal tool is basic and inexpensive, but if your pop-ups are stuck, it may not work. If it doesn't, then you can purchase the more expensive and sturdy metal removal tool. Either way, please note: if your Caretaker pop-ups are 1992 or older, they are reverse threaded, so they unscrew clockwise.
One last comment: it is surprising to me that you have all these valves without any of them being automated!

- Feb 6, 2015
- 7,851
- Pool Size
- 12300
- Surface
- Plaster
- Chlorine
- Salt Water Generator
- SWG Type
- CircuPool RJ-45 Plus
@Dodger has you covered.
As for the tools to remove/replace the dome - they are highly technical.....

 _ _ _ ?
As for the tools to remove/replace the dome - they are highly technical.....
- A small crescent wrench or open-end wrench to fit the nut on the band clamp
- Silicone based pool lube for the o-rings
- A small mallet or block of wood to tap around the band clamp as it gets tight
- A bit of strength and finesse to pop the dome off after you remove the band clamp
_ _ _ ?I have one speed pump.@Dodger has you covered.
As for the tools to remove/replace the dome - they are highly technical.....
- A small crescent wrench or open-end wrench to fit the nut on the band clamp
- Silicone based pool lube for the o-rings
- A small mallet or block of wood to tap around the band clamp as it gets tight
- A bit of strength and finesse to pop the dome off after you remove the band clamp
In terms of filter I have 4 x 19”5 by 5”
In terms of robot if you are referring to the crawler tools, that’s what started this whole thing, the suction was not making the crawler move around and that’s when I learned about what the caretaker and pop ups do. Soon as I complete the caretaker dome removal, review and test the pop ups to see what works then I will report back.
And in terms of automation I’m not sure what work that would do for me, I found the pool system like this.
Thanks Sergio
Attachments
- Feb 6, 2015
- 7,851
- Pool Size
- 12300
- Surface
- Plaster
- Chlorine
- Salt Water Generator
- SWG Type
- CircuPool RJ-45 Plus
Seeing what is working and what isn't will help to determine whether it's worth sinking money into fixing what you have or possibly moving in another direction.
Take so pics of what is inside the water valve (under the dome). Look for missing parts and cracks, etc in what you find in there. It may be easy and cost effective to fix or maybe not.
Take so pics of what is inside the water valve (under the dome). Look for missing parts and cracks, etc in what you find in there. It may be easy and cost effective to fix or maybe not.
I will
Thanks
I will do that and report backSeeing what is working and what isn't will help to determine whether it's worth sinking money into fixing what you have or possibly moving in another direction.
Take so pics of what is inside the water valve (under the dome). Look for missing parts and cracks, etc in what you find in there. It may be easy and cost effective to fix or maybe not.
Thanks
Thread Status
Hello , This thread has been inactive for over 60 days. New postings here are unlikely to be seen or responded to by other members. For better visibility, consider Starting A New Thread.