
bbq island framing question
- Thread starter pecker88
- Start date
You are using an out of date browser. It may not display this or other websites correctly.
You should upgrade or use an alternative browser.
You should upgrade or use an alternative browser.
- Oct 18, 2009
- 3,648
- Pool Size
- 6000
- Surface
- Plaster
- Chlorine
- Salt Water Generator
- SWG Type
- Hayward Aqua Rite (T-15)
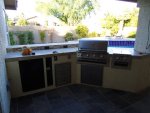
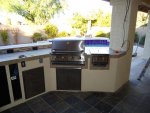
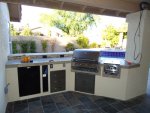
It turned out fantastic. I love the way it looks and it matches the side of the house. Happy grilling and entertaining. We use ours almost every nite..... 
Very nice! I bet you're loving it.
Can you suggest a resource or 2 for info on framing, etc? I'm interested in a similar project but not sure where to begin.
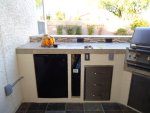
What is the gizmo between the fridge & rack of drawers?
Can you suggest a resource or 2 for info on framing, etc? I'm interested in a similar project but not sure where to begin.
What is the gizmo between the fridge & rack of drawers?
acroy said:Very nice! I bet you're loving it.
Can you suggest a resource or 2 for info on framing, etc? I'm interested in a similar project but not sure where to begin.
What is the gizmo between the fridge & rack of drawers?
A good place to start is right here in this forum; "bay side build" thread. Tons of info there.
Few pointers/tips:
-I used the exact method for strengthening the bar overhang as is outlined in bay side build thread.
-One thing to keep in mind is that hardibacker is supposidly not rated for outdoor use...for this reason, I used durock; which is OK for outdoors
-There seems to be conflicting info out there re: the top. Some say to use ply, then cement board, then tile (non-combustible areas) thinset in between. Others say no ply at all; will move/warp/expand over time, cracking tile on top. For these reasons, they say 2 layers of cement board, thinset in between...I used a combo; 3/4" ply, then 1/4" cement board, thinset in between for non-combus. side. On grill/burner side, I used 2 layers of 1/2" durock, thinset between. Do the math....the 2 sides ended up equal height.
-Keep things SQUARE, especially when you start on metal framing; This was toughest part for me
-If you want a 36" high countertop, (standard), cut all vertical studs 33". By the time you put trex feet under the base, ply/cement board/thinset/tile on the top, you'll be at 36"
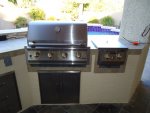
-Also keep all the top layers in mind for the framing of grill/burner 'height' cutout. Take a close looks at my pics...Theres a 2" gap under grill/burner!!!!! I'm going to fill this with stainless steel flat bar and mesh; will help with ventalation, and wont' look 2 bad...
between fridge and drawers is electronics compartment; stereo receiver (speakers mounted in front of island), XM satellite radio and satellite TV receiver.
G
Guest
 I really like the speakers mounted in the enclosure
- Jun 26, 2008
- 16
Our build was very similar to yours a few years ago. We bought one pre-built in 1998 that sat directly on the paver patio. The metal studs rotted out. We elected to build on the same site to access the existing electric and gas lines. Thanks to this forum, we used Trex footers and over three years later, the metal studs are still in great shape.
We used hardiboard for the exterior under layer and topped it with Noche travertine on top and tejas manufactured stone on the sides. Under the overhang is my own applied stippled "stucco" as well as the backside, where the doors are.

We used hardiboard for the exterior under layer and topped it with Noche travertine on top and tejas manufactured stone on the sides. Under the overhang is my own applied stippled "stucco" as well as the backside, where the doors are.
looks amazing great job. Wish I would have seen this thread when you started. Would have offered to help in hopes of picking up some ideas for mine
Thread Status
Hello , This thread has been inactive for over 60 days. New postings here are unlikely to be seen or responded to by other members. For better visibility, consider Starting A New Thread.