Advice for new equipment pad layout?

Option

0
Bronze Supporter
Feb 2, 2017
103
Sacramento/CA
Hello, I've found these forums to be invaluable after becoming a pool owner several years ago so I just wanted to say thank you to all the knowledgeable posters who help out the rest of us here. I've come once again with a new issue and any advice would be greatly appreciated.

There is a large suction side leak underneath the middle of my pool equipment pad most likely from tree roots (a large redwood tree is located about 7 feet from the pad). Rather than have the damaged line repaired (relatively expensive IMO) we're considering tearing out the existing pad, removing all of the roots beneath it and replacing it with a new pad (costs more but a better long-term solution IMO).

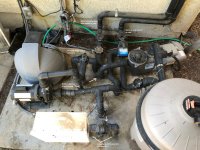
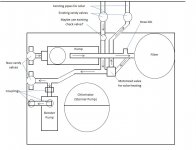
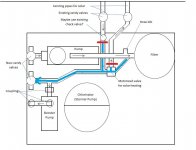
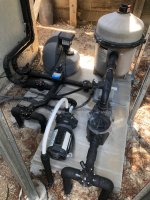
The original pipe routing (see attached pic) appears to have a lot of extraneous bends so I'm hoping to take the opportunity to simplify the layout for better flow. I'm also thinking it might be good to keep all of the incoming/outgoing plumbing near the edge of the pad so that they can be more easily accessed if there is another problem in the future. I've taken measurements and drawn up the following scaled layout but I'm no expert so any suggestions or advice would be greatly appreciated.

PS - Does anyone know why some of the existing plumbing is routed to dip under the pad only to pop back up a few inches away? Seems like a lot of unnecessary bends but maybe there is a good reason?

PPS - The offending redwood tree is located off the bottom right corner of the diagram.
 

Attachments

  • Existing pad layout.jpg
    Existing pad layout.jpg
    529.8 KB · Views: 82
  • Pool Pad Design 1.JPG
    Pool Pad Design 1.JPG
    50.8 KB · Views: 80
Couple thoughts;
There should be a pipe connecting those two jandy valves below the solar. That way you can bypass the solar.
There should be a check valve on the side going UP to the solar.

Thats pool pad is a mess! Guess you'll find out why the pipes go into and out of the slab once you break it up.
 
There should be a check valve on the side going UP to the solar.
Oh, you're 100% right! Can't believe I overlooked that since the existing setup has one. I assume that's to prevent water from coming back down the solar inlet?
There should be a pipe connecting those two jandy valves below the solar. That way you can bypass the solar.
Hmm, I'm not sure I'm understanding the need since I thought the motorized valve would direct water away from the solar inlet and the check valve on the solar outlet would prevent water from going up that route. Wouldn't that work as shown below?
 

Attachments

  • Pool Pad Design 1a.jpg
    Pool Pad Design 1a.jpg
    66.6 KB · Views: 25
Ok just looked at my layout. This was plumbed based on advice of company that sold me the solar panels.

Remove the motorized valve and replace with a 90 going to solar.

The jandy valve on the right going to the solar would get the motorize valve, and a short pipe going to the jandy on the left.This will be the solar bypass. That jandy gets removed and gets a ‘t’. Put check above that ‘t’.

In my layout there’s a check below the jandy on right.

Btw, I have a motorized box that goes over the jandy. It was removed because there was an issue with it.

My plumbing is a little rough and needs some rework. The white coupler on the pipe going to the solar (right) was put in due to frozen pipe.


3A3C2B2D-C9BB-4D43-994A-16DAD2A955E6.jpeg
 
Ok just looked at my layout. This was plumbed based on advice of company that sold me the solar panels.
Thanks for the additional follow-up!

Your setup is functionally very similar to my proposed setup except for the two extra valves I have located at the solar inlet and outlet. I only included them on the proposed layout since they were already there from when the solar company did the installation but I have no idea why they would be necessary. If anything, I imagine they could cause damage if either of them are closed and the motorized valve is activated to turn on the solar.

Any idea why a solar company would spend the money to install those two Jandy valves?
I guess just to be able to isolate the solar panels. But, as you noted, you could cause problems if the switch was directed to solar and they were closed. So not a good way to go.
 
I guess just to be able to isolate the solar panels. But, as you noted, you could cause problems if the switch was directed to solar and they were closed. So not a good way to go.
Thanks again for the advice! We may end up keeping those two extra valves since it might be too much trouble to remove them but if so, I'll put them in the open position and remove the handles.

Aside from the solar, does this look like a good layout for efficient flow? There are so many extra bends in the existing system (not to mention some "street" elbows rather than sweep ells) that I'm hoping this might improve things in that regard.

EDIT - While reading some other posts here on the forums, it seems the pump should have at least 8" of straight pipe before it. Looks like I may need to re-think this layout a bit to accomodate that.
 
Last edited:
Whatever you do dont encase the pipes in concrete, bring them up over the edge. The length in front of pump isnt a deal breaker but is good to have.
Kevreh pics are a proper solar piping install. You cam flip flop the supply/return if easier with your layout. He has a check valve under the 3way solar feed/diverter that doesnt necessarily need to be there. Some solar installs put them there depending on the controller as if pump timer shut off pump with solar on the PRV on roof could empty out pump prime. Modern automation panels switch the 3way relay off automatically on end of cycle so not needed if you have one
 
Whatever you do dont encase the pipes in concrete, bring them up over the edge.
Oh yes, that is an excellent idea! I was thinking to have them come through the cement near the edge to make it easier to access but your suggestion gives full access!
The length in front of pump isnt a deal breaker but is good to have.
Noted. Since the booster pump does not have a basket in front of it's motor, is it important to give it a decent length (6-10") of straight pipe in front of it?
Kevreh pics are a proper solar piping install. You cam flip flop the supply/return if easier with your layout. He has a check valve under the 3way solar feed/diverter that doesnt necessarily need to be there. Some solar installs put them there depending on the controller as if pump timer shut off pump with solar on the PRV on roof could empty out pump prime. Modern automation panels switch the 3way relay off automatically on end of cycle so not needed if you have one
I've do have a centralized pool controller but it acts pretty strangely sometimes so it's probably a good idea for me to plum in the check valve below/before the solar control valve.

One other question I had was whether it would be a good idea to upgrade my filter at this time? I like the design of the cartridge filter I have but from what I've read, 325 sqr feet may be a bit small for my 25k gal pool which gets a LOT of pollen, seeds and small debris from surrounding vegetation. Or perhaps the larger versions of the C3030 filter have their ports located in the same spots so they would be easy to swap later once my current unit wears out?
 
How often do you have to clean your cartridges? How old is it? If what seems like a lot, can't hurt to upgrade. But may not be worth it for the same product, just a little bigger. If your Waterway is older, fwiw I've been happy with my Hayward Prologic controller.

Also, those motorized valves can and do eventually fail and stop working. You want to be sure if it fails to operate it won't be an issue. You can usually remove them and use the jandy valve manually.
 

Enjoying this content?

Support TFP with a donation.

Give Support
I just wanted to post a quick thank you to everyone who chimed in with advice on this thread. It took a while due to the extreme demand for pool services in my area but I finally got the pad replaced and thanks to everyone's help here, it has a much improved plumbing layout. Now all the pipes come up the side of the pad so they can be more easily accessed by digging and there are far fewer bends. I'm also glad the entire pad was replaced since there were other leaks beneath it due to tree roots besides the one we identified. The repair guys were also able to install a root barrier to slow down any future root invasion and some fence posts to make my wife happy. Once we get past the hot summer months I'll use them to build a short fence to hide the equipment and reduce the pump noises a bit. Thanks again!

Oh, and in case anyone is curious, I did decide to keep my current quad cartridge filter which I clean once every 4-6 weeks. I might decide to go larger if/when this unit needs to be replaced.
 

Attachments

  • IMG_0997.jpg
    IMG_0997.jpg
    621.9 KB · Views: 16
Thread Status
Hello , This thread has been inactive for over 60 days. New postings here are unlikely to be seen or responded to by other members. For better visibility, consider Starting A New Thread.