Seeing as people had some very nice compliments on the picture of our patio I had posted my pre-planning thread in the Construction forum for phase II of our backyard oasis (finally a pool!!), I figured I would go ahead and post the whole patio build here.
Link to pool pre-planning thread in Construction forum:
http://www.troublefreepool.com/threads/88653-In-Pre-Design-Concept-Phase
The concept for this project was to turn what was a useless West facing, hot and miserable in the summer and cold and wet in the winter small patio pad into something a little more.... nice. We spent a couple of months simply pondering what we wanted. Well, mostly I pondered and showed my wife and she smiled and patted me on the head.
#1, We wanted shaded space. So this meant roof. Lots and lots of roof.
#2, I wanted lots of cooking options (I am the cook in the family. Both inside and out.). If we were going to do this, we were going to do it right.
#3, I wanted a koi pond. I've wanted one for a LONG time, and this seemed like a good opportunity to get one put in.
#4, We wanted a very nice and relaxing space that we could entertain in.
Beyond that, things just slowly fell into place as I made revision after revision after revision in Visio trying to get things just right so we could go to an architect/builder and have a very clear understanding of what we wanted to accomplish. And so we did.
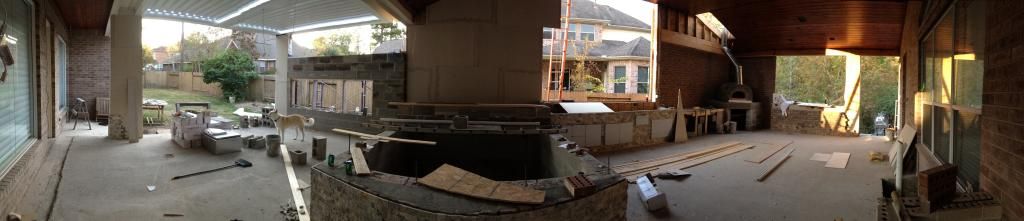
Total new concrete poured was approx 1100' sq. Just under 200' of that was for a 3/4 bath and storage room. The 3/4 bath so we had a shower when we finally got a pool.
The outdoor space (about 900' sq added to the existing pad space of around 200' sq) included:
A lounge area with 10' fire trough under a mechanized top pergola. The pergola blades will rotate to either open when you want to let in more light or close when it is raining or too sunny.
The koi pond. 8' x 8' and 6' deep. Approx 3000 gallons
A wet bar with an ice storage bin and fridge
A kitchen counter with sink and storage
A large dining area
An Argentine style wood grill
A wood fired pizza oven
A standard gas grill
A 300k BTU gas jet boiler
An electric smoker
We wanted an open feeling yet protected space. I think we got it just about right. After interviewing 5 contractors and presenting them a list of questions like they had never seen before, we finally made our selection in June of 2012 and broke ground in August of 2012. All said and done, the whole thing took about a year to complete and be done with the fixes to a few snafus.
Please be patient with me as this will take a day or two to get everything posted.
So with out further ado, I present the build:
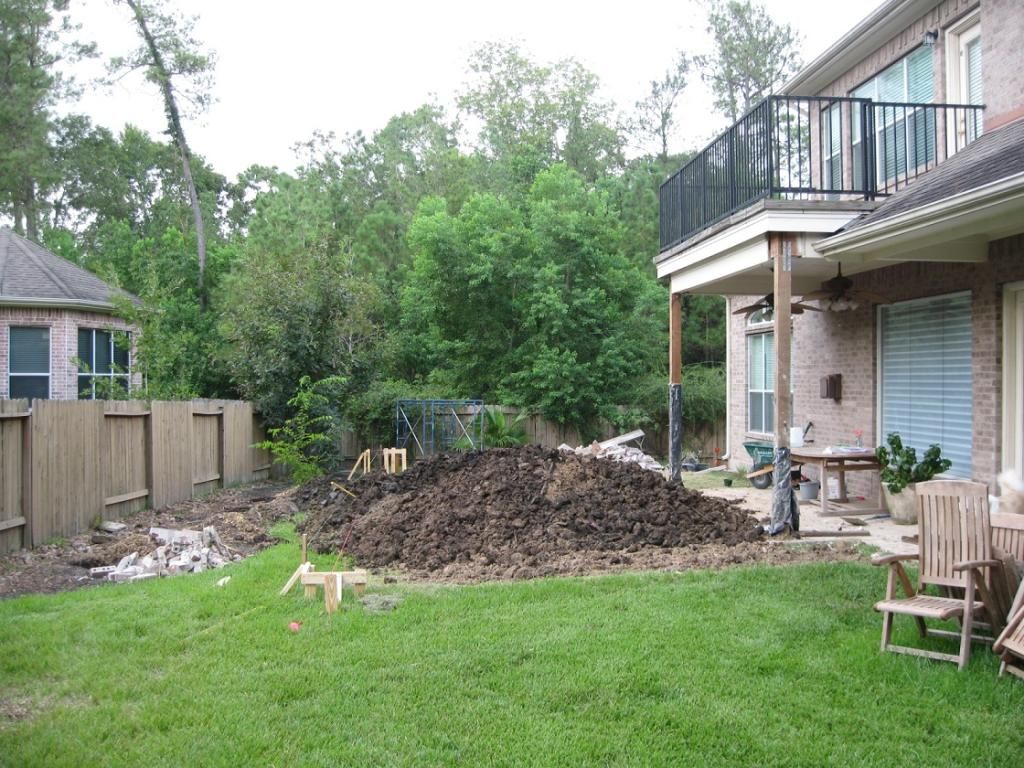
August 2012. We break ground. That is all greenbelt at the end that feeds into a park and eventually a very large lake.
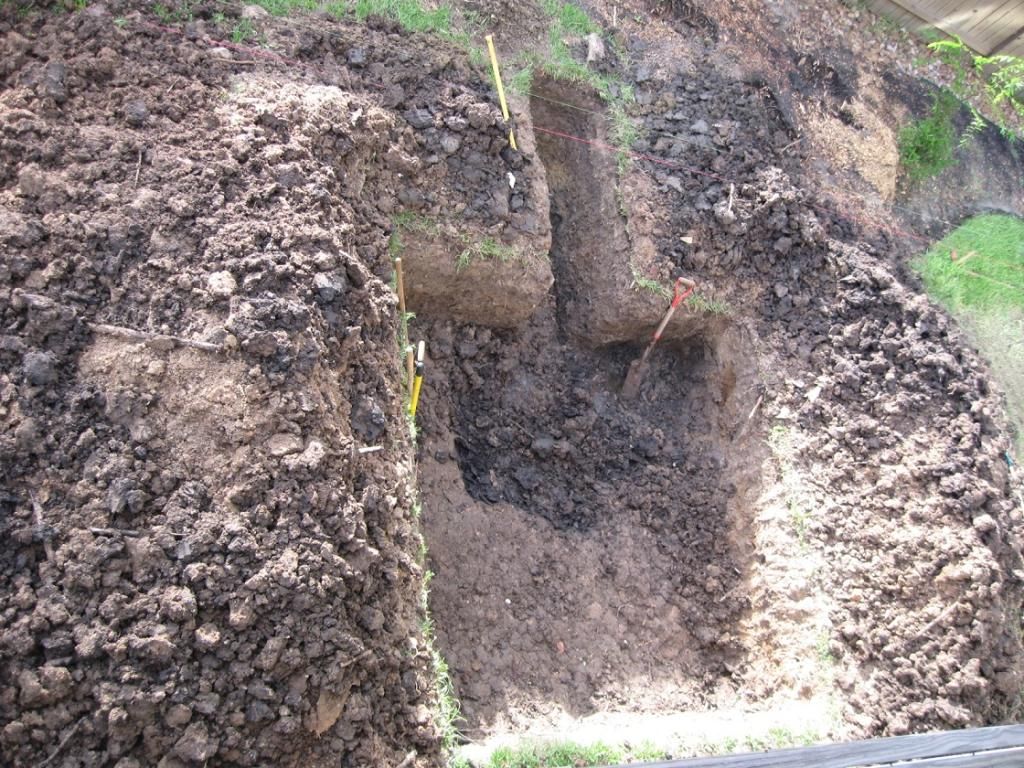
The koi pond is dug. They did this all by hand. It took up to 6 guys at one point a total of 3 days. The finished pond is 8' x 8' x 6' deep. I would guess the hole ended up to be about 10' x 10' and 3.5' deep. The final pond is raised 2' above grade so you can sit on the edge.
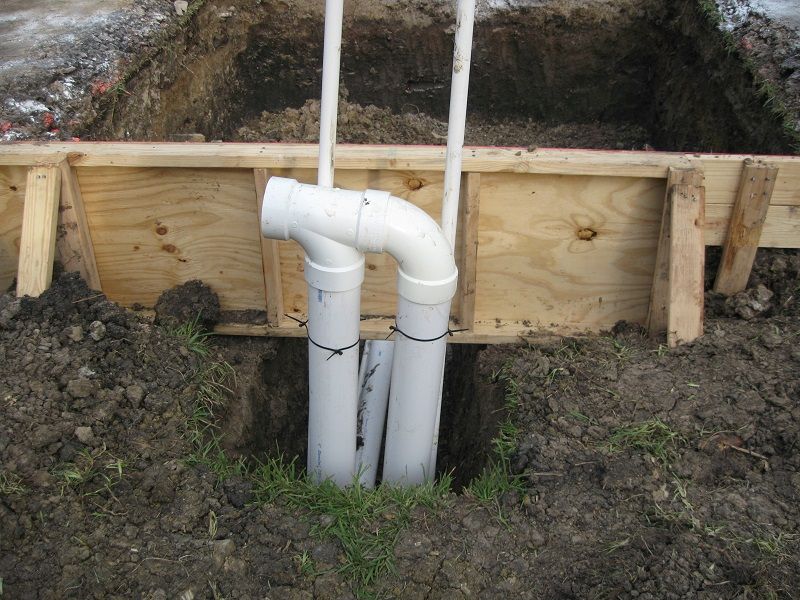
The bottom drains and lines are placed. 4" sched 40 lines. The bottom drains are aerated. You can pump very fine air bubbles up through an integrated membrane that sits on the top of them. This adds oxygen to the water and REALLY helps pull in the fish poop to the drain so the floor stays perfectly clean.
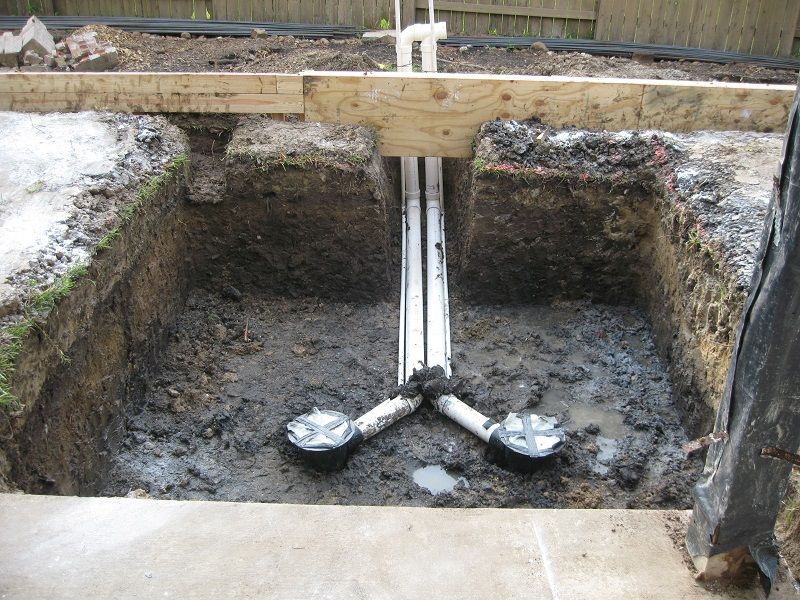
The dual bottom drains joined to one main line.
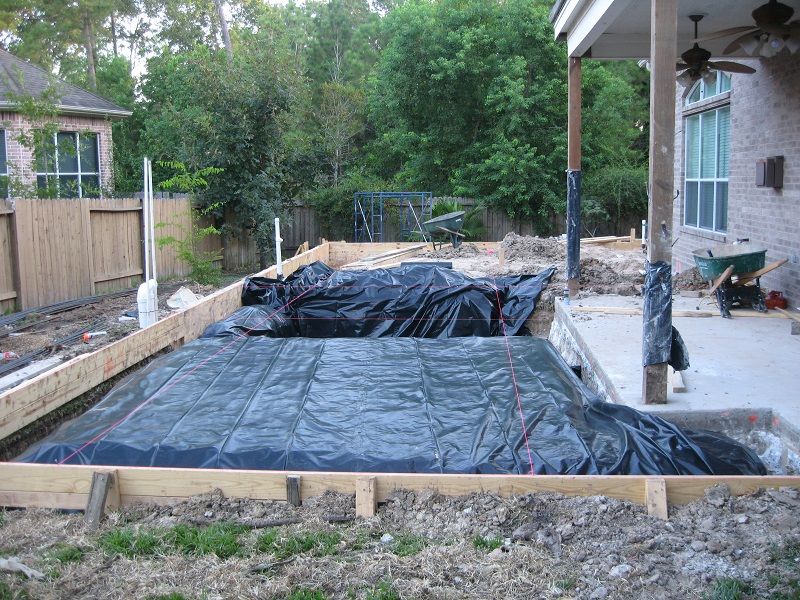
Moisture barrier and and perimeter concrete forms added.
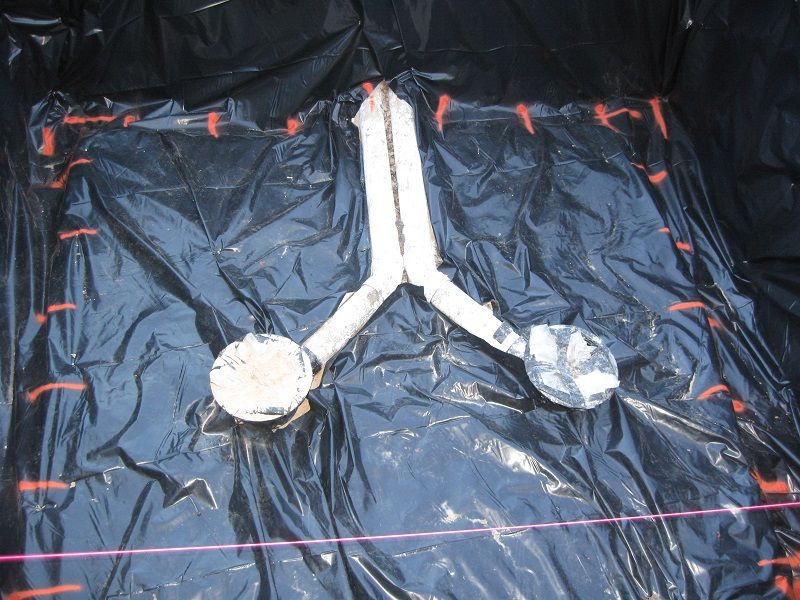
Final placement of bottom drains. There was a critical mistake made here. It caused a few months of grief. This is what happens when you do something that 99.9% of builders have never done before. I had actually tried to get this subbed out to a pool builder, but none were interested. I should have tried harder.... The trench and basin the bottom drains are sitting in were not deep enough. That combined with duct tape and baling wire wrapped around the drain housings compromised the seal and we had ground water leakage into the pond. It was originally designed as a drop in EPDM liner pond, but due to more mistakes, was changed to spray-in polyurea (truck bed liner), which in the end turned out to be the best thing possibe (at least so far).
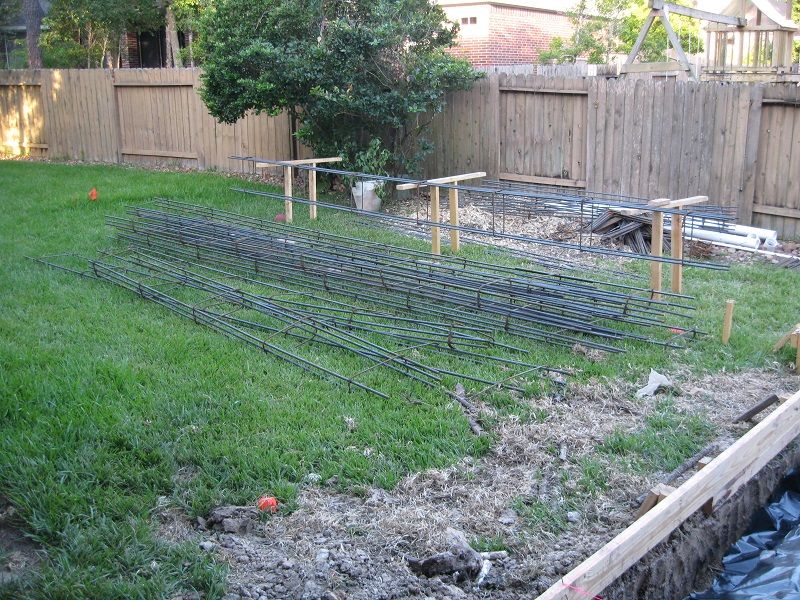
Rebar forming station with some cages built up. These all went into the foundation footers and around the pond.
That's all for now.
plat.
Link to pool pre-planning thread in Construction forum:
http://www.troublefreepool.com/threads/88653-In-Pre-Design-Concept-Phase
The concept for this project was to turn what was a useless West facing, hot and miserable in the summer and cold and wet in the winter small patio pad into something a little more.... nice. We spent a couple of months simply pondering what we wanted. Well, mostly I pondered and showed my wife and she smiled and patted me on the head.
#1, We wanted shaded space. So this meant roof. Lots and lots of roof.
#2, I wanted lots of cooking options (I am the cook in the family. Both inside and out.). If we were going to do this, we were going to do it right.
#3, I wanted a koi pond. I've wanted one for a LONG time, and this seemed like a good opportunity to get one put in.
#4, We wanted a very nice and relaxing space that we could entertain in.
Beyond that, things just slowly fell into place as I made revision after revision after revision in Visio trying to get things just right so we could go to an architect/builder and have a very clear understanding of what we wanted to accomplish. And so we did.
Total new concrete poured was approx 1100' sq. Just under 200' of that was for a 3/4 bath and storage room. The 3/4 bath so we had a shower when we finally got a pool.
The outdoor space (about 900' sq added to the existing pad space of around 200' sq) included:
A lounge area with 10' fire trough under a mechanized top pergola. The pergola blades will rotate to either open when you want to let in more light or close when it is raining or too sunny.
The koi pond. 8' x 8' and 6' deep. Approx 3000 gallons
A wet bar with an ice storage bin and fridge
A kitchen counter with sink and storage
A large dining area
An Argentine style wood grill
A wood fired pizza oven
A standard gas grill
A 300k BTU gas jet boiler
An electric smoker
We wanted an open feeling yet protected space. I think we got it just about right. After interviewing 5 contractors and presenting them a list of questions like they had never seen before, we finally made our selection in June of 2012 and broke ground in August of 2012. All said and done, the whole thing took about a year to complete and be done with the fixes to a few snafus.
Please be patient with me as this will take a day or two to get everything posted.
So with out further ado, I present the build:
August 2012. We break ground. That is all greenbelt at the end that feeds into a park and eventually a very large lake.
The koi pond is dug. They did this all by hand. It took up to 6 guys at one point a total of 3 days. The finished pond is 8' x 8' x 6' deep. I would guess the hole ended up to be about 10' x 10' and 3.5' deep. The final pond is raised 2' above grade so you can sit on the edge.
The bottom drains and lines are placed. 4" sched 40 lines. The bottom drains are aerated. You can pump very fine air bubbles up through an integrated membrane that sits on the top of them. This adds oxygen to the water and REALLY helps pull in the fish poop to the drain so the floor stays perfectly clean.
The dual bottom drains joined to one main line.
Moisture barrier and and perimeter concrete forms added.
Final placement of bottom drains. There was a critical mistake made here. It caused a few months of grief. This is what happens when you do something that 99.9% of builders have never done before. I had actually tried to get this subbed out to a pool builder, but none were interested. I should have tried harder.... The trench and basin the bottom drains are sitting in were not deep enough. That combined with duct tape and baling wire wrapped around the drain housings compromised the seal and we had ground water leakage into the pond. It was originally designed as a drop in EPDM liner pond, but due to more mistakes, was changed to spray-in polyurea (truck bed liner), which in the end turned out to be the best thing possibe (at least so far).
Rebar forming station with some cages built up. These all went into the foundation footers and around the pond.
That's all for now.
plat.
Last edited: