New Pool Cypress, TX Pics

I am really wondering if we made the right decision to build this pool.....after seeing all the problems people were have I was debating if we should build a pool. I have tried to stay positive during this pool build but there are a couple issues that are coming up that are really starting to bother me.

The weather has cleared up a bit and the tile guys were out putting the water line tile in and the sheer descents. We were told that we were going to get Pentair sheer descents but when I went out to look at them today. I noticed they were aquasheers....I started a new thread asking the difference in case someone else comes across the same issue.

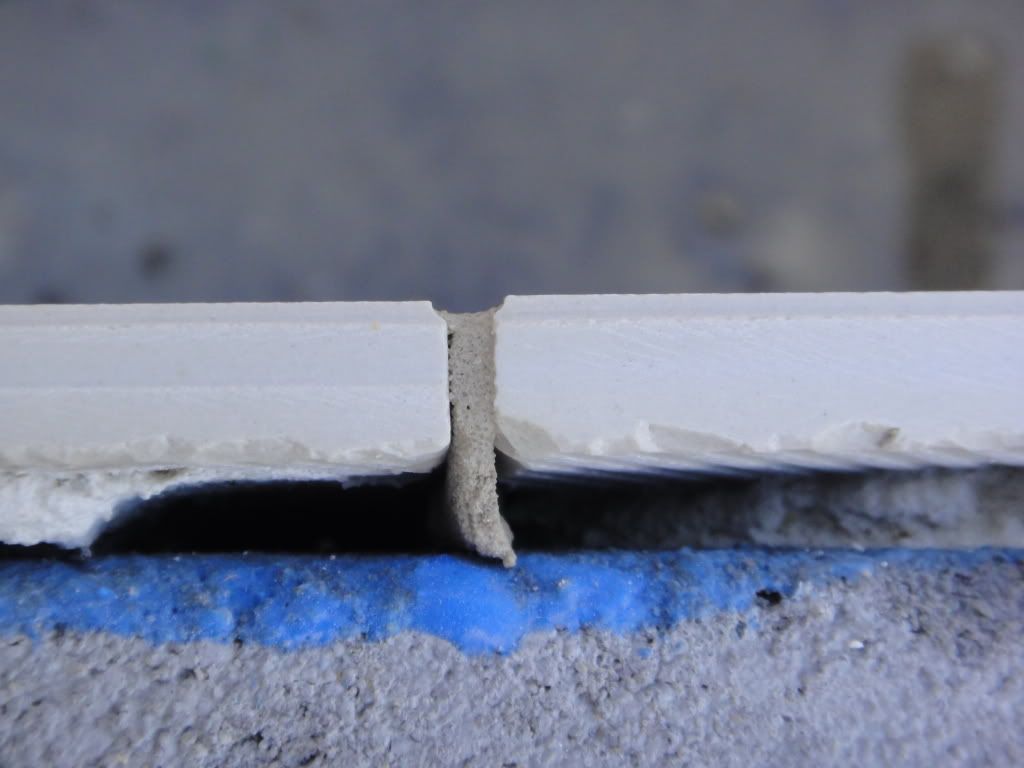
Also when I went to look at the waterline tile I noticed there was a lot of tile cement missing between the tiles and you can see a large void from the top to the bottom. I was watching the tile guys add the cement to the individual tiles and then place the tile with cement on the wall. with this large void won"t water get into up into the void and cause tiles to fall off later? Or will the plaster/pebble aggregate mix cover up the areas on the bottom and not allow water in?

Here's a pic of the waterline tile with voids of tile cement between them;
This one is from underneath where the water will be.


This one is from on top where no water will be


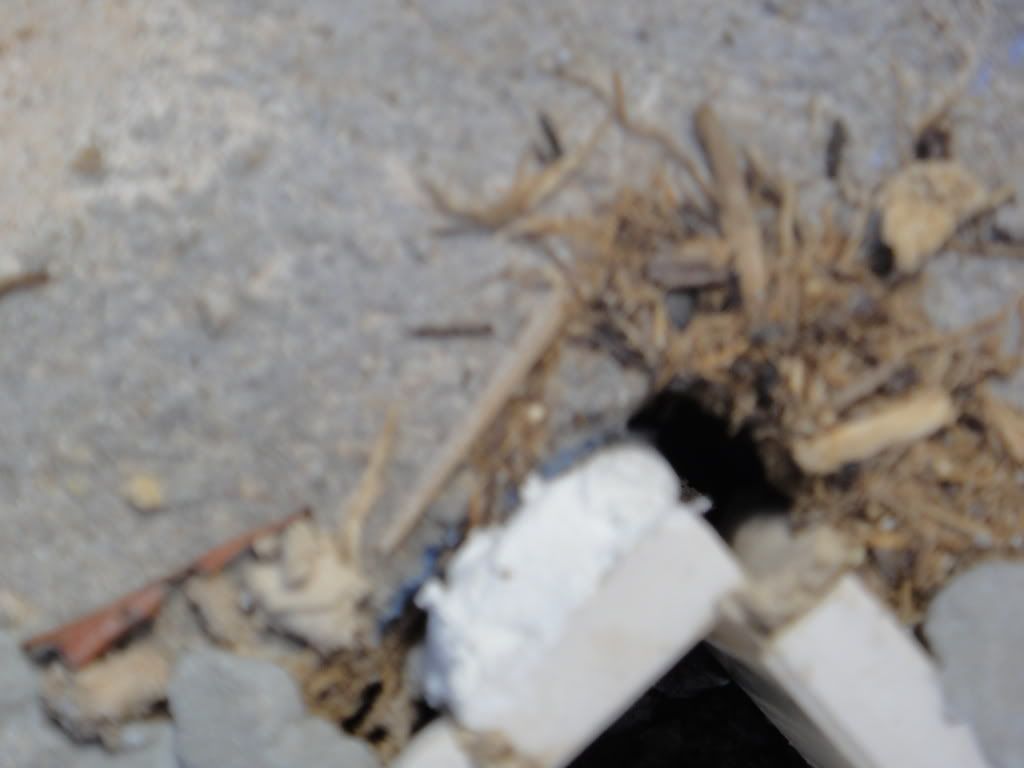
Here is a pic of one of the corners...theres no tile cement from the top to the bottom you can see the light at the bottom.


Also there are big voids on our 3 foot sheer descent where grout is missing or cement...I can see this causing a lot of problems later. Or am I just worrying about nothing?

Here is a pic of our 3 ft sheer descent from underneath missing a lot of tiling grout or cement.


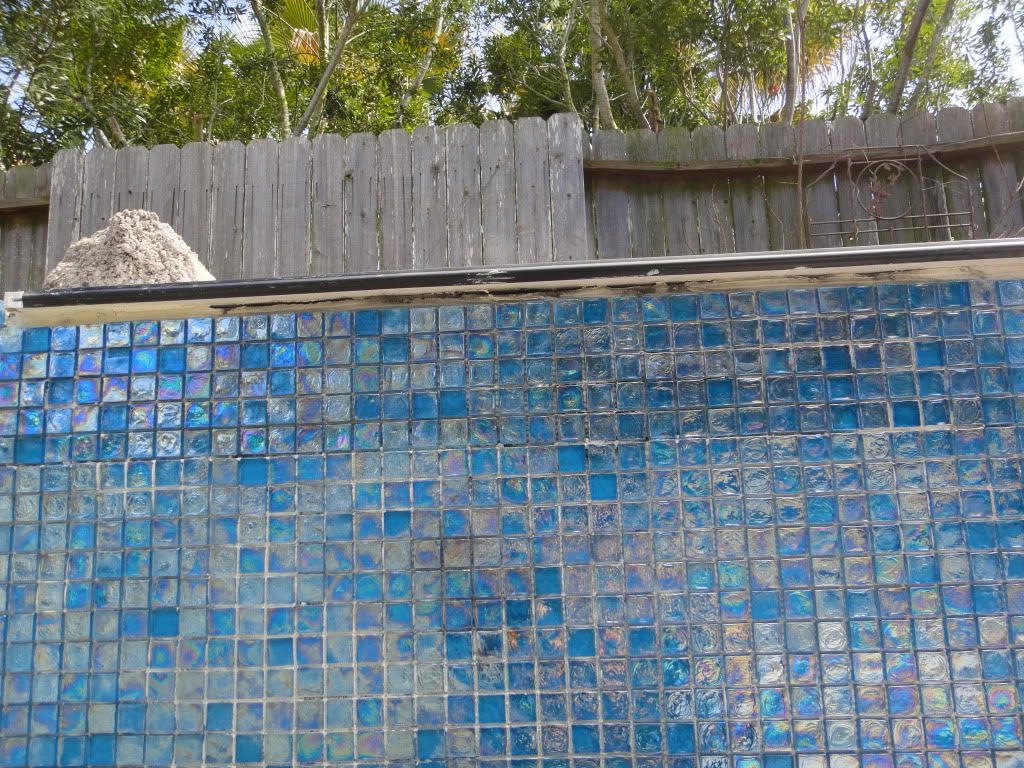
Here is a pic of our 1 1/2 ft sheer descent with concrete on it in clumps. They've been putting clumps of concrete on the sheer descent and letting it dry and then adding more concrete later in patches...


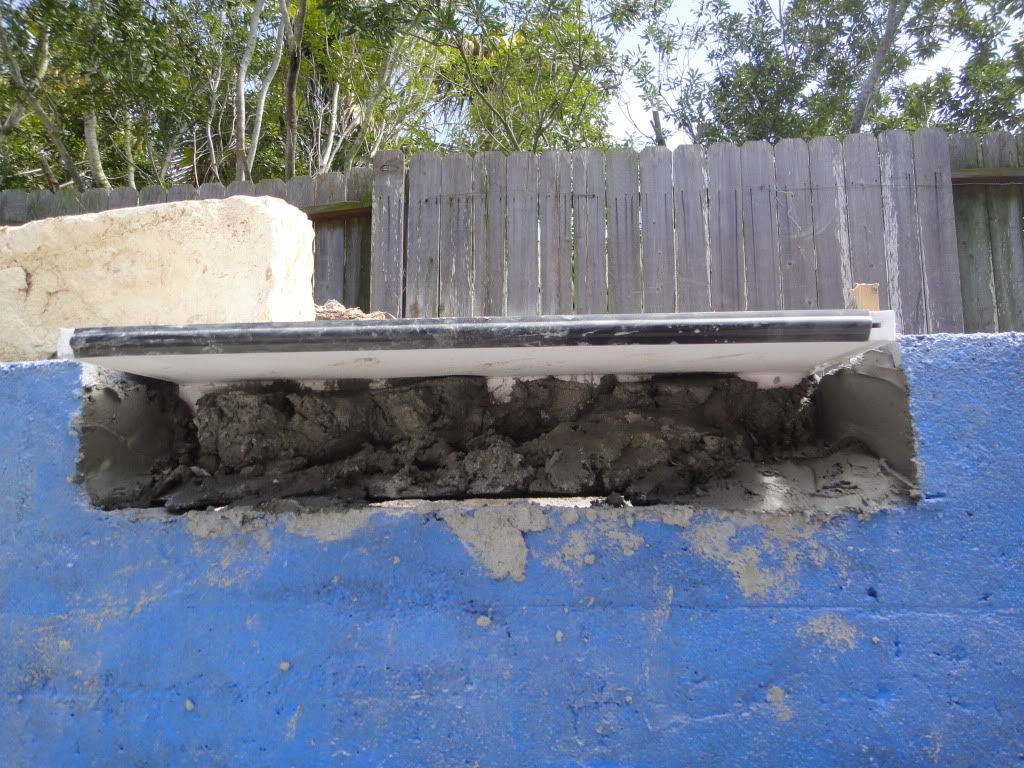
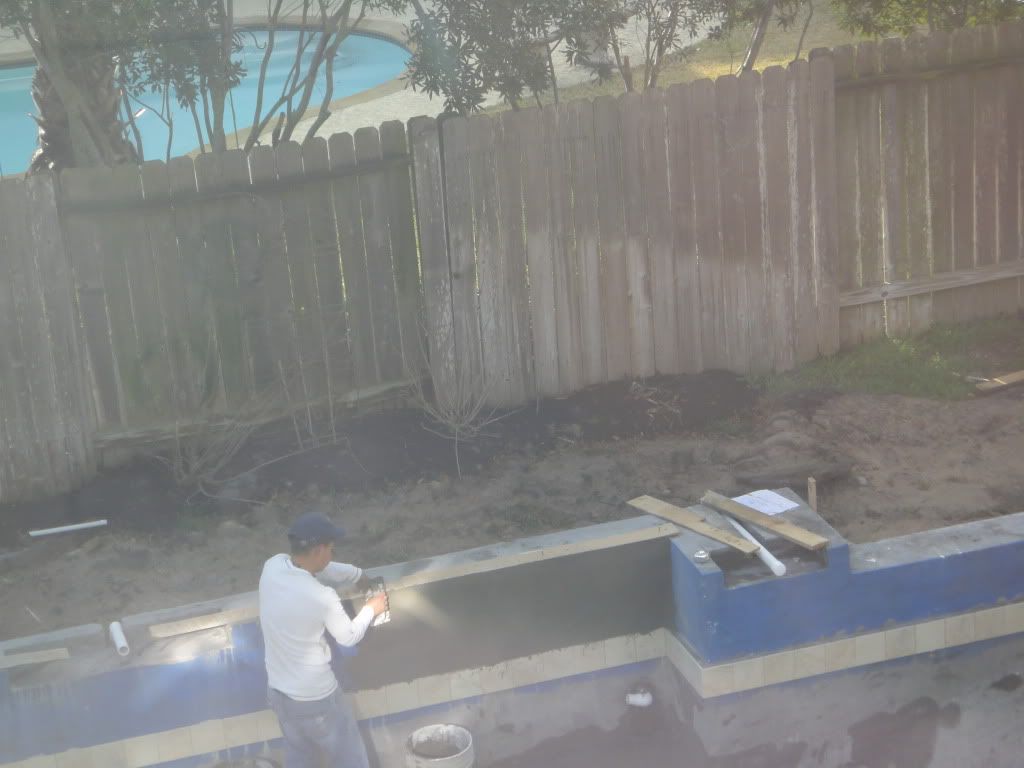
Also when they did the glass tile back wall/retaining beam they first added the blue paint stuff which is some type of water proof sealer I think and then they covered it up with a thin layer of cement and then white thin set before adding the glass tile. since that additional thin layer of concrete was not sealed will this cause problems later?

Heres a pic of the guy adding a thin layer of concrete on top of the sealed concrete. He then applied white thinset on top of the concrete before adding the glass tile. Pics are through a window screen and a little blurry.


We've had issues with the dig, gunite (gunite guys were good, they just had the wrong design), plaster/pebble color, travertine...everything has been resolved but if I wasn't home during the dig one of the entrances would of only been 7 ft long while the other was 10 ft. Both entrances are suppose to be 10 ft in length and was corrected. If I wasn't home during the gunite phase we would of ended up with a pool without a 3rd step....thank goodness I was here to catch it.

It might be important for those starting out to be home during certain phases, like the dig, gunite and tile/stone work...still trying to stay positive. At least communication with PB is good and we are able to work out these issues.
 
I can definitely understand your concerns and I hope you are bringing them up with your PB. I hope some of the more knowledgeable folks on this site can help you and give you good guidance. The glass tiles are really cool.

I think it is normal to question your sanity during this large a project. I certainly am doing that!

Stick with your gut instinct and bring these concerns up to your PB. It is to their benefit to address these things now before everything is complete and it is even more difficult to correct, if need be.
 
I'll comment on one of your issues. You can read this for recommended installation of glass tile.

http://http://www.nptglasstile.com/pdf/NPT_InstallGuide2012.pdf

It says that an additional (2nd) waterproof membrane is optional and "may be beneficial in freeze/thaw climates". This would be the layer you are asking about for installation over the mortar bed. Not sure if you consider yourself to be in a freeze thaw climate.

I would definitely ask PB about all your concerns.

Thanks imperator for the link, this helps a lot.

There was a delay the last couple of days on the pool coping because the correct color and type of Travertine for the pool coping was not brought to the house. Before they unloaded I checked the travertine and sent it back...the color had too much brown and pitted. It did not look anything like the lighter colored and smoother travertine coping that we were shown and agreed to use. We finally worked things out and the tile coping guys were able to do some of the coping yesterday, grout the some of the glass tile and add glass to the spillway.

We originally wanted an eased edge coping to give us the clean straight lines for the pool design that we wanted but found out the eased edge pool coping comes 2" thick. We were told if we use the 2" coping our new deck will have to be sloped a bit more to get proper drainage and to tie into our existing concrete decking. To eliminate this drainage issue we ended up going with the bullnose coping which comes in 1 1/2" inch thickness.

Apparently they were planning on using 1 1/2" thick pavers that are 18x24 and they were going to cut these down to size and bevel the edge to use as coping. Apparently this is what we were quoted for...during our whole pool design discussion we told PB that we are aiming for a clean modern pool design and showed him the lighter smoother travertine pool coping we wanted. To give the PB some credit they do have a new sales guy and maybe this was an honest mistake. We managed to work things out and ended up with a bullnose coping that is 1 1/2 inches thick so it will work out with the new decking and old decking.

Hopefully others can learn from my limited knowledge of pool building and pool materials and issues that come up. Apparently all eased edge pool coping is 2" thick and all Bull nose coping is 1 1/2 " thick. And it comes honed and filled-which is smoother looking or tumbled which is more pitted.

After watching the coping being placed on the pool, I am more comfortable with the missing tile cement between the waterline tiles. The mud from the pool coping will cover up the voids from the top. After talking to Mr PB construction supervisor he said the plaster/pebble will go all the way to the bottom of the waterline tile and fill the gaps from under which I suspected was the case. I've done kitchen tiling before and thought it would be a similar process, so I was shocked to see all these voids in the waterline tile. I am learning a lot about pool building as I watch ours being built.

Mr PB is aware of the missing grout under the sheer descent and assured me that it will all be filled.

Here are some pics of the pool coping and spill way


Coping and tiling around skimmer


Tiling around what i suspect is the autoleveler?


Heres the top view and plumbing of autoleveler


Back wall with glass tile..side walls will have travertine with a ribbon of glass tile along the bottom above the waterline tile.


After tile and coping is done the concrete will be poured for the decking and then the WetEdge guys will be here and then spraydecking will be last.
 
I like your glass tiles.
Double check the grout where the tile and the plastic skimmer housing meet. Ours wasn't sealed well and that's where we had our pool leak. It looks ok in the photo, but now is a good time to take a look before water is in the pool.
 
we are considering the arctic lagoon glass and travertine combo also. We may go with small travertine on the raised bond beam and spa if we can't find a good match for trav coping. Looking forward to seeing glass installed on yours. It's been difficult to find pics online other than npt's. What color plaster are you going with to tie in with the glass color. We actually think plain old white might work best for us.

If you have a hard time getting the tile from NPT, Noble also carries the same glass the item number is NNRG 180 Avingnon Turquoise. Also in case you aren't aware the NPT guys told me if you use a darker colored thinset then the glass will have a deeper richer hue. We ended up using a white colored thinset to keep the bright turqouise color but an ocean blue colored grout to make it look a bit more seamless.

I just read your thread on the rebar issue and a little concerned now with our decking. Our pool also has rebar stick out on the sides and my understanding is that they will tie this into the decking later. According to Duraleigh's post this is a big no no.. It seems to be standard practice here and if I remember correctly the reason they do this is to prevent shifting of the decking...so if the pool should rise/shift then the deck will follow it. I hope I understood this correctly. Not only did our PB tell us this but also the other PB's that we spoke with. I think they do this because of the expansive soil in TX and because of the expansive soil it was suggested that we stay away from cantilever poured concrete decking for the pool.

So those that have had builds in TX is it okay for them to tie the rebar that sticks up from the pool's edge into the decking later? Could this cause any issues later? I have no construction experience and this is our first pool build and just want to make sure things are done correctly.

Imperator, didn't want to hijack your thread and ask the question there but hope someone will comment here. I will try to take lots of pics of the decking process so you can see what they did.
 
I know you were hitting the panic button in that earlier post, but I think ya'll are going to love this pool when all is said and done. That coping looks great with the glass. You did good to catch the initial coping. Not just because of color but because it sounds like that was tumbled vs honed (which is what you ended up with). Tumbled is cheaper and you should get what you spec'd if it was the more expensive stuff.

I like how they did that V on the spa coping. Clever way to get extra bonding on the end piece which will be stepped on.

Thanks for the additional info on the tile.

I would not sweat the issue of the deck ties. I'd say, trust the experts. Besides, you've got someone to call on if you have trouble. My guess is it's a "lesser of two evils" kind of thing. Just think if your pool settled due to all our soft ground and the insane amount weight from the water. You could end up with a pool that's sitting two inches below your deck. That wouldn't work. I have also heard the same thing regarding the cantilever decks. You see it sometimes around here .. but it's rare. I think most builders would prefer to avoid it. I also wouldn't be surprised if subs in my area spend time in Houston and vice versa ... so no surprise that your seeing the same kind of construction methods.

Would love to see a top down pic of the glass tile mid-installation or after installed. I'm curious about the amount of mortar they use prior to thin set and tile. Your waterline tile pic helped me understand better. PM would be great so as to not mess up your thread with my ?'s

It's looking great!
 
Tile and coping is finally done...only some grouting left to do.

Mr. PB ended up using the pool coping on our back retaining wall to give it the smooth seamless look we wanted. But needed to make a choice between long horizontal pieces or short stacked pieces. I told him the long horizontal pieces will follow the lines of the coping and look sleeker. To do this they ended up cutting off the bullnose portion. This was used later to fill in a small gap at the top of the retaining wall. Since they had to cut the bullnose off this left a bit of a gap near the top that they would have to fill with an additional piece of travertine. I had to think quick and made a slight design modification and asked Mr.PB to add a small strip of glass on the bottom and then add the travertine on top to make it more seamless. Original plan was to have the side walls all travertine.

Here's the end result:


In order to use the coping the gunite guys had created a small notch along the back wall that was little larger than 1 1/2 inches wide, it was initially planned at the beginning that we would use the same pool coping on the back wall. Since I decided to add a small 2 row addition of glass tile to fill in the gap the guys had to build out that section a bit more with cement to accommodate the travertine the would go on top of this ribbon of glass. The glass tile is 1/4 inch thick so they had to use a bit of cement. They then proceeded with the thinset once the cement dried.

Here's pic of the build up.


Guys did a great job and cut most of the travertine with hand held radial saws. They pulled out the wet tile saw for the smaller cuts around the sheer descents. So far the work looks good.


We ended up using a polish ceramic tile that looks like travertine for our water line tile that blended well with the travertine. I thought the polished ceramic would be easier to clean if deposits should accumulate.


Now I am hoping the WetEdge Meditteranean blue comes close to the turquoise color as shown in the pics. I know there will be color variations with the water as the sunlight hits, but the iridescent glass also changes colors as the sunlight hits it. It will be interesting to see how the water colors and tile colors change throughout the day.

I think Mr. PB construction supervisor finally understands my design vision as things are completed. Now I have to find a way to hide the ugly wooden fence in the background....thinking Hedges will work well with tropical plants in front...
 
I like your glass tiles.
Double check the grout where the tile and the plastic skimmer housing meet. Ours wasn't sealed well and that's where we had our pool leak. It looks ok in the photo, but now is a good time to take a look before water is in the pool.

Thanks for the heads up 737, will check all grouting once things are done. Appreciate the input.
 

Enjoying this content?

Support TFP with a donation.

Give Support
Guys came and poured the concrete and dug the drains today. Work looks good and looks like they angled everything appropriately. Only thing they didn't do was add sand before pouring the concrete. Ive seen this done with other builds in Tx but they didn't do it for ours. They did go back and stamp down the dirt with a stamper and with the recent rains that we had I think most of the dirt is nice and compact around the plumbing. Also as they poured the concrete the guys pulled up the rebar off the ground to make sure it floated between the cement.

Rebar pics before cement


they clipped off the hook part of the rebar before tying it to the deck rebar


Cement work under new patio and existing patio with drains


close up of expansion joint and the foamy expansion thing(I don't know the technical term for this) between the spa and cement


plumbing for the drains and they also placed 2 french drains in the yard that ties into our existing french drain. I think the drain size looks good it is marked 4"


Spray deck will be last after plaster and patio addition is completed.

- - - Updated - - -

Cement guys chipped a piece of travertine on our back pillars while they were working. Mr. PB said it will be fixed before spray decking. Men and their tools....what can I say...


This is an example of our finish for the spa. It is a custom WetEdge glass bead finish. The base color will be Mediterranean.


Yes, I have a preference for sparkly things and like the look of glass tiles on the pool and in the pool :). If done properly we shouldn't have any issues with chipped glass so I am keeping my fingers crossed that it is done right. The WetEdge applicator is one of the best in our area so I have faith they will do a good job.
 
Guys came and started the WetEdge finish in the pool and spa. It looks great so far!! I am so happy. Tomorrow will be the acid wash and then we can start to fill in the afternoon. It is suppose to rain later this week so they should finish just in time and maybe some of the rain water will help with the pool fill.

Pics


Closer view of back wall and finish


steps and spa area


Close up of the pebble and glass bead aggregate finish in the pool: :) :) It looks beautiful! So happy!! I took this as they were troweling it all in. The slurry was still rising to the top. It really looks so much better in person.
 

Enjoying this content?

Support TFP with a donation.

Give Support
Thread Status
Hello , This thread has been inactive for over 60 days. New postings here are unlikely to be seen or responded to by other members. For better visibility, consider Starting A New Thread.