Pool Build - Baltimore

And after a brief delay...

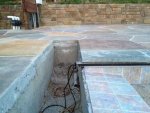
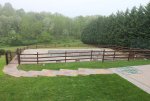
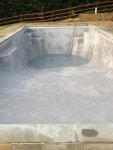
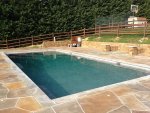
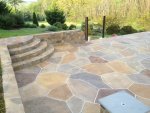
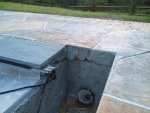
Here's a picture of the decking fully painted but not yet sealed. There were/are still two places where the water does not flow correctly towards the deck drains. You can see the grooves if you look closely that are being done to alleviate the issue. I will finish the fence soon and show that next.

Plaster/water will not be until next Monday at the earliest (which basically means it won't be Monday but some day after that because we've been getting regular rain which is normal). Today is 3 months from the dig but the last month was more or less self-imposed due to travel and my fence installation. The fence will have aluminum gates and split rail fence sections with black metal mesh, which is why you see a wooden post next to each aluminum gate post. The gate on the side is so you can get into the pool area without using steps (step averse person (but not slope averse), wheelbarrow for grounds maintenance, etc.) I will tell you regarding the fence that doing a split rail fence on a curve (other than a really gentle curve) is a pain...but looks nice - lots of cutting of rails.

[attachment=1:3f74rvb5]2013-05-10 07.20.38 - TFP.jpg[/attachment:3f74rvb5]
[attachment=0:3f74rvb5]2013-05-10 07.21.03 - TFP.jpg[/attachment:3f74rvb5]
 

Attachments

  • 2013-05-10 07.20.38 - TFP.jpg
    2013-05-10 07.20.38 - TFP.jpg
    146.5 KB · Views: 2,062
  • 2013-05-10 07.21.03 - TFP.jpg
    2013-05-10 07.21.03 - TFP.jpg
    155.8 KB · Views: 2,043
kooma said:
Looks Great!!!!!
Could you throw up a pic of the finished auto cover side with the coping in place on both sides? Would really appreciate it.
Thank you. Sure, I'll take one as it is now and then after cover installation. The autocover is not installed yet so the brackets and coping pieces are not in. The concrete decking covers the box all the way around now. The cover should be on within a week or so of plaster.
 
Do you have/know any of the details of how the painter is painting your concrete?

Products?
Technique?
Expected Longevity?
Links to research you did to decide to go with this method?

I've got a whole lot of concrete i want to stain and seal soon. Considering spicing it up, just not sure, your's looks really nice!

And i'm not interested with any overlay.
 
The stain they are using is water based and they are applying it with a sprayer for the larger areas (deck) and a brush for the smaller areas (walls). The product is a proprietary item from StoneMakers that licensed installers have access to. On the durability I suppose we'll find out! But with sealing annually I'm hoping to have some decent color left for quite some years to come. Time will tell. They are using type S mortar mix prepared to the consistency of paint for the grout lines. It goes on gray and dries white. Then after a rain and some days passing it fades to somewhat gray. The durability of the grout is more of a question in my mind as it is not that great at this point. The sealer is what may help that, or not.
 
Wow..that is Huge!..And Beautiful!!! I love all the stone work and all the stairs! Ok I love 'looking' at the stairs, and it would be a good workout before and after pool time. :)
Great Job..I cannot wait to see it with the water!
Dena
 
Kooma - Here are two pictures of the cover box after the decking was poured which is the current state.

[attachment=0:1iw7gi3a]image.jpg[/attachment:1iw7gi3a]
[attachment=1:1iw7gi3a]image.jpg[/attachment:1iw7gi3a]
 

Attachments

  • image.jpg
    image.jpg
    131.3 KB · Views: 1,875
  • image.jpg
    image.jpg
    131.2 KB · Views: 1,871
Thanks for all the kind words. Denaw - Yes, around our house you have to like steps and/or hills or it's a sad existence.

Here's a shot of the fence progress from early last weekend. I will finish it this weekend. At this point the plasterers are still scheduled for Monday. The pool equipment was set today and related electrical. Not the neatest job but oh well. They sealed the concrete decking yesterday so the colors have a little more punch to them for the time being. Not sure how much more slippery it is now...we'll find out soon.

The garage has been taken over by unassembled pool furniture and tools for the DIY aspects of the project. I'll be glad to reclaim that side of it next week sometime.

[attachment=0:yu37idq7]IMG_7388 - TFP.jpg[/attachment:yu37idq7]
 

Attachments

  • IMG_7388 - TFP.jpg
    IMG_7388 - TFP.jpg
    209.7 KB · Views: 1,867

Enjoying this content?

Support TFP with a donation.

Give Support
bmoreswim said:
Kooma - Here are two pictures of the cover box after the decking was poured which is the current state.

[attachment=0:adzuhwku]image.jpg[/attachment:adzuhwku]
[attachment=1:adzuhwku]image.jpg[/attachment:adzuhwku]

I would recommend smoothing the inside edge of the cover vault so that when the cover rolls out it is contacting a smooth surface, ideal would be a bull nose tile in there. There will be less abrasion on the underside and it will roll out smoother, I didn't do that and when my cover is closed you can hear the seams "catching" on the sharp edge.
 
bobby1017 said:
bmoreswim said:
Kooma - Here are two pictures of the cover box after the decking was poured which is the current state.

[attachment=0:25ytim9s]image.jpg[/attachment:25ytim9s]
[attachment=1:25ytim9s]image.jpg[/attachment:25ytim9s]

I would recommend smoothing the inside edge of the cover vault so that when the cover rolls out it is contacting a smooth surface, ideal would be a bull nose tile in there. There will be less abrasion on the underside and it will roll out smoother, I didn't do that and when my cover is closed you can hear the seams "catching" on the sharp edge.
I second this!
 
Great idea guys (folks). I'm not sure why that didn't cross my mind before. For another purpose I bought a diamond blade for my grinder. I think I will cut the dam wall edge at a 45 degree angle right after the tile and then smoth out the edges of that and also the leading and trailling edges of the tile there.

Thanks again!
 
I did clean up the cover dam wall lip as much as possible which I appreciate the comments on.

Then finished up the fence this weekend...

These also ended up being the morning of plaster pictures.

[attachment=1:ne8nimvh]IMG_7399 - TFP.jpg[/attachment:ne8nimvh]

[attachment=0:ne8nimvh]IMG_7401 - TFP.jpg[/attachment:ne8nimvh]
 

Attachments

  • IMG_7399 - TFP.jpg
    IMG_7399 - TFP.jpg
    124 KB · Views: 1,769
  • IMG_7401 - TFP.jpg
    IMG_7401 - TFP.jpg
    175.9 KB · Views: 1,774
So today was plaster day! Three months and one week after our Valentine's Day dig. The finish was going to be standard marble plaster tinted gray. Then the other day our PB said the new plaster crew they have been using this spring (from Texas) favored using Diamond Brite - Onyx mixed with the white cement and marble dust instead of the normal plaster tint he uses, supposedly to get less mottling, though that really wasn't our concern anyway.

So we ended up with the following mixture: 1 bag DB Onyx, 4 bags white cement, 7 bags marble dust per batch.

It took three and a half batches so we have 3 1/2 bags of DB quartz finish mixed in with our plaster. He will do an acid bath on Thursday when he starts up the equipment to expose some of the DB. When it was being applied it is a uniform color but as it dried it clearly is mottled. As the water is added it mostly blends together. However, we only have about 1 foot of water from our well in it so far. The water trucks are coming at 5:00 am tomorrow so I'll keep the well running and hope it doesn't temporarily run dry tonight.

This was a no cost addition for us (not a big cost anyway due to the low volume of DB and some acid). He said the DB is $30/bag versus $5/bad for marble. He had full DB as an option originally but we passed on it - but are getting some of it anyway. I call it poor man's DB French Gray. Our PB is experimenting, at least from his perspective. As I said, the plasterers do this mix frequently. I could have probably gone with 1 1/2 bags of DB Onyx and still not been too dark but didn't want to chance it. I'm sure we will be happy - it's certainly a noticable color variation from white plaster leading to a deeper blue which was our goal. I'm expecting our water may look greenish upon first fill before chemicals from what I've heard. I'll see if if my DW freaks out if that occurs before I let her know what is going on!

[attachment=2:2oqvf92s]IMG_7408 - TFP.jpg[/attachment:2oqvf92s]

[attachment=1:2oqvf92s]IMG_7429 - TFP.jpg[/attachment:2oqvf92s]

[attachment=0:2oqvf92s]IMG_7440 - TFP.jpg[/attachment:2oqvf92s]
 

Attachments

  • IMG_7408 - TFP.jpg
    IMG_7408 - TFP.jpg
    141.4 KB · Views: 1,808
  • IMG_7429 - TFP.jpg
    IMG_7429 - TFP.jpg
    169.8 KB · Views: 1,809
  • IMG_7440 - TFP.jpg
    IMG_7440 - TFP.jpg
    105.1 KB · Views: 1,807
The first few drops...

[attachment=1:3adrn8gf]2013-05-21 17.51.44 - TFP.jpg[/attachment:3adrn8gf]

A long way to go. Hopefully the water trucks arrive tomorrow.

[attachment=0:3adrn8gf]2013-05-21 19.55.28 - TFP.jpg[/attachment:3adrn8gf]

To those in process, the end does eventually arrive.
 

Attachments

  • 2013-05-21 17.51.44 - TFP.jpg
    2013-05-21 17.51.44 - TFP.jpg
    39.8 KB · Views: 1,819
  • 2013-05-21 19.55.28 - TFP.jpg
    2013-05-21 19.55.28 - TFP.jpg
    57.1 KB · Views: 1,815
On Tuesday they did the plaster and then yesterday morning the water trucks came. Here it is. The plaster is grey so it yields this color water (which could be a tad green due to limited chemicals/filtration but we'll see if it changes any). Our goal was a deep blue which it mostly is. I’m sure everyone says this but it changes from every direction and time of day/type of sky. Equipment should be turned on today. Water is from the Baltimore City water supply - good water (ok, so no one cares about that except me). And a few thousand gallons from our well on Tuesday night waiting for the trucks to arrive - also good water but mildly acidic and somewhat hard.

We won't be swimming until next week as they will be doing an acid wash in the water to allow a bit of the surface to come off with brushing to expose the black quartz crystals added and give the color. The cover should also be installed later next week.

We are very pleased with the project though it hasn't been without it's headaches, not all of which were overcome, but certainly enough were to be happy.

[attachment=1:166h45aa]2013-05-22 18.15.21 - TFP.JPG[/attachment:166h45aa]

[attachment=0:166h45aa]2013-05-22 18.15.44 - TFP.JPG[/attachment:166h45aa]
 

Attachments

  • 2013-05-22 18.15.21 - TFP.JPG
    2013-05-22 18.15.21 - TFP.JPG
    89.9 KB · Views: 1,871
  • 2013-05-22 18.15.44 - TFP.JPG
    2013-05-22 18.15.44 - TFP.JPG
    67.3 KB · Views: 1,862

Enjoying this content?

Support TFP with a donation.

Give Support
Thread Status
Hello , This thread has been inactive for over 60 days. New postings here are unlikely to be seen or responded to by other members. For better visibility, consider Starting A New Thread.