Pool Build - Baltimore

There it is...

I suppose it adds character.

[attachment=0:66ckmsiw]IMG_6516 - TFP.jpg[/attachment:66ckmsiw]
 

Attachments

  • IMG_6516 - TFP.jpg
    IMG_6516 - TFP.jpg
    192.6 KB · Views: 1,981
I may try hitting the the distinctive coping piece with a wire brush on a drill for kicks. It is only skin deep from what I can tell by looking at the edge of the piece. I'm not feeling compelled to have it changed, but we'll see. Interestingly the decking will have lots of that color in it. Here is a sample of what the decking will look like...sans brick.

[attachment=1:2f09874t]2012-12-09 21.02.02.jpg[/attachment:2f09874t]

And the obligatory TF-100 test kit accessorized with SpeedStir and salt test strips.

[attachment=0:2f09874t]IMG_6526 - TFP.jpg[/attachment:2f09874t]
 

Attachments

  • 2012-12-09 21.02.02.jpg
    2012-12-09 21.02.02.jpg
    32 KB · Views: 1,923
  • IMG_6526 - TFP.jpg
    IMG_6526 - TFP.jpg
    67.6 KB · Views: 1,890
Here is the result after using a wire brush on the coping piece shown above. Much better and quite satisfied. It's only slightly more rust colored than the many other rust accented pieces now. A little elbow grease was all it needed.

[attachment=2:gu7gt00j]IMG_6557 - TFP.jpg[/attachment:gu7gt00j]

Here they are on 3/22 fully excavating for the upper side deck area. They moved all of this dirt to the lower left corner of the yard and eased the drop-off in that corner. It is excavated 2' further than the decking will extend to allow for the wall and drainage space behind it.
[attachment=1:gu7gt00j]IMG_6532 - TFP.JPG[/attachment:gu7gt00j]

Upper side fully excavated. They had to dig slowly where the skid-steer is located because the septic line headed to the tank is under the decking there. They are down about 24-30" in that corner and didn't hit the stone that is surrounding the pipe so that was nice. We will be able to have that corner fully utilized, as we planned, for the steps.
[attachment=0:gu7gt00j]IMG_6556 - TFP.jpg[/attachment:gu7gt00j]

We are having a two-day delay in the wall/decking festivities due to a 5" snow today. They will be back Wednesday to dig footers and set rebar. Thursday will be the footer pour and the wall creation/carving.
 

Attachments

  • IMG_6557 - TFP.jpg
    IMG_6557 - TFP.jpg
    209.2 KB · Views: 1,933
  • IMG_6532 - TFP.JPG
    IMG_6532 - TFP.JPG
    179.3 KB · Views: 1,955
  • IMG_6556 - TFP.jpg
    IMG_6556 - TFP.jpg
    235.2 KB · Views: 1,918
The snow is gone and we are back in business today. Digging the footer for the poured concrete Stonemakers wall. http://www.stonemakers.net/

[attachment=2:1i9z18f6]IMG_6659 - TFP.jpg[/attachment:1i9z18f6]

Footers excavated and rebar set. Part of the walls extend above ground and others form the support for the pool deck.

[attachment=1:1i9z18f6]IMG_6665 - TFP.jpg[/attachment:1i9z18f6]

[attachment=0:1i9z18f6]IMG_6667 - TFP.jpg[/attachment:1i9z18f6]
 

Attachments

  • IMG_6659 - TFP.jpg
    IMG_6659 - TFP.jpg
    206.5 KB · Views: 1,881
  • IMG_6665 - TFP.jpg
    IMG_6665 - TFP.jpg
    216.7 KB · Views: 1,892
  • IMG_6667 - TFP.jpg
    IMG_6667 - TFP.jpg
    160.3 KB · Views: 1,880
Just one oops today...the septic line to the tank was found, right where it should have been. But it was conveniently while no one was home and was fixed quickly. Tomorrow concrete and a pump truck show up for the first pour/carving event.

[attachment=0:39a48oex]IMG_6669 - TFP.jpg[/attachment:39a48oex]
 

Attachments

  • IMG_6669 - TFP.jpg
    IMG_6669 - TFP.jpg
    227.1 KB · Views: 1,858
Hello - great pool build thread! Thanks!

Do you have any pics of how the flagstone coping is being set on the autocover lid? I'm told it sits in a track and is not set in there? I'm wondering how this section looks when it meets the regular section of set coping? As well as how you have over come the over hang needed for the cover equipment?

Thanks
 
kooma said:
Hello - great pool build thread! Thanks!

Do you have any pics of how the flagstone coping is being set on the autocover lid? I'm told it sits in a track and is not set in there? I'm wondering how this section looks when it meets the regular section of set coping? As well as how you have over come the over hang needed for the cover equipment?

Thanks

Right now I can't post any pics due to some computer issues but I'll explain how it will work for our pool. The top of the shell is the same height all the way around the outside most walls. The interior dam wall is 2 1/2 sloping to 1 1/2" below that level. The coping sits on a bed of mortar about two inches thick. The autocover track is mounted within that mortar bed and screwed down. The coping is installed in the "U" shaped section on the shallow end (opposite the cover) and down the sides until it reaches the opening of the pit. The side walls of the pit, the opening of the pit and a few inches of the dam wall will be covered by square pieces of flagstone mounted on large metal brackets mounted on the inside back wall of the pit. The back wall of the pit and the "returns" of the pit walls will be covered with the decking of poured concrete. So the coping will be the "u" shape of mortared flagstone with a wider end of flagstone sitting on brackets. I'm not sure how clear that is but I will post pictures soon. The decking should be poured this week which will be another piece to the coping puzzle. Then after plaster and water in early May, the cover and brackets/flagstone lid wil be installed which will complete the coping.

The last two days of last week were big ones with the walls being poured/carved. They were here for 12 hours both days with 6 men and the CM. Both days ended up with them working with artificial lighting. Seven trucks of concrete visited and two loads of gravel. Tomorrow will be much more gravel (which is being used to fill the retaining wall structure up to the level to pour the decking) some small walls and runs for conduit and piping. I can't explain the wall structure easily but will post pics of it as soon as possible. Keeping lots of little details in order on the project is interesting.
 
Kooma,

Here are two pictures of the track and regular coping. It will probably be early May before the cover is installed to show you the full details.

Motor end...
[attachment=1:8498r9uf]IMG_6826 - TFP.jpg[/attachment:8498r9uf]

Non-motor end...
[attachment=0:8498r9uf]IMG_6827 - TFP.jpg[/attachment:8498r9uf]
 

Attachments

  • IMG_6826 - TFP.jpg
    IMG_6826 - TFP.jpg
    212.8 KB · Views: 1,832
  • IMG_6827 - TFP.jpg
    IMG_6827 - TFP.jpg
    193.8 KB · Views: 1,831

Enjoying this content?

Support TFP with a donation.

Give Support
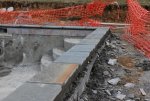
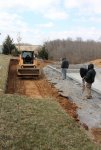
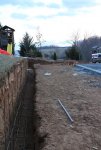
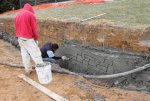
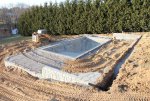
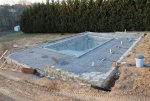
Thursday, 3/28 was the first day of the concrete pour for the StoneMakers walls. They used 4 trucks of concrete for today's activities. The first 1 1/2 trucks were moved with the skid-steer bucket and the remaining were moved with a small trailer concrete pump. The first truck backed into yard unadvisedly and promptly got stuck trying to exit. A 1/2 hour later and the skid-steer eventually pulled him out. Now they stay on the driveway, which by the way, is taking a real beating.

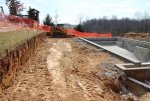
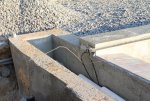
First they pour footers that are contiguous with the walls.
[attachment=2:zhn00cjv]IMG_6725 - TFP.jpg[/attachment:zhn00cjv]

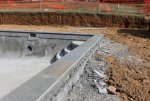
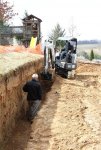
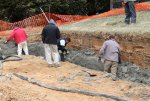
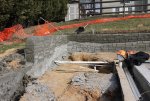
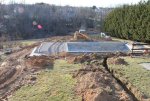
Then they start stacking the concrete up.
[attachment=1:zhn00cjv]IMG_6748 - TFP.jpg[/attachment:zhn00cjv]

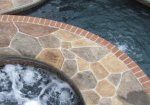
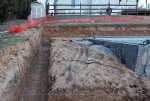
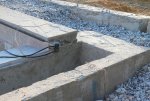
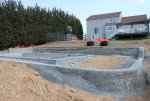
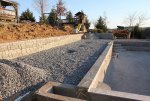
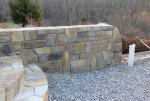
And finally they begin shaping the walls and carving them. You might notice that the pattern in this picture is slanted downward to the right. Once I pointed out that the pattern should be more or less level, then things went great. They just scratched out/filled in that part and moved on.
[attachment=0:zhn00cjv]IMG_6743 - TFP.jpg[/attachment:zhn00cjv]

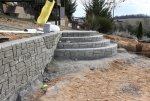
They finished with the steps in the dark which you'll see in the Friday pictures next.
 

Attachments

  • IMG_6725 - TFP.jpg
    IMG_6725 - TFP.jpg
    250.6 KB · Views: 1,782
  • IMG_6748 - TFP.jpg
    IMG_6748 - TFP.jpg
    242.1 KB · Views: 1,802
  • IMG_6743 - TFP.jpg
    IMG_6743 - TFP.jpg
    219.9 KB · Views: 1,791
Here are the chemicals additives they measure and pour into the concrete trucks. A quick high speed mix and they are ready to go.
[attachment=0:2e8rw64a]IMG_6741 - TFP.jpg[/attachment:2e8rw64a]
 

Attachments

  • IMG_6741 - TFP.jpg
    IMG_6741 - TFP.jpg
    122.4 KB · Views: 1,704
Friday, 3/29 was day two of the walls. Three more concrete trucks, all unloaded by skid-steer and shovel. Two gravel trucks.

Here are the steps which we really like. They mirror the steps in the corner of the pool, just larger.
[attachment=2:12gl3mtz]IMG_6765 - TFP.jpg[/attachment:12gl3mtz]

You can see the day two fresh concrete versus the day one pour. They just left it rough so there was a good bonding surface. They missed carving that one stretch due to darkness and also didn't carve the tops of the walls. So on Monday they used a small grinder for hours and did a great job. The top of the walls had been left smooth but look great with the grinder created grout lines.
[attachment=1:12gl3mtz]IMG_6769 - TFP.jpg[/attachment:12gl3mtz]

Overview after the walls were complete and some gravel added on the narrow side of the decking.
[attachment=0:12gl3mtz]IMG_6776 - TFP.jpg[/attachment:12gl3mtz]
 

Attachments

  • IMG_6765 - TFP.jpg
    IMG_6765 - TFP.jpg
    233.1 KB · Views: 1,811
  • IMG_6769 - TFP.jpg
    IMG_6769 - TFP.jpg
    240.9 KB · Views: 1,820
  • IMG_6776 - TFP.jpg
    IMG_6776 - TFP.jpg
    191.8 KB · Views: 1,799
Monday, 4/1 drainage and electrical trenches were dug, the pool lights were wired and more gravel was added.

[attachment=1:3skukuym]IMG_6808 - TFP.jpg[/attachment:3skukuym]

[attachment=0:3skukuym]IMG_6809 - TFP.jpg[/attachment:3skukuym]
 

Attachments

  • IMG_6808 - TFP.jpg
    IMG_6808 - TFP.jpg
    295.3 KB · Views: 1,799
  • IMG_6809 - TFP.jpg
    IMG_6809 - TFP.jpg
    256.7 KB · Views: 1,797
Today was more gravel, lines for future solar were plumbed, more site drainage work and we passed our electrical trench inspection. Tomorrow the painter is scheduled to paint the walls. Also meeting with the PB to identify outlet, light post and walkway locations.

Trench at the house. Need to drop in water line now.

[attachment=1:316ym7qt]IMG_6831 - TFP.jpg[/attachment:316ym7qt]

Upper side decking prep. The solar line terminus stubs are visible in front of the skid-steer. We plan to build a pavillion on that side some day with a southern exposure on the roof. So I wanted the option to easily run solar from that roof to the equipment which will be out of view to the left in the picture.
[attachment=0:316ym7qt]IMG_6824 - TFP.jpg[/attachment:316ym7qt]
 

Attachments

  • IMG_6831 - TFP.jpg
    IMG_6831 - TFP.jpg
    172.3 KB · Views: 1,755
  • IMG_6824 - TFP.jpg
    IMG_6824 - TFP.jpg
    233.9 KB · Views: 1,764
JimboAZ said:
Cool, that wall is looking good. Sure looks like a lot of work!

Thanks for the good word. And I agree, the group really works hard. The painter is doing his thing on the wall today. I think he wishes the stones were bigger though. It's a bit slow going.

Spent some serious time going over lots of details with the CM today. Conduit here, conduit there, conduit everywhere. Then the owner called me to go over the highlights of my CM conversation because the two of them had spoken. Good communication though. If you don't enjoy that aspect of the project, I'm sure it can feel like a huge hassle.

Failed an inspection today, the clamps for attaching the bonding wire to the wire grid, which will be encased in concrete, needed to be brass or bronze (can't remember which one) but not galvanized. Hopefully the inspector is out early/first thing tomorrow. Concrete trucks are scheduled...
 
Nova13 said:
nice job, like the concrete walls, like everything else to

Thank you. Here is today's update...

We are (mostly) ready for concrete decking tomorrow. I was marking for the umbrella holders at dusk tonight.

This shows the most completed section regarding painting of the walls. It's the base colors that still needs to be blended. We are also having them ease up on the yellows.

[attachment=2:3abboi7u]IMG_6843 - TFP.jpg[/attachment:3abboi7u]

The steps are only partially done. Still some unpainted "stones".

[attachment=1:3abboi7u]IMG_6844 - TFP.jpg[/attachment:3abboi7u]

Ready for another big day tomorrow...

[attachment=0:3abboi7u]IMG_6852 - TFP.jpg[/attachment:3abboi7u]
 

Attachments

  • IMG_6843 - TFP.jpg
    IMG_6843 - TFP.jpg
    212.4 KB · Views: 1,747
  • IMG_6844 - TFP.jpg
    IMG_6844 - TFP.jpg
    176.8 KB · Views: 1,749
  • IMG_6852 - TFP.jpg
    IMG_6852 - TFP.jpg
    229 KB · Views: 1,756
Well last Thursday they did pour the concrete decking (7:30am - 9:00pm), including a ramp for our existing shed. The carving takes a lot of time but they did a nice job. On Friday they graded everything below the pool, two separate areas mainly, along with some other miscellanous tasks. On Saturday two guys worked on painting the wall. Today they excavated for and installed the sidewalk which we are thrilled with. We might actually get real pool work done this week too. Equipment may get set and electrical connected...we'll see.

Here's a quick shot of the current status. I'll post more in a few days after it's mostly finished (except for the DIY fence, plaster and water). Decking worked out to 1650 s.f. with 250 s.f. elsewhere.

[attachment=0:1j3vlv4y]IMG_6853 - TFP.jpg[/attachment:1j3vlv4y]
 

Attachments

  • IMG_6853 - TFP.jpg
    IMG_6853 - TFP.jpg
    165.4 KB · Views: 1,695

Enjoying this content?

Support TFP with a donation.

Give Support
Thread Status
Hello , This thread has been inactive for over 60 days. New postings here are unlikely to be seen or responded to by other members. For better visibility, consider Starting A New Thread.