
My pool adventure
- Thread starter Optoman
- Start date
You are using an out of date browser. It may not display this or other websites correctly.
You should upgrade or use an alternative browser.
You should upgrade or use an alternative browser.

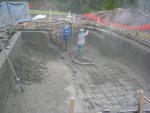

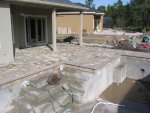
Start -> finish was about 7 hours.
Really happy with what it looks like and how it came out.
Deck grading tomorrow or wednesday, tile and plumbing Wednesday or Thursday.
Time for me to re-read hydraulics 101 for some pipe layout
Really happy with what it looks like and how it came out.
Deck grading tomorrow or wednesday, tile and plumbing Wednesday or Thursday.
Time for me to re-read hydraulics 101 for some pipe layout
Attachments

Oh, you're in the danger zone there. I've read Hydraulics 101 at least seven times... and realize now that I may never graduate.Optoman said:Time for me to re-read hydraulics 101 for some pipe layout
Nice pics... thanks for posting.
not much "picture worthy" has happened. plumbing laid to the pad, waterline tile added, pool light pulled.
They're throwing the coping on today and digging the footers for the screen.
Hope everyone had a great holiday !
Trying to decide between the Suntouch and the Easytouch. Between all of the models and choices, my head is starting to spin")
They're throwing the coping on today and digging the footers for the screen.
Hope everyone had a great holiday !
Trying to decide between the Suntouch and the Easytouch. Between all of the models and choices, my head is starting to spin
G
Guest
One vote for the EasyTouch! The SunTouch is the "entry level" unit and has very limited capabilities........
Yup, I've been combing through the Easytouch v. Suntouch posts using the search function.
My quandry is that I have a very very very vanilla pool, so I am not seeing the need for the extra relays. But then again -- I'm nearsighted
I would imagine that I should just splurge for the 8 relay easytouch and then I'll always know that I can add on.
Getting the Easytouch saves me from spending the extra 150$ on the intelliBRITE switch as well -- since it has the menu system built in... See -- I can talk myself into anything !
bk406
0
I have an intellibright hooked up to an Easytouch. Love the built in menu. Another vote for Easytouch.
Hello Pool Friends !!!! Ended up going with the Easytouch 8. It ended up being ~300 more than the Suntouch.
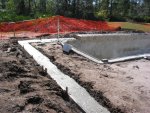
Things are moving along -- they poured the footers yesterday. So if you happen to be new and or wondering about your first pool.... From the last pic they....
Coping and pavers are delivered, coping goes on today!
Still waiting on the larger filter. There were no 420s locally, so they had to stick one on a truck from Cali...
Things are moving along -- they poured the footers yesterday. So if you happen to be new and or wondering about your first pool.... From the last pic they....
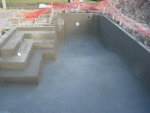
removed the kickers from the gunite shell.
brought the bobcat back to pre-grade the deck
slapped up the waterline tile
rough plumbed the pipe from the pool to the pad
ran the pight wire back to the pad (the box and the light is still sitting on the deck)
'probed' around the shell with a long pipe jetting water out to basically find air pockets between the dirt and the shell
compacted all of that, dug out the trench for the footers for the screen and slapped rebar in.
Coping and pavers are delivered, coping goes on today!
Still waiting on the larger filter. There were no 420s locally, so they had to stick one on a truck from Cali...
Attachments

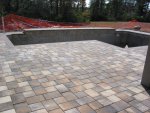
The brick coping had been a slight delay-factor over the past week. First it showed up as the wrong color. The next batch showed up damaged. The subsequent batch showed up damaged again. The fourth batch showed up fine. Anyway it is finally installed and the grouting will occur tomorrow. Good times ! Pic forthcoming post grouting.
Pic forthcoming post grouting.I wonder how many people this happens to.... I had similar trials during the plaster phase, 3 consecutive unscheduled days off work waiting for delivery of the right tile, all to no avail as I finally relented: "Just plaster it!" (with the wrong tile.)Optoman said:The brick coping had been a slight delay-factor over the past week. First it showed up as the wrong color. The next batch showed up damaged. The subsequent batch showed up damaged again. The fourth batch showed up fine. Anyway it is finally installed and the grouting will occur tomorrow. Good times !
- Oct 18, 2009
- 3,637
- Pool Size
- 6000
- Surface
- Plaster
- Chlorine
- Salt Water Generator
- SWG Type
- Hayward Aqua Rite (T-15)
Looking great :-D Don't forget to run as many electrical outlets in as many places :-D You can never have too many, trust me, DW always finds some sort of light up creatures to plug in  Also run as many water faucets as possible. I have one in every corner inside and outside our pool cage. Also now is the time to plan for summer kitchen which means drains, water faucets and electrical outlets
  Even if you do not plan on one in the very near future. Believe me you will regret this later. I put in 14 electrical outlets and we are running out of them, ahhhhh I see more projects coming soon
Also run as many water faucets as possible. I have one in every corner inside and outside our pool cage. Also now is the time to plan for summer kitchen which means drains, water faucets and electrical outlets Even if you do not plan on one in the very near future. Believe me you will regret this later. I put in 14 electrical outlets and we are running out of them, ahhhhh I see more projects coming soon - Oct 18, 2009
- 3,637
- Pool Size
- 6000
- Surface
- Plaster
- Chlorine
- Salt Water Generator
- SWG Type
- Hayward Aqua Rite (T-15)
Optoman said:Hi Simi,
Thx greatly for the suggestions.
Yes the urns will have their own valve. I was contemplating rigging them as the "spa" for the Suntouch control panel. If that won't work then a ball valve will go in for flow control.
The urns will lay on their sides, but on the two radii in the back corners. We put the radii in for the exact reason you cite, dribble protection
With respect to the urn itself, we searched long to find one with a negative edge on the lip when laid over. If necessary, we'll tilt the urn forward a touch until nothing runs backwards to the decking. If further necessay, I'll dremel out a more aggressive recess below that edge -- just as you suggested.
I guess I should stick a hose in it to see what it's going to do
Any recommendations on where I may find any of those sealing products you mentioned? Is that a home depot/lowes type of thing or is that a speciailty store item?
And thanks again -- great suggestions!!!
optoman if it is not too late you can stub in for future urns or water statues. I had the PB put in round sprinkler boxes which I bought form Home Depot or Lowes. The Mermaid/ Dolphin statue and the deck jet in our pool is plumbed to this. I have ballcock valves controlling the flow and I can control both of them using a Pentair never lube valve. Look at our pool build in the signature. I hope this helps

Hey Poly, It is good and bad that I am flat out obstinate about getting what I'm paying for.... so the world came to a halt despite the PB explaining to me repeatedly that it would have been fine after I sealed it. He ended up bringing out some sealer and smearing it on the affected areas, and... wow -- it still looked like poo, but wet and slick :blah:
I told him I was indeed born at night, but not last night :lol: ..... We specifically chose winter to build so that we could take our time, allow for endless delays, and absoultely not care about those delays.
Hey Brent, Awesome suggestion about the sprinkler box (local control), bibs, and outlets. I tried to encourage the wife to let me toss more outlets in -- but I got the old......... ""but there will be conduit running up the wall??? that's ugly"" The deck went in today -- so that dream is postponed until she gets out there and wants to plug some stuff in Thankfully, I pulled the paver guy aside and asked him to chamfer the bottom edge of all of the soldier course pavers. It will be a breeze to pop them out and slap some conduit after I get the ""go ahead"". You see -- it always has to be HER idea
We have an extra bib inside the screen area so tapping off of that for the future is easy enough. The urns are plumbed separately on their own neverlube at the pad. I'm going to slap an extra solenoid on that valve and rig it into the easytouch.
Everyone has been absolutely great about your comments and suggestions. Thank you again.
Jumping over to the other comp to post pictures.
I told him I was indeed born at night, but not last night :lol: ..... We specifically chose winter to build so that we could take our time, allow for endless delays, and absoultely not care about those delays.
Hey Brent, Awesome suggestion about the sprinkler box (local control), bibs, and outlets. I tried to encourage the wife to let me toss more outlets in -- but I got the old......... ""but there will be conduit running up the wall??? that's ugly""
The deck went in today -- so that dream is postponed until she gets out there and wants to plug some stuff in Thankfully, I pulled the paver guy aside and asked him to chamfer the bottom edge of all of the soldier course pavers. It will be a breeze to pop them out and slap some conduit after I get the ""go ahead"". You see -- it always has to be HER idea We have an extra bib inside the screen area so tapping off of that for the future is easy enough. The urns are plumbed separately on their own neverlube at the pad. I'm going to slap an extra solenoid on that valve and rig it into the easytouch.
Everyone has been absolutely great about your comments and suggestions. Thank you again.
Jumping over to the other comp to post pictures.
For posterity -- thiis what the coping showed up as...
If by chance anyone else reads this and is considering brick coping -- be sure to prepare your builder that this wouldn't be acceptable, and is *not* remedied by sealer.
These are the worse pieces.... but ya... half the pallet was like this.
If by chance anyone else reads this and is considering brick coping -- be sure to prepare your builder that this wouldn't be acceptable, and is *not* remedied by sealer.
These are the worse pieces.... but ya... half the pallet was like this.
Attachments

Yup... much improved over that porous-looking bullnose that is featured in the last picture. You were pretty darn smert to do this project in the winter.Optoman said:If by chance anyone else reads this and is considering brick coping -- be sure to prepare your builder that this wouldn't be acceptable, and is *not* remedied by sealer.
- Oct 18, 2009
- 3,637
- Pool Size
- 6000
- Surface
- Plaster
- Chlorine
- Salt Water Generator
- SWG Type
- Hayward Aqua Rite (T-15)
WOW the pool is coming along Your coping looks exactly like ours and the pavers are great, looks just like ours, imagine that  Can't wait to see the finished product
Your coping looks exactly like ours and the pavers are great, looks just like ours, imagine that Can't wait to see the finished product
G
Guest
While not critical, somebody might want to pull the pool light out of the swamp water and put it on the deck!
It is looking awesome Absolutely beautiful!!!
It is looking awesome
Absolutely beautiful!!!Thanks guys!
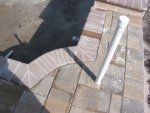
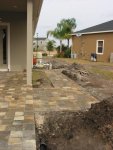
Fished out the light this morning -- ty :-D
Paver guys finished the walkway around to the pad this morning.
Electrician tomorrow, Screen work Tuesday through Friday. Hoping for fillage about two weeks from now!!!
Time to become a member and order my test kit
Fished out the light this morning -- ty :-D
Paver guys finished the walkway around to the pad this morning.
Electrician tomorrow, Screen work Tuesday through Friday. Hoping for fillage about two weeks from now!!!
Time to become a member and order my test kit
Attachments

Just want to give my very humble congratulations on a very beautyful pool 
I love the coping! Is there a chance that you could post a pic of the skimmer for example, so I can see how that is placed in relation to the coping in height and how far out the coping goes?
I can see how well you have matched the coping with the waterline tile, something I haven't payed enough attention to But like someone said:
Half of the people can be part right all of the time,
Some of the people can be all right part of the time,
But all of the people can't be all right all of the time.
All the best Mats
I love the coping! Is there a chance that you could post a pic of the skimmer for example, so I can see how that is placed in relation to the coping in height and how far out the coping goes?
I can see how well you have matched the coping with the waterline tile, something I haven't payed enough attention to
But like someone said: Half of the people can be part right all of the time,
Some of the people can be all right part of the time,
But all of the people can't be all right all of the time.
All the best Mats
Thread Status
Hello , This thread has been inactive for over 60 days. New postings here are unlikely to be seen or responded to by other members. For better visibility, consider Starting A New Thread.