Installation Plan....what am I missing?

jopheso

0
Bronze Supporter
Mar 12, 2018
17
south Louisiana
Hello TFP,

I have an intex 16x32 ultraframe on the way. I have been doing my "due diligence" (read obsessive researching) on this process. Here is the 1000 foot view in my head:

1) Determine grade with stakes, masonry string and bubble level
2) Use large tiller to tear up a 18'x34' area to account for blocks under legs
3) rake the now loosened dirt from the high side of grade to the low side(our area is pretty flat here in South Louisiana) but there is a bit of a concave to fill in
4) Tamp the now raked dirt and scrape with long 2x4 and tamp some more
5) Place the 16 foam sheets and duck tape the seems, including additional tape in the corners
6) Place the tarp that comes with the pool on top of the foam
7) layout the rail to show me where the legs will be
8) dig down and install 16"x16"x2" blocks butted up against the foam boards and dug down to be flush with the foam boards
9) Layout the liner
10) install rail and legs
11) Begin filling and removing wrinkles


I will also be installing a through wall skimmer and hard plumbing the filter and SWG, bu those will have their own list when we get to that step :)

Any feedback is much appreciated
 
Hello and welcome to TFP! :wave: Item 12 (ADDED) - Tylenol! :) I'm breaking a sweat just reading your plan. Woo! You have a pretty good path ahead. The only thing that I would emphasize, because we see it time & time again .... is accurate leveling. I did the string level thing for my first (smaller) Intex, and it came out fine. But the larger pools leave a bit more room for error. So leveling is always my #1 priority. Some folks might even take advantage of the latest laser levels for better accuracy. I think you can rent them locally from the local stores. Just a thought, but everyone has their own technique. The season is just starting to pick up, so I suspect other AGP owners will reply. Good luck and take lots of pictures. Good luck! Welcome to the forum.
 
I love my laser level.... If you are creative you can rig one up with on the cheap. I have found the self leveling laser level to be a more borrowed tool than a pickup truck.

Lasers aside do a quick search for a water level. For a few bucks you can get laser accurate just goes a lil slower.

Avoid putting any of your frame supports over any area you have filled in. If the low spot is in the center of the pool you should be ok.
 
There will be lots of tylenol, but I also have 2 teenage sons who are used to work(we have a small farm), but my back may start to hurt from sitting in my lawn chair directing them :) There will definitely be pictures and possibly videos. I know the leveling is crucial. String level will be just for determining which way to push the dirt. 8 foot 2x4 with 4 foot level taped to it will be my instrument of choice. My biggest concern is using the tiller for my "excavation" of the top soil. I cant think of a reason why this wouldnt work, but I havent seen many others doing it.

- - - Updated - - -

I love my laser level.... If you are creative you can rig one up with on the cheap. I have found the self leveling laser level to be a more borrowed tool than a pickup truck.

Lasers aside do a quick search for a water level. For a few bucks you can get laser accurate just goes a lil slower.

Avoid putting any of your frame supports over any area you have filled in. If the low spot is in the center of the pool you should be ok.

do you just set the laser level on the ground and let the light hit the stakes? Sorry never used one before. Im not opposed to spending a little bit of money on new tools, especially if it is something I can use for the fence and deck builds coming down the road.

The dip in the ground would be under the liner and not the supports. I am really hoping that the foam boards will help with a lot of this. Meaning I shouldnt even know the dip is there once its filled and the foam boards are laid on top.
 
My biggest concern is using the tiller for my "excavation" of the top soil. I cant think of a reason why this wouldnt work, but I havent seen many others doing it.
Our biggest concern would be if too much earth was disturbed that would require fill - thus "soft spots" that could settle after the pool if filled. That's why we caution those owners who try to raise their low spots and tamp/pack as opposed to cutting-down the higher end that those areas are never as stable. But between careful tilling and a couple strong backs, you should make your way through it just fine. Have a nice weekend.
 
A laser level shoots a level laser line 360 degrees. You can then measure off of that line with a story pole and laser detector. The laser is accurate to 1/8 inch over 300ft.

They make things like site work and decks much easier. Getting footings and beams level is a breeze. Indoors shelving and paint lines are simplfied. The problem is they cost 400+ for the basic ones and can easily hit over 1000 for pro models. I have the Johnson one from home Depot which they are selling currently for 420. It's lasted 4 years now with some pretty rough use in all kinds of weather conditions and still works perfectly. I had to have one to install a septic system and have been happy I had one since.

A slight dip of an inch or two in the middle of the pool won't be noticable.

When using the tiller just remember any dirt you lossen has to come out so go slow and be gentle. Not easy to do with a tiller but it is possible.

DO NOT fill with top soil it is full of organic material that won't compact and will settle a lot over time. If you must fill bring a proper compactable fill material that has no organic material in it.
 
From my experience last summer:
  • I regret using the included tarp on top of the foam boards I put in. The included tarp is next to useless and anywhere it got a decent amount of sun, it has already deteriorated since June last year. I ripped up most of what is left but it looks ugly. See for yourself. I'm not sure what I recommend to do differently though. One of those Gorilla pads?
  • Agree with others about being careful about tilling. Anything that gets tilled will need to be compacted thoroughly.
  • Be careful about using the outside railing to set your bases. The outside edges of the base of my legs on my 12'x24' pool are 13'3" x 25'9". See if you can find measurements for your pool size and go with those. As you can tell from this pic, the legs stick out a fair amount past the top railing.
  • Make sure your level is level. I used a laser line level to lay mine out and relied on the leveling bubbles on the level to help me get it level. Turns out the level bubbles were a good 2.5" off across the short width of the pool. And since I would shoot from one side and then move it to the other it kept getting worse and worse (I could actually see it by eye). I finally figured it out and had to use a different level to level my laser level base. Annoying.
  • Don't let your kids rush you. Take your time and make sure everything is the way you want it. And I would actually give myself time to sleep on it another night. I was so done with it and decided I was done regardless. Overall it turned okay but could have used another hour or two of tweaking.
 
ground1.jpg
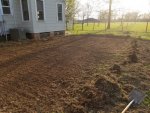
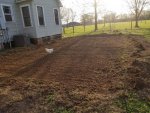
Progress was made this weekend. It is hard to tell in the picture but we removed prolly 4 inches of top soil. Thanks for the advice on NOT back filling with it. I will get a truck load of sand or 3 and use that for leveling beneath the foam boards. This is going to take forever, but I have heard loud and clear the voices on the importance of leveling.
ground2.jpg
We did receive a LOT of help from the chickens and turkeys :)
 
I bet the chickens are having a field day in that dirt. Looks like you guys did a really nice job cutting down the top soil.

As a point of reference it took about 4-5 yards of sand to put a 2 inch layer of sand under my liner that includes the coping along the wall edge.
You don't have coping to build so you will probably need closer to 4 yards to cover that area in about 2 inches of sand. A lawn roller or plate compactor will tighten every thing up and give you a nice base. Washed mason or concrete sand is a good choice which ever is cheaper. Concrete sand will have dust and small pebbles up to about 1/4" in it. Masons sand will be a uniform sand with no pebbles.

Its tempting to dump the sand in the level area but don't do that. Dump the sand next to the cleared area and use a wheelbarrow to carefully lay the sand out and spread it evenly as you go. Start on the end furthest from the pile and work towards the pile of sand this will help you start with an even sand bed that won't have compacted high spots in it that are hard to flatten out. In the end doing it this was saves a lot of back braking work and will go much faster. Having 2 or 3 people for that day will help speed things up a lot.

When you compact or roll the sand make sure to give it a good watering. You want the surface of the sand to look damp when you compact it to get good compaction. It should be firm enough after compacting that you can walk gently on it without leaving big footprints in the sand.

I ended up tilling that area 8 times. made 2 passes and then we started pulling out the top soil/grass with shovels. After doing that I could see there was still a LOT of grass root so tilled several more times, pulled more soil/grass out, then hit it a few more times, then time using the grading rake between tiller runs. In the end it turned out decent, but of course since im the one doing it( along with all my kids who are very strong) I can see all of the imperfections.

Do you think I will be able to get the sand properly compacted with a hand tamper or will a roller be required?

so lets say we have a large pile of sand right next to the flat area, we then fill a wheelbarrow and dump at the far end. Then use a shovel to dispense the wheelbarrow mound and a rake to spread the sand. Do this from the far end to the end closest to the big sand pile. then once the sand is in place use the 2x4/level method to screed the sand. Check for level, then water and then start compacting?
 

Enjoying this content?

Support TFP with a donation.

Give Support
The sand will smooth things out in a hurry, don't sweat the little imperfections. You are doing a great job so far.

To save your back and about a days worth of work try to get your hands on a water roller to do the sand. A used steel 55 gallon drum that isn't dented will work. Generally you can find one on craigslist for less than 20 bucks.

You can just dump the wheel barrow when you get where you are going with it. Its easy to spread that much sand that is freshly dumped. The idea is its easy to push around lots of little piles and get it flat. One big pile messes with your perspective and you will end up with a big hump where the pile was. It will also compact unevenly where the pile was.

Once you have it spread out and raked smooth I would compact it first then you can use the 2x4 to find the highs and lows and rake it smooth again. At this point you can rake the high spots of sand into the low spots and only bring in more sand if you have to. By the looks of things you should be pretty level after your first pass.

Run the barrel over the whole area a few times in alternating patterns and you should be all set to move onto getting the frame out and setting your blocks. If you are putting foam under the pool you want the top of the blocks to be level with the top of the foam.

perfect! Thank you for the gameplan. I saw some water rollers on amazon for about 125. I would go that route if I could think of any future applications for it.
 
I have a 55 steel barrel and I didn't use it to Tampa the sand......next time

Sadly the 2 drums I have, were sawed in half to make water troughs for the livestock :( Im going to have to find something to act as a roller. dont think I want to hand tamp the sand, but the kids might :)

On another note. Based on my research Its really useless to bond to the metal legs of the rectangular ultraframe polls as the plastic between the legs/upper frame breaks the connection. That being the case and the fact that I am using the intex double insulated sand filter, any suggestions on where how I should go about bonding the pool?

forgot to mention I will get the water bonding kit for the skimmer as well, but I will need more than that I believe.
 
With the Intex like you have you will want to do the perimeter bonding loop which is #8 or #6 bare copper solid wire run around the outside edge of your cleared area. You want it burried about 3-6 inches down so do it now before the sand is in place.

From there you will run another piece of that same bare copper wire to you water bond and then one over to you equipment area.

You don't need to bond the frame or the pump. The wire to the equipment area is for future use if you add something that needs bonding.

From your pictures it looks like your AC unit is within 5 feet of the pool. You may need to bond the frame of that if it is that close. Also that conduit on your house if it's metal and closer than 60inches from the pool it will need to be bonded.
 
The pictures are deceiving. The AC will be 10 feet or so from the pool. There will be nothing metal within 5 feet of the pool, including the filter and SWG they will on a raised pad next to the AC prolly 12 feet from the pool. If the only thing I am bonding to is the water, then is there any reason beyond future proofing to doing the bonding?
 
It's required by code if you are getting a permit, and it's an electrical safety thing . Shocks in pools are most dangerous to small people so the people who will benefit most are the kids.
 
It's required by code if you are getting a permit, and it's an electrical safety thing . Shocks in pools are most dangerous to small people so the people who will benefit most are the kids.

I dont need a permit, but I think its a good idea from a safety standpoint. I just wanted to make sure I wasnt wasting my time by bonding only to the water bond. As long as it will be effective enough to increase safety I will be doing it.
 
Thread Status
Hello , This thread has been inactive for over 60 days. New postings here are unlikely to be seen or responded to by other members. For better visibility, consider Starting A New Thread.