Need help with spa “wall” repair

May 16, 2024
9
DFW
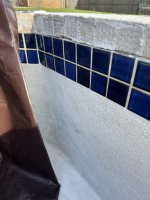
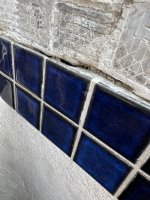
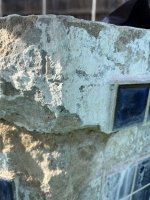
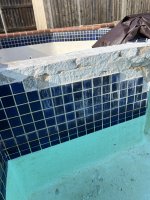
This past winter’s storms and near-zero freezes damaged the “wall” around my outdoor pool’s spa. Initially I thought that I just needed to re-attach and re/grout the spa tiles using Leslie’s Patch-It, but as I removed tile after tile I noticed that a small amount of the “substrate” beneath some of the tiles is damaged. By substrate, I’m referring to the structure beneath the tiles - which appears to be concrete.
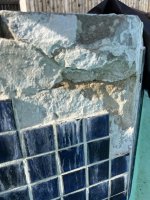
There are several spots where the “concrete” beneath the tiles is cracked, and several 1/2” chunks simply fell out.
I’m not in financial position to pay big $$ for an expert’s repair.
Can I use concrete to fill the damaged areas and cracks, then allow that to cure, and then proceed to use Patch-It to secure the tiles? If so, is there a specific product recommended?
I have no experience with this specific type of repair; however, I did build my own pool equipment pad several years ago, using rock, rebar, etc, which has held up 100% for several years, but this damaged spa wall needs a very smooth surface on which to re-seat tiles.
I’m looking for professional-quality answers: what specific material would be best to repair/replace the damaged area beneath the tiles.
Thanks in advance!
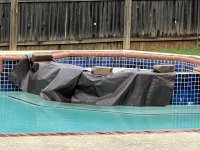
I covered the damaged area with a tarp, so closeup pics are not currently available as it is raining hard today in Texas. Included one pic, but can provide more after things dry up over the next few days.
I appreciate your help!
John in DFW
 

Attachments

  • IMG_5451.jpeg
    IMG_5451.jpeg
    483.2 KB · Views: 26
You gotta show us pictures.

I don't think you are seeing damaged gunite.

I think you are seeing some thick thinset that you should remove down to the real gunite.

I use this for tile repairs...


I was able to get home early.
Previously I had removed only loose tiles on the “outside” walls, where I saw damage beneath the tiles. After realizing that the exterior wall damage may have been caused by a leak thru the inner wall, I removed another row of tiles on the inner wall. Now it’s clear that there is a crack near the top of the inner spa wall that is obviously leaking through.
I would prefer to repair this wall rather than tear it down and re-build it.
It is completely dry now.
I’m in DFW area, where last year we had several days of zero degree weather and several MONTHS of 100+ degree weather.
Is there a product that can seal this crack??
We have not used this spa in years. I keep it clean and sanitized, and can lower the spa water level BELOW this damage.
Pictures 1&2 show the crack on the inside of the spa wall.
Pictures 3&4 show the leak damage to the exterior spa wall.
Pictures 5&6 show the overall area of the problem.
I’ve self-maintained this pool for 28 years.
Thanks for your positive thoughts and suggestions!
 

Attachments

  • IMG_5455.jpeg
    IMG_5455.jpeg
    543.1 KB · Views: 18
  • IMG_5456.jpeg
    IMG_5456.jpeg
    674.3 KB · Views: 18
  • IMG_5458.jpeg
    IMG_5458.jpeg
    486.5 KB · Views: 18
  • IMG_5459.jpeg
    IMG_5459.jpeg
    522 KB · Views: 19
  • IMG_5462.jpeg
    IMG_5462.jpeg
    642.1 KB · Views: 18
  • IMG_5461.jpeg
    IMG_5461.jpeg
    486.2 KB · Views: 18
Is there a product that can seal this crack??
Hydraulic cement.

Cracks like that happen due to pressure on the wall. If you do not fix the root cause, the wall will crack again.

Depends on how much effort you want to put into doing a lasting fix versus patching it and hoping for the best.
 
  • Like
Reactions: john_in_dallas
I researched hydraulic cement today. Looks very doable; however, the crack on the inner spa wall is at most 1/4” wide. The Lowe’s hydraulic cement video recommends enlarging the crack to 3/4”, because the hydraulic cement expands.
Any recommendations beyond the Lowe’s video?
Also, after removing the excess hydraulic cement, is that surface suitable for re-installing the tiles?
BTW: I was born to fix stuff. You name it; I’ve probably repaired it! My goal has always been “do it right the first time”, but that doesn’t always happen. I listen to multiple experts, compare suggested products, then give my best effort.
I will have more questions, so I’m hoping for multiple ideas/techniques via this forum.
By the way, the pics of the removed tiles show a grayish-colored glue/cement with trowel groove marks. These tiles have never been removed since the 1996 installation. I thought pool/spa tiles were seated using white thinset plaster. Am I wrong?
Thanks in advance… John
 
I researched hydraulic cement today. Looks very doable; however, the crack on the inner spa wall is at most 1/4” wide. The Lowe’s hydraulic cement video recommends enlarging the crack to 3/4”, because the hydraulic cement expands.
Any recommendations beyond the Lowe’s video?

Nope. You can try Type S mortar but it will not expand to try and seal.

Anything you put in the crack will benefit from having a larger area to fill.

The best way is to demo the gunite down to the crack, epoxy in rebar dowels, build forms from some wood, and then fill with concrete to reform the bond beam. With rebar in the area it will not crack again.

Also, after removing the excess hydraulic cement, is that surface suitable for re-installing the tiles?

Yes.

Although I might put on a waterproof membrame before the tile.


https://cdn.shopify.com/s/files/1/0...l-Water-Feature-Installation.pdf?v=1625588595

img_1178-png.555220

1626430671428-png.355575
full
full

By the way, the pics of the removed tiles show a grayish-colored glue/cement with trowel groove marks. These tiles have never been removed since the 1996 installation. I thought pool/spa tiles were seated using white thinset plaster. Am I wrong?
It sounds like thinset but who knows what materials were used 30 years ago.
 
I’m going to try your “best method”.
The inner spa wall crack obviously goes all the way through to the outer wall. I will remove that entire chunk of the wall.
The newly-exposed wall will be sloped downward (towards the pool), so should I make an effort to make that new spa wall level?
Regarding the rebar, I assume that I need to drill down into the remaining/sturdy spa wall every 6” to 8” apart, then clean out the holes thoroughly, apply some epoxy filler halfway into each hole, insert the rebar (cut such that it will be about 1” to 2” short from the “top”), then “top off” each rebar hole with epoxy.
Then I’ll build a form on top of the good/remaining wall.
Will I need to apply a special product onto the inside of the form and the newly-exposed concrete for cohesion/adhesion purposes before I begin to fill the form with (what you called) “concrete”?
Having never done a job like this before, what type/brand of concrete do you recommend??
I assume that the form should be no higher than the wall I’m trying to build, so that I can use the top edge of each side of the form to level the “concrete”.

The data that you posted has some serious “cure” times. How long would you recommend that the “concrete” cure before removing the form? Will I need to apply a sealant to this “concrete” before attempting to re-tile? And if so, what type of sealant, and how long for it to cure?
Sorry for all the questions.
Your responses are very helpful, and I would love to post a successful story with pictures soon.
Thank you so much for your help…
John in DFW
 
Read through this thread. I think it answers most of your questions from someone who did it.


Enjoying this content?

Support TFP with a donation.

Give Support
When I re-opened this thread tonight, I saw a “Part Two”, which DID help me understand more about the concrete situation.
“Part One” was focused on cutting an expansion joint. I do have a question about what I read about cutting a “V” into a crack: the first thread I read recently mentioned cutting an “inverted V”, which to me meant that a crack would remain small at the surface, but would widen BEHIND the crack. But this article shows the opposite, where the cracks have been widened at the SURFACE.
I’m going to read it all again thoroughly tomorrow.