Plumbing breakdown, may be an extra fitting here and there not accounted for. I know allot of the stuff I'm posting on this thread is a bit redundant but I want to put as much on here to hopefully help someone else out in the future! 
Pool Plumbing, ALL 2” SCH-40 PVC or CVPC
INYO = INYOpools.com
PW = Pool Warehouse
LOWES= Lowes Deptford/Mantua found online in stock
Pool with 2 returns, 2 skimmers, 1 water feature, pump and filter assembly
-Total with double union ball valves excluding tax and shipping = $906.03
Total with single union ball valves excluding tax and shipping = $685.93
Total cost for heater bypass excluding tax and shipping = $234.14
Pool Plumbing, ALL 2” SCH-40 PVC or CVPC
INYO = INYOpools.com
PW = Pool Warehouse
LOWES= Lowes Deptford/Mantua found online in stock
Pool with 2 returns, 2 skimmers, 1 water feature, pump and filter assembly
-Total with double union ball valves excluding tax and shipping = $906.03
Total with single union ball valves excluding tax and shipping = $685.93
- (3) – 3-Way Valves $133.80 / $66.90 INYO
- CMP Pool and Spa 3-Way Diverter Valve, 2" Inside, 2-1/2" Outside, 25913-204-000
- (2) –2-Way Valves $129.02 / $64.51ea INYO
- CMP 2 Way Diverter Valve, 2" Inside, 2.5" Outside - 25912-204-000
- (5) – Union Ball Valves
- Double Union $290.00 / $58.00 each PW
- Astral 6622 True Union Ball Valve, 2 In. Socket, 2-Way, PVC
- Fully removable and rebuildable
- Double Union $290.00 / $58.00 each PW
- (5) - Single Union $69.90 / $13.98 each LOWES
- RELIABILT 2-in PVC Single union Sch 40 Ball Valve Item #209668
- $220.10 cheaper than double union valves but not rebuildable
- RELIABILT 2-in PVC Single union Sch 40 Ball Valve Item #209668
- (2) – Unions
- Slip-Slip Union $44.44 / $22.22 each LOWES
- (2) – Tee’s
- Slip Tee $9.90 / $4.95 each LOWES
- (21) - 90⁰ elbow
- Slip 90˚ elbow $96.18 / $4.58 each LOWES
- Charlotte Pipe 2-in 90-Degree Schedule 40 PVC pool sweep Elbow Item #23910
- (9) – Couplers
- Slip coupler $19.62 / $2.18 each LOWES
- (4) - Reducing Male Adapter
- 1-1/2” MPT – to – 2” slip reducer $20.88 / $5.22 each LOWES
- Charlotte Pipe 2-in x 1-1/2-in Schedule 40 PVC Reducing Male Adapter Item #137434
- (20) – 10’ sch40 PVC pipe
- $273.60 $13.68 each LOWES
- Charlotte Pipe 2-in x 10-ft 280 Psi Schedule 40 PVC Pipe Item #23832
- (1) - CPVC Orange Lava Hot Cut-In Cement (16 oz.) $20 each LOWES or Home Depot
Total cost for heater bypass excluding tax and shipping = $234.14
- ALL 2” PIPE AND FITTINGS
- (2) – 2-Way Valves $129.02 / $64.51ea INYO
- CMP 2 Way Diverter Valve, 2" Inside, 2.5" Outside - 25912-204-000
- (1) – Check Valve $50.78 INYO
- CMP Check Valve, 2" Inside 2-1/2" Outside, 1/2 lb. Spring - 25830-814-000
- (2) – Tee’s
- Slip Tee $9.90 / $4.95 each LOWES
- (2) Unions
- Slip-Slip Union $44.44 / $22.22 each LOWES


 . Shot the yard with a transit to figure out where the top rail would be, and we decided that we want the 24" of excavation to be from grade at the retaining wall. If we go with the grade at the fence line then the top rail will be 25" higher than the patio wall, kinda defeating the point (to us at least) of burying the pool. The con to this is that the rear of the yard is 12" higher at the fence than it is at the patio retaining wall so plans will be to build a 8-12" retaining wall at the back about 24" from the pool, there is about 8 feet from the fence line to where the pool is going to be and about 9' front the pool to the tree. Granted if we just backfill to grade will it be an issue structurally? I highly doubt it, but Wilbar says 24" to stay within warranty specs.


 but I'm hoping they are a bit quicker than that. Zoning literally approved the day I submitted. Everything has been ordered that isn't from a brick and mortar store and the remining is quoted out ready to be picked up whenever. Took the past few days to clean the piles of
  out of the garage and built the pallet racking I bought off marketplace a year ago lol. Having a gutter guy come out to give me a quote too. Gotta love the projects!

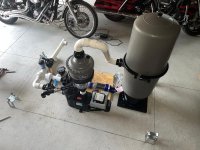
 . In the meantime all of my equipment came in and I decided to do a rough fit on my 3x6 “pad” marked out in the garage so I have an idea of what I want do outside. Pouring the equipment pad this week pending weather. I’m going to put anchors in the corners for 4x4s so I can build a house over it. Will be well ventilated and have a hinged roof and side access. I am pretty happy with it and think any servicing will be quick work when it needs to be done.