DIY 20' x 40' In-Ground Build - In Progress!

Thanks for all the feedback and help! It’s appreciated!

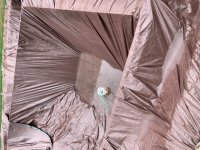
The tarps worked phenomenally well, pumped everything out and it’s as dry as can be. Was able to make a good amount of progress.

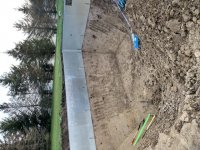
I got my first “oh Darn” moment. I continued shaving the back wall and found that the back wall dig was too deep in spots. I took some measurements and it looks like roughly 3”-4” too deep in a few spots. Looking for some guidance or reassurance here. Is this ok just to pool krete over or will I need to do something else? With it being a wall it seems not as simple as the base.

Thanks for any help.

8AA78524-6634-42FF-ACC1-4799A36AF6A3.jpeg0E9A4773-75B8-4FD2-85EA-10474D7FBF0F.jpeg
 
I did not really relax until I had my pool krete complete. Having said that...the goal should be to get the walls set and bond beam poured before tons of rain if possible or you might have to do some re-plumbing and squaring.

I took a week of vacation that started on a Monday. I did the pool dig layout over the weekend and I broke ground Monday morning. I was pouring my bond beam exactly 1 week later on a Monday morning. Not 1 drop of rain fell during that first week (I was blessed). I did breath a little sigh of relief once the bond beam was poured. I did pay a guy to help me dig that first week...two people get twice as much done and there is no way I would have been able to do the bond beam 7 days after breaking ground without 2 shovels working all week long. I started on plumbing immediately after the bond beam and due to the fact that I was contracting someone to do my pool krete...I had to work off of his schedule, so I did things slightly out of order and did the pool krete before the pool deck (not normal). Not a big deal...but pool krete, unlike concrete, does not get really hard. So you have to be careful knocking rocks and stuff on the pool krete and using ladders from inside or you will put little divots in it. I had some divots and patched them the day before I hung my liner.

If you are doing liner over steps or steps/tanning ledge, I would also advise you use concrete there instead of pool krete on the steps/ledge. The steps/tanning ledge are relativity shallow and if you jump on it/them you may dent it if it were pool krete. The pool bottom is not really an issue because by the time you are that deep in the water you have some buoyancy and your weight is not really a factor. You could do this when you pour the bond beam or when you pour the pool deck.

I did have rain, I ended up having 2 really big tropical storms, that made it all the way to Arkansas, that dumped 3-4 feet of water into my deep end. This was while I was doing plumbing and while it made the trench around the outside of the walls a muddy mess, it did not stop me. I had to pump the water out and buck out a bunch of mucky sludge that ended up settling in the bottom of the hopper.

That was a lot of typing to say...you can breath a little easier after the bond beam is poured and locked your walls in their plumb and square position. :)

Thanks! I reviewed your build thread and that was mostly what I gathered. I'm contracting out the excavation so I'm hoping to follow a similar timeline as your where I can take a week off of work, break ground on a Monday, and ideally get that bond beam poured before going back to work the following Monday. Our pool is going to be a bit smaller (16x30) so I figure it might be possible.

One thing I'm thinking of now is the order of operations, which I think might also parallel yours. I need to install and plumb my drains prior to pouring the concrete collar (I don't think I saw that your pool had drains.) So, I'll probably tackle that immediately after excavation and getting the walls up. Then concrete collar. I'll probably do the pool base prior to backfilling and like you did too though because we're doing pavers and it'll take some time until we can get that all done correctly.

Did you backfill with excavated soil or did you only use gravel to backfill?

EDIT: I'm going to make my own post. Apologies to @jastudee and I hope you'll make your way over to my post to share all of your lessons learned in the future.
 
No worries @dleonard1122 - my hopes in a thread like this is to document the journey and also learn more along the way and to help others interested in doing the same! I’ll be following your build as well.

Made more progress today. Was some hard work, but starting to see it all take shape. I’m sure this could be done faster, but I’m pretty happy with it.

Excavator is coming back Friday to finish, should be starting pool krete this weekend!

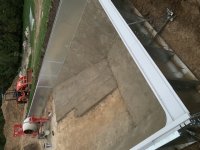
It’s still bothering me with the deeper spots where it was overdug on the walls. I’m debating whether to just roll with it and be sure to depress material into the deeper spots - or to skim coat or to get it all level and then do the main 2” base. Any thoughts?

15E9844C-A3CE-4860-984C-B4781F465D20.jpegA55B5CA4-4ED3-445E-AA3C-A32A405EF57B.jpeg
 
Easiest way to fix walls is to fling concrete. Grab a bunch of 50# bags they are easy to get into pool and mix on plywood with a hose spray very dry, with a shovel flipping material. Then use same flat shovel to fling on the wall and build up to get to 2". You can use the vermiculite to do it it's more expensive. 2" is ideal it helps it not crack, less will spider crack with time. Don't have to be too fussy. If you want a real nice bottom use screed rails or the head off a bull float works great too drag multiple directions.
 
@jimmythegreek - thanks a lot for the information and reassurance! My only concern was if there is any downside to having two layers of material built up? Although I assume the concrete creates a pretty solid mass behind the pool krete mixture. Any particular cement mix you recommend for building this up, or would any do just fine? Also, when you say with a hose spraying very dry - do you mean almost like a mist just slowly getting the mixture to consistency?
 
Neither. You are using it to pack with...like glorified gravel. The Portland in it holds its shape where gravel will fall. You don't want it mixed like concrete you want damp mix that is sticky. I use whatever brand 50# the supply house has that day it's just fill in reality no strength involved in the concrete
 
Neither. You are using it to pack with...like glorified gravel. The Portland in it holds its shape where gravel will fall. You don't want it mixed like concrete you want damp mix that is sticky. I use whatever brand 50# the supply house has that day it's just fill in reality no strength involved in the concrete
Perfect, thought about it a bit more and that’s exactly why I did - that’s reassuring. Appreciate the confirmation.
 
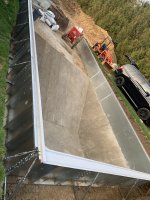
We have made some really good progress over the past 2 days. Finished up the dig, got everything shaved in and smoothed out, repaired the deeper dig portions and cranked out a bunch of the pool base yesterday. Hoping to have the vast majority of it done today.

I went to bed last night saying “ugh… everything hurts” 😂

Pretty happy with the results though.
 

Attachments

  • 21102A47-76C0-4FD6-9E1B-8FB54DFBCA00.jpeg
    21102A47-76C0-4FD6-9E1B-8FB54DFBCA00.jpeg
    158.8 KB · Views: 80
  • D1E07554-D753-4B24-8CB7-7DF63E706C29.jpeg
    D1E07554-D753-4B24-8CB7-7DF63E706C29.jpeg
    148.8 KB · Views: 80
  • A5CE27D6-C871-46DE-85FC-49D0EC5C9629.jpeg
    A5CE27D6-C871-46DE-85FC-49D0EC5C9629.jpeg
    118.9 KB · Views: 80

Enjoying this content?

Support TFP with a donation.

Give Support
Want to follow this up with one additional question. Wanted to see if someone here had the answer before I call the pool manufacturer. Typically I’ve seen the liner over steel stairs exposed on the top for an open pour. These stairs are not, but they are exposed behind the wall. Does this get filled with a flow able concrete or stone? Has me really confused..

You can kind of see it in the bottom right of this attached photo. Every step has a big opening like that on the back side.

There of course is no direction at all in the manual on this.
 

Attachments

  • 7A005D37-C76E-4F88-A005-0FDEF0778D99.jpeg
    7A005D37-C76E-4F88-A005-0FDEF0778D99.jpeg
    125.7 KB · Views: 46
No idea on your question, but everything looks awesome (except for the comment about everything hurting :ROFLMAO:) It will all be worth it though. So cool to follow!
 
More progress today! This is certainly the most labor intensive job I have done in a long time. I am still enjoying it, but man it’s back breaking. I applaud those who do it for a living every day.

Should wrap up the base tomorrow.

Can see the areas that the dig got a bit deep.
 

Attachments

  • 04ED8683-B820-45E3-B6D7-5B8FA2459CAB.jpeg
    04ED8683-B820-45E3-B6D7-5B8FA2459CAB.jpeg
    106.6 KB · Views: 67
  • CED79D91-D31C-4A24-898D-3AA4BF0E32DD.jpeg
    CED79D91-D31C-4A24-898D-3AA4BF0E32DD.jpeg
    113.3 KB · Views: 68
  • Like
Reactions: TKpoolOH and Lanzz
You want to fill in the stair voids to keep them from bouncing. Some stairs you can gravel pack as you assemble with clean stone, others you have to sloppy pour them from the back. Looks really good, makes it more work using a mixer. You can mix right on the hopper floor if you pour that first with your collar. Hose and flat shovel and it goes fast
 
Thanks @jimmythegreek!

Made some more progress today but not as much as I’d hope. Was going solo at it today, just the shallow end to do yet, that should be much easier now. I expect one more “shift” of doing pool base. Then I’ll give myself a day of smoothing, prepping for liner, and then liner!
 

Attachments

  • 6109974D-1351-40E9-981A-771D2C88F72C.jpeg
    6109974D-1351-40E9-981A-771D2C88F72C.jpeg
    651.1 KB · Views: 79
  • 948FEAB0-C8B8-47ED-9589-565DDA217A1E.jpeg
    948FEAB0-C8B8-47ED-9589-565DDA217A1E.jpeg
    675.2 KB · Views: 78
Like it alot. Not sure it's not on the to do list but I'd say to round off the break at the transition from shallow to deep end otherwise anything heavy or even the robot will eventually cut through the liner. Again I've never followed any of these so maybe thats the plan.....
 
I'm curious how you found working with the pool base? What was its consistency like, and does it harden enough to walk on eventually or do you still have to stay off of us until you get the liner poured?
 
You can walk on it the next day it's like an oatmeal consistency. You remove shoes and walk with socks to vacuum it all really well before liner install. It's the most important part of the install....nobody wants to feel a pebble or small rock under a new liner
 
  • Like
Reactions: dleonard1122
Jastudee make sure the inside transition of the angle hopper meeting the shallow break is a little flat. I don't go to the wall I stay 2 inches in and flatten the area a little. It's a spot that someone can step down the road and tear the liner. As someone else posted round the break line slightly you only want sharp lines in the deep end on concave lines. Looks really good from pics very nice job
 
  • Like
Reactions: newdude

Enjoying this content?

Support TFP with a donation.

Give Support
Thread Status
Hello , This thread has been inactive for over 60 days. New postings here are unlikely to be seen or responded to by other members. For better visibility, consider Starting A New Thread.