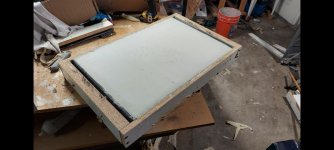
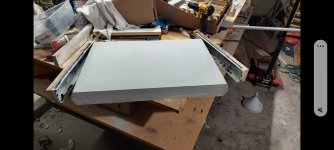
Yeah I was thinking of pouring smaller sections in forms upside down no more than 2 x 3 ft and then flipping and installing. I've seen videos where they pour in place and that looks way to hard to pull off by myself having no prior experience. I bet your outdoor kitchen looks awesome with the granite countertop.Its alot of work to make it look good enough to actually keep it. I did a top for an outdoor kitchen I built last year at my house. I ended up adding to it this year and the top wasnt that great so I just bit the bullet om granite. For small stuff you can flip its cake, pour in place is tough amd takes alot of work making the forms

DIY Hot Tub, 750 gallons, Questions and Build Updates (Finished!)
- Thread starter Dirrby
- Start date
You are using an out of date browser. It may not display this or other websites correctly.
You should upgrade or use an alternative browser.
You should upgrade or use an alternative browser.
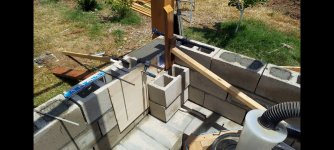
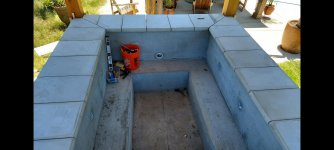
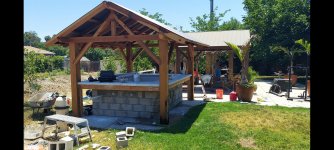
Finished the block work, installed the skimmer, and filled all but a few cores with cement and rebar. I was a surprised i needed another 20 bags of cement for that alone. I bought a cement mixer from HF a few weeks ago so it was a good time to finally put that to use. I also covered one wall with mortar as a test. I want to make sure I get a good bond before proceding. Should i have used a cement mix instead? I switched from quikcrete to ProFinish S type mortar and what a difference. Maybe it was user error, but i wont ever use that quikrete mortar gain after using profinish.
The SiderCrete should arrive on wednesday and I'm hoping to be ready to apply it next weekend, but we'll see. Side note, my TF-Pro test kit arrived yesterday. I need to brush up on pool school, but we'll let future me worry about that. Also still waiting on the spa components to ship. They said it was a 3 week lead time so maybe by the end of the week ill have a ship date.
The SiderCrete should arrive on wednesday and I'm hoping to be ready to apply it next weekend, but we'll see. Side note, my TF-Pro test kit arrived yesterday. I need to brush up on pool school, but we'll let future me worry about that. Also still waiting on the spa components to ship. They said it was a 3 week lead time so maybe by the end of the week ill have a ship date.
Attachments

S type may not hold up on a parge coat long term. We use a portland mix for parge coats its richer. What other suction do you have other than the skimmer or is that it? Looking good starting to shape up
Ok, I'll use a portland/sand mix for the rest of the parge coat. Thank you! There are two 2.5 inch drain/suction lines in addition to the skimmer.S type may not hold up on a parge coat long term. We use a portland mix for parge coats its richer. What other suction do you have other than the skimmer or is that it? Looking good starting to shape up
Just wanted to be sure you had suction lines down low. Look up different recipes for parge coats for your weather region. It's a regional thing, usually pertaining to the level of frost in your region
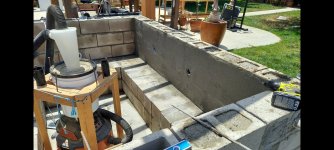
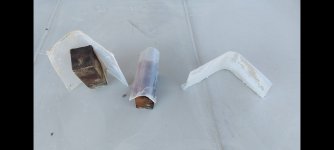
I'm almost done installing the coping. I ended up using Cement All instead of the concrete countertop mix I intended because I couldn't find it locally. Each "stone" is 24 x 16 x 2.5 inch and required a little over one 50 pound bag of cement. I needed 28 and ended up casting 30 after the first 2 didn't come out quite right. I cut down 4 inch ABS drain pipe to form the bull nose edge and built 6 forms but really only used 4 once I got into a rhythm. Progress is slower than I hoped (it always is) but I'm having a blast with this project and really enjoying the process.
Attachments
- Jul 3, 2013
- 9,028
- Pool Size
- 15000
- Surface
- Vinyl
- Chlorine
- Salt Water Generator
- SWG Type
- CircuPool SJ-40
I appreciate the compliment! Yeah I think they turned out pretty good for making them myself but I checked out your build thread and really like the white stone, chiseled edge you picked out! It's actually the exact style I had in mind but couldn't get my hands on white cement and the molds for chiseled edges were sold out (at least everywhere I looked online). I'm happy with the way it turned out but I'm kicking around the idea of white washing with lime to get more of that natural white stone look. Congrats on the build btw. I'll be following along to see how it all comes together!I bought mine from the "pro's" and yours look better")
- Jul 3, 2013
- 9,028
- Pool Size
- 15000
- Surface
- Vinyl
- Chlorine
- Salt Water Generator
- SWG Type
- CircuPool SJ-40
phonedave
Well-known member
- May 30, 2012
- 1,986
- Pool Size
- 17000
- Surface
- Vinyl
- Chlorine
- Salt Water Generator
- SWG Type
- Hayward Turbo Cell (T-CELL-5)
I appreciate the compliment! Yeah I think they turned out pretty good for making them myself but I checked out your build thread and really like the white stone, chiseled edge you picked out! It's actually the exact style I had in mind but couldn't get my hands on white cement and the molds for chiseled edges were sold out (at least everywhere I looked online). I'm happy with the way it turned out but I'm kicking around the idea of white washing with lime to get more of that natural white stone look. Congrats on the build btw. I'll be following along to see how it all comes together!
I just look at the number of bags of cement / mortar / concrete you have used and my back starts to hurt. Maybe 10 years ago for me. I set something like 200 linear feet of belgian block in cement last year (and that HF cement mixer more than paid for itself) and that was enough for me. I like masonry work, but I no longer like lugging around tons of material.
I always thought that if I did a concrete pool of some time (spa, etc) I would think about glass tile. I have been following Jimmy Reed of Rock Solid Tile for quite some time now. I could never afford him, but I do like looking what he does. I would love something like that.
darkrider
Well-known member
- Jun 14, 2021
- 289
- Pool Size
- 27000
- Surface
- Plaster
- Chlorine
- Salt Water Generator
- SWG Type
- Jandy Aquapure 1400
I'm not sure if you've finalized your choice in SWG, but here is another one to consider: The Hot Tub Wizard | Store | The Hot Tub Wizard. I have no direct experience with their controller. However, I've been using the Scepter replacement cells (same cell as in this package) for my Hot Spring Grandee, as it is plug and play with my factory ACE controller and they work extremely well! The Grandee is 500 gallons, and I had to dial this cell back some compared to the factory cell, so I have no doubts that it could keep up with an even bigger tub.Any recommendations on a SWG system? I'm considering pulling the trigger on a Blue Works BLH20. The price point is reasonable and the reviews on Amazon are decent.
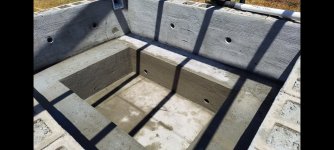
Finished grouting the coping and almost done applying the powerbase coat. I'm in the process of rounding the inside and outside corners. For that I cut out corner sections of a plastic tote to make the "tools" and its actually coming out pretty good. A few more rounds of touch up and light sanding and i'll be ready for plaster.
Attachments
To be honest after mixing my first batch of morter by hand and stacking just 4 blocks my back hurt and for a fleeting moment i considered hiring someone to do the blockwork. Glad i stuck with it. I actually started enjoying the hard work after my back stiffened up.I just look at the number of bags of cement / mortar / concrete you have used and my back starts to hurt. Maybe 10 years ago for me. I set something like 200 linear feet of belgian block in cement last year (and that HF cement mixer more than paid for itself) and that was enough for me. I like masonry work, but I no longer like lugging around tons of material.
I always thought that if I did a concrete pool of some time (spa, etc) I would think about glass tile. I have been following Jimmy Reed of Rock Solid Tile for quite some time now. I could never afford him, but I do like looking what he does. I would love something like that.
I took a peek at Jimmy Reed's work and wow. Glass tile looks great. Grouting tile is probably my least favorite thing to do so that was not something i really considered doing but see the appeal. Also, longer lasting than plaster i would think.
Thanks for the recommendation! Yeah i already bought the saltron mini but if in the future i decide to go inline I'll give this a look.I'm not sure if you've finalized your choice in SWG, but here is another one to consider: The Hot Tub Wizard | Store | The Hot Tub Wizard. I have no direct experience with their controller. However, I've been using the Scepter replacement cells (same cell as in this package) for my Hot Spring Grandee, as it is plug and play with my factory ACE controller and they work extremely well! The Grandee is 500 gallons, and I had to dial this cell back some compared to the factory cell, so I have no doubts that it could keep up with an even bigger tub.
- Jul 3, 2013
- 9,028
- Pool Size
- 15000
- Surface
- Vinyl
- Chlorine
- Salt Water Generator
- SWG Type
- CircuPool SJ-40
I will have about 2000 sq ft of 1 inch tile to installTo be honest after mixing my first batch of morter by hand and stacking just 4 blocks my back hurt and for a fleeting moment i considered hiring someone to do the blockwork. Glad i stuck with it. I actually started enjoying the hard work after my back stiffened up.
I took a peek at Jimmy Reed's work and wow. Glass tile looks great. Grouting tile is probably my least favorite thing to do so that was not something i really considered doing but see the appeal. Also, longer lasting than plaster i would think.
phonedave
Well-known member
- May 30, 2012
- 1,986
- Pool Size
- 17000
- Surface
- Vinyl
- Chlorine
- Salt Water Generator
- SWG Type
- Hayward Turbo Cell (T-CELL-5)
I will have about 2000 sq ft of 1 inch tile to install
If you look at what Jimmy Reed does, it is all (well a lot, maybe not all) in the prep. His people measure and skim the plaster so everything is whole tile as much as possible. No cuts in corners or on stair treads. There are some places you have to cut, like when two bullnose corners meet, but if he can avoid cuts, he does.
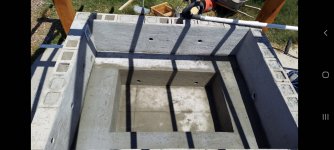
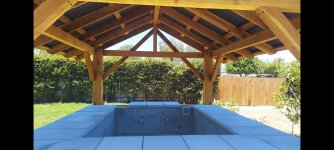
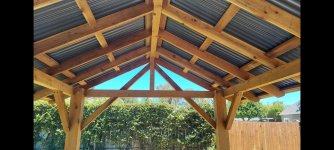
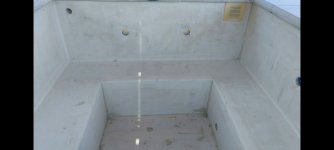
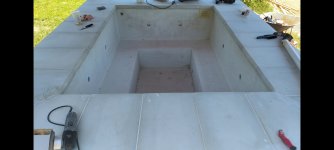
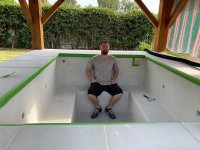
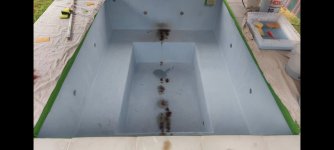
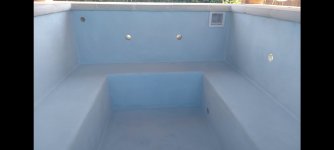
I finally got around to finishing the plaster. The first photo was taken before starting and I think provides a good reference as to the actual size of the tub. The second photo is the morning after the first coat. We had some unexpected rain that night and because i had yet to install the ridge cap on the pavillion it made a real mess. I cleaned it up the best i could but there were still light stains i'm hoping dont bleed through the second coat. So far so good, the last pic is after the second coat. There are some areas i may touch up, but overall I'm happy with the result.
Attachments
- Jul 3, 2013
- 9,028
- Pool Size
- 15000
- Surface
- Vinyl
- Chlorine
- Salt Water Generator
- SWG Type
- CircuPool SJ-40
Thread Status
Hello , This thread has been inactive for over 60 days. New postings here are unlikely to be seen or responded to by other members. For better visibility, consider Starting A New Thread.