Hello all! This is the first pool we'll be building and I need some advice on the quotes I'm receiving. What should I change, is there something missing, and is this a reasonable price for the Houston, Texas area? This will be a pool build only with decking around it.
Appreciate any help I can get to make sure I get this right
")
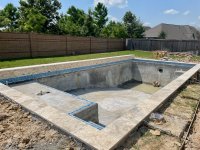
- Pool Size: 34x16
- Pool Shape: Geometric
- Pool Depth: 3'6" - 6'
- Plaster Finish: Pebble Sheen Level 1
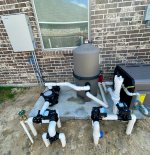
- Filtering System: Hayward 525 Cartridge Filter
- Filter Pump: Hayward Tristar VS 950 Omni
- Cleaning System: Hayward Aquanaut 450 Suction Cleaner
- Heater: Hayward H-Series Low NOX 500k BTU Induced Draft Heater
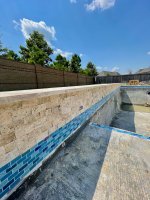
- Coping: Cross Cut Travertine 3cm Paver (haven't selected color)
- Waterline Facing: Glass/Mosaic Tile ($12 Allowance) - I haven't picked out the tile
- Skimmers: 2 Hayward automatic skimmers
- Pool Returns: 6 directional (included eyeball fittings)
- Sanitation: Hayward Salt Cell T-15
- Controls: Hayward Omni Logic
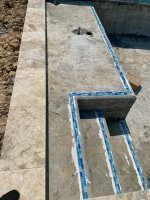
- Equipment foundation: Steel reinforcement 4 -1/2” bar bond beam. Floor and walls 8" o.c. with 3/8" rebar
- Drain System: Deck drainpipe (4” PVC) to the front curb with a pop-up. 8 Area Drain Grates (4" SDR). Gutters tied into drains.
- Maintenance equipment: 8'- 16' telescoping pole, 35' vacuum, net, brush, etc.…
- Visual Feature 1: 36' of 12" Raised Beam Finished in Spilt Face Travertine; Backside of Beam Wall finished in Sun Decking
- Visual Feature 2: Two (2) 18" Sheer Descents
- Visual Feature 3: One (1) Bubble Jet on Sun Shelf
- Decking: 511 sq. ft. finished in Sun Decking
- Lighting: Two (2) Hayward LED ColorLogic Pool Low Voltage Lights in Pool. One (1) Hayward LED ColorLogic 320 Low Voltage Lights in Sun Shelf.
- Sod: Replace damaged Sod due to excavation. Includes replanting of an existing tree in the backyard.
- Sprinklers: Repair damaged sprinkler due to excavation
- Fence: Reinstall fence for excavation
- Sleeves: 6 umbrella sleeves (One on sun shelf and 5 around the pool and decking)
- Cleaning Equipment: 8’-16’ telescoping pole, vacuum head, 35’ hose, plastic wall brush, leaf net, 2-in-1 test kit.
- Plumbing and Electrical: All pressurized pool plumbing around the pool and equipment run with Sch. 40 PVC pipe. Gas supply to pool equipment performed by Contractor. Where a backwash line is required, it will be run to a sanitary sewer with a p-trap. Electrical to equipment and Lighting performed by Contractor.
Total Price: $80,500
Does not include the landscape work around the pool other than sod replacement. New decking will be inline with existing patio cover.

 www.troublefreepool.com

 .
.

