Siris21

Member
Apr 7, 2022
16
Lafayette, IN
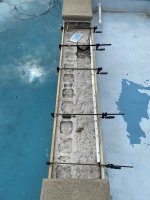
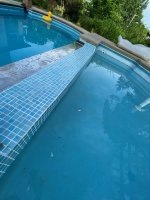
Hi! We purchased a home in September of 2021 which came with a less than 10 year old Fiberglass Pool and Splash Pool. The Splash Pool drains into the main pool through 3 spillways. We live in Indiana and had a particularly hard winter. During some spring clean up we noticed that some of the front face of the splash pool had succumbed to the winter freeze and become dislodged. We contact a plaster repair person to repair the spot, and he pointed to the leaky tile around the spillways allowing water to get behind the plaster work.

This was an unexpected repair, and I would prefer to do it right so it will last. So I have a couple of questions:

1. How to repair the front face (under the spillways) properly? This area was originally tiled when the pool was installed, but the tile did not hold up to the Indiana winters. We plan to plaster with metal lath. and then stain and seal. Open to other ideas!
IMG_2330.jpg
2. How to repair the spill ways. I have included pictures showing the rough fiberglass openings. I am open to re-skimming with concrete (not sure how to manage the transition from fiberglass to concrete), re-tiling (with some help on best practices for winter), or adding a custom stainless steel spillway that would run the entire length, with an apron in the splash pool ($390/each).

I appreciate any help you can offer, I would love to be better educated before hiring someone to do the work!


IMG_2326.jpgIMG_2327.jpgIMG_2328.jpgIMG_2329.jpg
 
1. How to repair the front face (under the spillways) properly? This area was originally tiled when the pool was installed, but the tile did not hold up to the Indiana winters. We plan to plaster with metal lath. and then stain and seal. Open to other ideas!

So a plaster repair person proposes repairing with plaster. I am sure a tile repair person would propose repairing with tile.

I think metal lathe with plaster is the wrong material for a spillover. The metal lathe will rust and put metals into the water. Plaster is made to be submerged, not exposed to the elements.

Stone or ceramic tile is the correct surface for a spillover. The tile you had on does not look like pool grade ceramic tile. And it does not look like it was applied properly.

Below are recommendations for the proper tile installation, Then there needs to be annual maintenance of the grout so that small cracks are sealed and you don't allow water to get behind the tile to damage it during the winter.

Any ice will be damaging to your tile. You can’t prevent hairline cracks from appearing in the grout. Water gets into the cracks and behind the tiles. When the water freezes it expands and slowly pushes the tile away from the thinset. It is cumulative and develops over time and freeze cycles.

Do you drain the water below the tile line for the winter?


1647701865056-png.395469

1647701770841-png.395468

1647701893651-png.395470

1647701920555-png.395471

1647702071819-png.395472

1647702097563-png.395473


2. How to repair the spill ways. I have included pictures showing the rough fiberglass openings. I am open to re-skimming with concrete (not sure how to manage the transition from fiberglass to concrete), re-tiling (with some help on best practices for winter), or adding a custom stainless steel spillway that would run the entire length, with an apron in the splash pool ($390/each)


View attachment 399731View attachment 399732View attachment 399733View attachment 399734

I think this area also needs to be properly tiled and maintained.

A stainless steel spillway will eventually rust on you.
 
Last edited:
  • Like
Reactions: Siris21
So a plaster repair person proposes repairing with plaster. I am sure a tile repair person would propose repairing with tile.

I think metal lathe with plaster is the wrong material for a spillover. The metal lathe will rust and put metals into the water. Plaster is made to be submerged, not exposed to the elements.

Stone or ceramic tile is the correct surface for a spillover. The tile you had on does not look like pool grade ceramic tile. And it does not look like it was applied properly.

Below are recommendations for the proper tile installation, Then there needs to be annual maintenance of the grout so that small cracks are sealed and you don't allow water to get behind the tile to damage it during the winter.

Any ice will be damaging to your tile. You can’t prevent hairline cracks from appearing in the grout. Water gets into the cracks and behind the tiles. When the water freezes it expands and slowly pushes the tile away from the thinset. It is cumulative and develops over time and freeze cycles.

Do you drain the water below the tile line for the winter?


1647701865056-png.395469

1647701770841-png.395468

1647701893651-png.395470

1647701920555-png.395471

1647702071819-png.395472

1647702097563-png.395473


I think this area also needs to be properly tiles and maintained.

A stainless steel spillway will eventually rust on you.
Thank you for this really detailed reply!

The pool is drained 12" below the skimmer over the winter and the splash pool empty or almost empty which makes the tile clear of water during the winter months. We suspected that the tile was perhaps not done correctly and was also not likely properly maintained.

We really appreciate the notes on metal lath near the pool, I can envision the rust marks if it gets wet just streaming down the face of the pool.

We have talked ourselves into tile and plan to try to do the work ourselves, it appears that if we take the process slow, get the right tools and materials, the process is pretty straight forward...plus if it needs repaired down the road we know what we are doing.

The guide looks really detailed and at first glance is intimidating, however you gave me several different options for each stage!!! Very open to any other tips!!
 
Print out and do what @ajw22 wrote out. It is the best practices out there for what you are facing!

Good luck and keep us in the loop each step of the way so we can :kim: you on!
Thank you! We will print, follow, and document the process:

  • Demo (Using foam and plastic tarps to keep debris out of the pool
  • Repair any concrete that needs patched before prepping the mortar base
  • Waterproof barrier
  • Mortar Base (may hire this out to a professional concrete finisher depending on how level it is after demo)
  • Waterproof layer 2
  • Thinset and tile with glass tile!
We can do it!!
 
  • Like
Reactions: kimkats
Good morning, just a little update! We demo'd the old tile, and thin set to get back down to a solid base to work with! Unfortunately the two center sections of our spillways (the raised islands) were so badly degraded from water penetration over the years that they no longer had enough workable material...soooo we removed them. We will now have one big spillway instead of 3 small ones. This should make a great little tanning ledge! I cannot believe that I took a saw to our pool yesterday!

Here are a couple of pics (and yes the pool got shocked yesterday as well)
 

Attachments

  • IMG_1643.jpg
    IMG_1643.jpg
    632.9 KB · Views: 37
  • IMG_1644.jpg
    IMG_1644.jpg
    611 KB · Views: 38
Did you have to take a few deep breaths before the first cut?? Well done! You have a solid plan and are putting it to work.

Now lets work on that water. Do you have a good test kit? See the ones we use for our pools Test Kits Compared
yeah I know the pool $tore will test your water for "free' BUT is it really free if you walk out of the store with your arms full and wallet empty? We can teach you how to care for your pool using stuff from Walmart, Target, Lowes...............how neat is that?? Look in my signature for the "recommended chemicals".

We do something called a SLAM here is a link SLAM Process It is VERY good at clearing a pool using liquid chlorine. You do need to be able to test the levels for it so...............get the test kit on the way and add a jug of liquid chlorine a day with the pump running 24/7 to keep it from getting worse.
 
  • Like
Reactions: Siris21
Morning! I wanted to drop some progress photos! We completed the demo, and switched to a 7 foot spillway design. We took out all of the bad concrete and got down to good material. We decided to ease the pressure on the fiberglass by reinforcing it with a piece of angle aluminum secured in 6" intervals with stainless hardware which will be tiled over. We then attached the aluminum to remesh before pouring. We used a polymer reinforced cement for the repairs and a fiber reinforced for the base pour!

IMG_2569.JPGIMG_2571.JPGIMG_2586.JPGIMG_2590.JPGIMG_2595.JPG
 
  • Love
Reactions: kimkats

Enjoying this content?

Support TFP with a donation.

Give Support
Here's a follow-up on the long but fruitful process!
  • Attached the fiberglass splash pool to the concrete with metal bracing and rebar, poured over that and allowed to fully set.
  • Poured mortar base over that and waterproofed with Basecrete Intercept and followed it with 2 coats of Basecrete
  • Mapei Thinset with Glass Tile from OceanMosaics
    • Keragard Silicone Adhesive and Grout
  • Stainless Steel Overflow lip installed
  • Front face of overflow is 2 coats of Basecrete which will get a 3rd coat of white Basecrete followed in a few weeks with a color match to the rest of the pool!
IMG_3111.HEIC.jpegIMG_3112.HEIC.jpegIMG_3113.HEIC.jpeg

Thank you for all of the guidance and support...you all empowered us to take ownership of this project and see it through to the finish line! Big shout out to Loyal at Basecrete for spending more time than he probably should have walking us through the process!
 
Thread Status
Hello , This thread has been inactive for over 60 days. New postings here are unlikely to be seen or responded to by other members. For better visibility, consider Starting A New Thread.