I am rebuilding the burner tray of my Raypak P-R406A-EN-C Heater. I purchased most of the parts, but there is no details on the pilot assembly. Does anyone have a picture or diagram. I believe I have the Honeywell IID Atmospheric Pilot.

Raypak Heater Burner Manifold Rebuild. P-R406A-EN-C
- Thread starter zzed
- Start date
You are using an out of date browser. It may not display this or other websites correctly.
You should upgrade or use an alternative browser.
You should upgrade or use an alternative browser.
- Jul 21, 2013
- 52,825
- Pool Size
- 35000
- Surface
- Plaster
- Chlorine
- Salt Water Generator
- SWG Type
- Pentair Intellichlor IC-60
Is this the manual for your heater... http://cdn.globalimageserver.com/FetchDocument.aspx?ID=c404f1c5-ac50-4209-9457-56246d010b20. Figure 62 on page 34 shows a picture of the pilot assembly.

Yes thank you. I purchased the whole assembly from Raypak, part number 002003F. But how does it connect to the burner manifold. The bracket assembly is not shown. I think because there are a few pilot options. Mine was so rusted it was unrecognizable. I purchased a few of the brackets but have no idea what is should look like.Is this the manual for your heater... http://cdn.globalimageserver.com/FetchDocument.aspx?ID=c404f1c5-ac50-4209-9457-56246d010b20. Figure 62 on page 34 shows a picture of the pilot assembly.
View attachment 472917
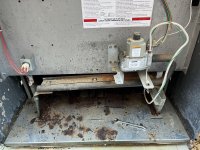
The bracket slides onto the notch on the right side and secured with the ground wire and screw in the front. The pilot is secured inside the square part of the bracket with a single screw. The spark should be facing up. You will want to secure the pilot first and bracket after.
Which bracket. I purchased two. 010352F and 306692. Is there any diagram that shows the assembly?The bracket slides onto the notch on the right side and secured with the ground wire and screw in the front. The pilot is secured inside the square part of the bracket with a single screw. The spark should be facing up.
the given model number is for a polymer atmo so #306692 bracket is needed. As far as diagrams they are vague in the manual. You could look up a YouTube. But assembly is pretty straight forward.
Last edited:
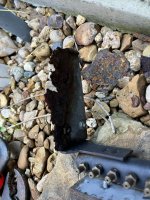
Make sure the proper orifice is installed with the pilot. The pilot assembly should come with a small diagram picture.
Thank you. Yes ive seen this burner refurbished on youtube but no good shots of the pilot assembly. Others are different burner types on different heater models. I'm not a pro so I just looking for more details. THANK YOU!Make sure the proper orifice is installed with the pilot. The pilot assembly should come with a small diagram picture.
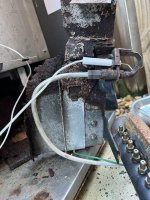
Should also note this isn’t normal wear and tear. There is an internal leak somewhere that needs to be addressed I would check the header and back header. It’s leaking inside the cabinet somewhere.
Thread Status
Hello , This thread has been inactive for over 60 days. New postings here are unlikely to be seen or responded to by other members. For better visibility, consider Starting A New Thread.