Pool Build - California Dreaming - 3 Years Closer

Re: Pool Build - California Dreaming

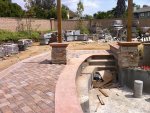
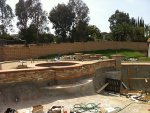
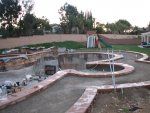
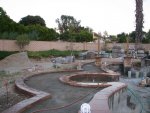
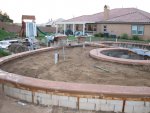
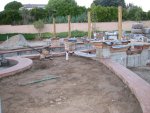
The second round of coping is now done. In total we have now poured over 120 CY of concrete, 20 CY of colored concrete to form the pool coping and the exterior band of coping that will frame the pavers, plus the caps to the columns and various raised walls to the stairs and the sunk-in swim up bar. This added some cost to the pool project, which is now just north of $65K.

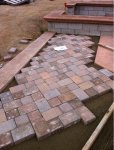
It was actually exciting to see it come together and start to lay the paver base. I was going to wait to do the deck last to prevent staining from the plaster but the inspector advised me to complete it right away due to the confusion regarding the equipotential bonding grid; so why look a gift horse in the mouth, right?

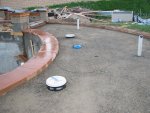
Today, I installed the deck laminar jets; you can see them below in the deck. These are fiberoptic lit and will shoot arched color lit streams of water into the pool. We ran the last few deck drains. Enjot the pics.

Let me know what you think.
 

Attachments

  • IMG_3889.JPG
    IMG_3889.JPG
    174.1 KB · Views: 665
  • IMG_3868.JPG
    IMG_3868.JPG
    205.9 KB · Views: 660
  • IMG_3869.JPG
    IMG_3869.JPG
    183.5 KB · Views: 662
Re: Pool Build - California Dreaming

In the pictures you may notice that I covered most of the poured in place column caps, wall caps and steps with reflective sheets to slow down curing process and reduce direct exposure from sun. After having numerous cracks already appearing in some the pool coping, I got really concerned and basically did things different than before. I think they stategy worked. So far no cracks have developed in the new pour. In a copule days we should have a good portion of the paver deck complete. Thanks.
 

Attachments

  • IMG_3885.JPG
    IMG_3885.JPG
    175.5 KB · Views: 659
  • IMG_3890.JPG
    IMG_3890.JPG
    218.3 KB · Views: 660
  • IMG_3881.JPG
    IMG_3881.JPG
    176.9 KB · Views: 656
Re: Pool Build - California Dreaming

Has the Paver guy seen all those curves yet? I've only got a 1/10th the area you have in Pavers and it took a couple DAYS to make my cuts. :)
You are going to have a wet saw running in the yard for a week (or two).
 
Re: Pool Build - California Dreaming

The price one pays for putting design before thought. :hammer:
I was already concerned before your advertence as there will be cuts on both sides of the curved coping.

I calculate at least 1000 cuts which should take about a week. The areas where the pavers will lie has already been cleaned, filled and compacted. That took a little under two days. I am hoping install goes fairly painfree.

Below is the pattern we are going with. Aside of the interesting design, I chose this principally because it was a near 50/50 distribution of the 6x6 and 6x9 pavers we purchased.

Regards.
 

Attachments

  • slatepattern245.jpg
    slatepattern245.jpg
    335.9 KB · Views: 579
Re: Pool Build - California Dreaming

Today was an exciting day to see the pavers begin to go down withing the coping "frame".

The "boot" pattern looks better than I thought. The trick and time consuming thing will be color distribution and of course the many, many, many, many cuts.

Let me know your thoughts.
 

Attachments

  • IMG_1149.jpg
    IMG_1149.jpg
    112.8 KB · Views: 560
Re: Pool Build - California Dreaming

Here are some recent pictures with the tarp removed from the exterior coping, column caps, stairs, etc. I am also posting updated pictures of the paver installation. They are moving at a fairly good pace. The pool deck, raised spa and stairs together call for about 2400 sq ft. of pavers. At the pace its going. I think it will take 6 days including compaction.
 

Attachments

  • IMG_1163.JPG
    IMG_1163.JPG
    219.3 KB · Views: 526
  • IMG_1160.JPG
    IMG_1160.JPG
    275.6 KB · Views: 526
  • IMG_1162.JPG
    IMG_1162.JPG
    240.8 KB · Views: 526
Re: Pool Build - California Dreaming

Thanks Flippy. Starting to circle the final few laps (I hope).

There is still alot more to complete. At this juncture we have the following left:

1. Glass Mosaic Tile Installation
2. Equipment Hookup
3. Swim up bar top and sunkin patio
4. Ledger stone on all exposed areas
5. Site Clean Up
6. Plaster
7. Water Fill
8. Margaritas :cheers:
 

Enjoying this content?

Support TFP with a donation.

Give Support
Re: Pool Build - California Dreaming

spillmar said:
Thanks Flippy. Starting to circle the final few laps (I hope).

There is still alot more to complete. At this juncture we have the following left:

1. Glass Mosaic Tile Installation
2. Equipment Hookup
3. Swim up bar top and sunkin patio
4. Ledger stone on all exposed areas
5. Site Clean Up
6. Plaster
7. Water Fill
8. Margaritas :cheers:

You should increase your margarita to work ratio.
 
Re: Pool Build - California Dreaming

I'll bet you'll be happy when all those pallets are empty. I have used over 20 pallets myself and probably have 10 left to go... Every day you enjoy seeing what has been accomplished and I've enjoyed looking at your progress.
, Ed
 
Re: Pool Build - California Dreaming

looks great! I love the pavers! I am going to continue my existing pavers from my patio onto the pool deck. have you talked to anybody about the mastic issue between to coping and deck. I have seen a bunch of pics on paver decks where there does not seem to be mastic. It does seem counter productive seeing as it is not a sold pour. I assume the mastic is an important issue seeing as it is used on solid pours..... is there an alternative?
 
Re: Pool Build - California Dreaming

Here is an update. Almost halfway done with the paver deck after 3 days. Pretty good timing considering the size of the deck is almost 2000 sq ft.

As to mastic, my understanding is that the pavers have enough give to handle the movement. I may be wrong however, we shall see. :?
 

Attachments

  • Pavers.jpg
    Pavers.jpg
    108.8 KB · Views: 382
Re: Pool Build - California Dreaming

Thanks CCP for the kind words. I would love to see pictures of your pool build if you had not posted it already.

Today I we received our ornamental iron pool fence panels. There is a lumber company in Riverside that is selling Fortress Iron Versai panels for half price. This are adjustable rake fencing which eliminates the stepped up or down look on fences with changing grades. To me its more pleasing on the eye.

Our fence will run the shortest distance from the wall of the house around the curved portion of the patio closest to the house and then up the sloped hill and fastened to the property's back wall, effectively closing off the entire back portion of our lot to entry.

Since we feel in about 3 years or so the fence will be removed and we do not want to drill into the coping, I have opted to use Oz-Posts. These are not that expensive (about $12 per post holders). They are basically spikes with sheaths in which you insert the fence support posts. They make these for iron, wood, vinyl and even for decking supports. They are fairly easy to remove and withstand in many cases more lateral pressure from wind. Below is a picture of the Oz-Post.

As to the fence design, I am considering to alternate between the 2x2 black coated galvanized steel post with 12x12 stone columns so it gives the fence a more estate look. Here is a sample image of what I have in mind except that the posts will be lined with the same ledge stone as the raised bond beam and stair walls.
 

Attachments

  • westwood_mills fence post.jpg
    westwood_mills fence post.jpg
    50.3 KB · Views: 335
  • ozp_i2850_2a.png
    ozp_i2850_2a.png
    26 KB · Views: 333

Enjoying this content?

Support TFP with a donation.

Give Support
Thread Status
Hello , This thread has been inactive for over 60 days. New postings here are unlikely to be seen or responded to by other members. For better visibility, consider Starting A New Thread.