I don't know where you are in your process, but if I had your pool, I would be looking at remodeling it to look like a mid-century modern pool. The shape you have is perfect for the style. You might also like how inexpensive things like coping and such are for a MCM. Google "mid century modern pool" and you'll see what I mean.

OKC renovation - forty-year facelift
- Thread starter MiaOKC
- Start date
You are using an out of date browser. It may not display this or other websites correctly.
You should upgrade or use an alternative browser.
You should upgrade or use an alternative browser.
Hi Robbie! I googled pics and MCM pools are cool! Our house is sort of a Shingle style neocolonial, Dutch Gambrel, and we're trying to tie the pool in by heading in a kind of "Hamptons/East coast" direction, as best we can with a backyard full of bamboo (zen style?) and within our budget. We'll see where we end up!
Texted PB yesterday and found that PB rescheduled coping pour for Tuesday rather than Monday but didn't mention it to us. We'd already taken Monday off work to be here for it. Let's just summarize my reaction: BLEEEEEEP!
Moving on, coping now scheduled for Tuesday. Discussed the drainage situation with DH and the PB. Taking into consideration the helpful input here (thanks, bmoreswim!), and the history we had with rain flooding over our retaining wall and trashing the pool, thus sucking us into a multi-week SLAM cycle and killing our swim time, we've decided to use the channel drains at the base of the retaining wall. They move a lot more water, and drainage is one of those un-sexy things that you don't think about until you need it and I don't want to regret not taking care of an issue I know we have had to the best of our ability during this time where everything is torn up. My goal is for my pool to NEVER FLOOD AGAIN and the channel drains will help me with that. PB is also installing box drains behind the retaining walls to help, too. The channel drains will be within a an inch or two of the base of the wall, which for the most part is adjacent to walkway (3-4 ft wide section of deck) rather than more usable deck space, except for in one area where the decking does get up to 12 ft deep so we will have lounges or something there, and the drain will be tucked up to the wall pretty well.
We will use the pour-a-lid deck drains on any deck drains away from the retaining wall, so in the places closer to the house or in the large swaths of deck with a more visible impact and higher usage areas, they will be a more "hidden" solution. I'm keeping in mind that we are going from practically ZERO drainage back there and think this will be a radical improvement. The way our property is oriented, our house is on a slight hill, both from front to back and left to right, so the highest point in the yard is the upper right (looking from the back door out at the yard), so we have two slopes to deal with, with the pool oriented exactly to catch the runoff both downhill and sideways. Our previous deck had no drains, but was slightly sloped to send water to the driveway and down to the left side of the property. We think there might have been a really ineffective drain installed behind the retaining wall, but it was not doing its job and we cannot figure out exactly how it was supposed to work with the contour of our site.
Had lovely weather this weekend and took the opportunity to go out and measure to work on the final design for our pergola. After a lot of discussion, I think we have decided to switch from a cantilevered design to a traditional style. The finished product will be about 8 feet x 32 feet (roughly double the size of the pergola we built at our last house). We didn't think the cantilever was going to give us that sense of "outdoor room" that we wanted to have, and to cantilever it effectively (as far as we could tell with our rudimentary construction/engineering knowledge) would require so many posts and bracings we were worried about the structural integrity versus aesthetic considerations we were facing. DH also worked on the measurements around the pool and this new rendering is a more accurate representation.
So, we paced it out and even laid it out with spare electrical conduit the electrician has left in our driveway, and I think this is what we're going with:
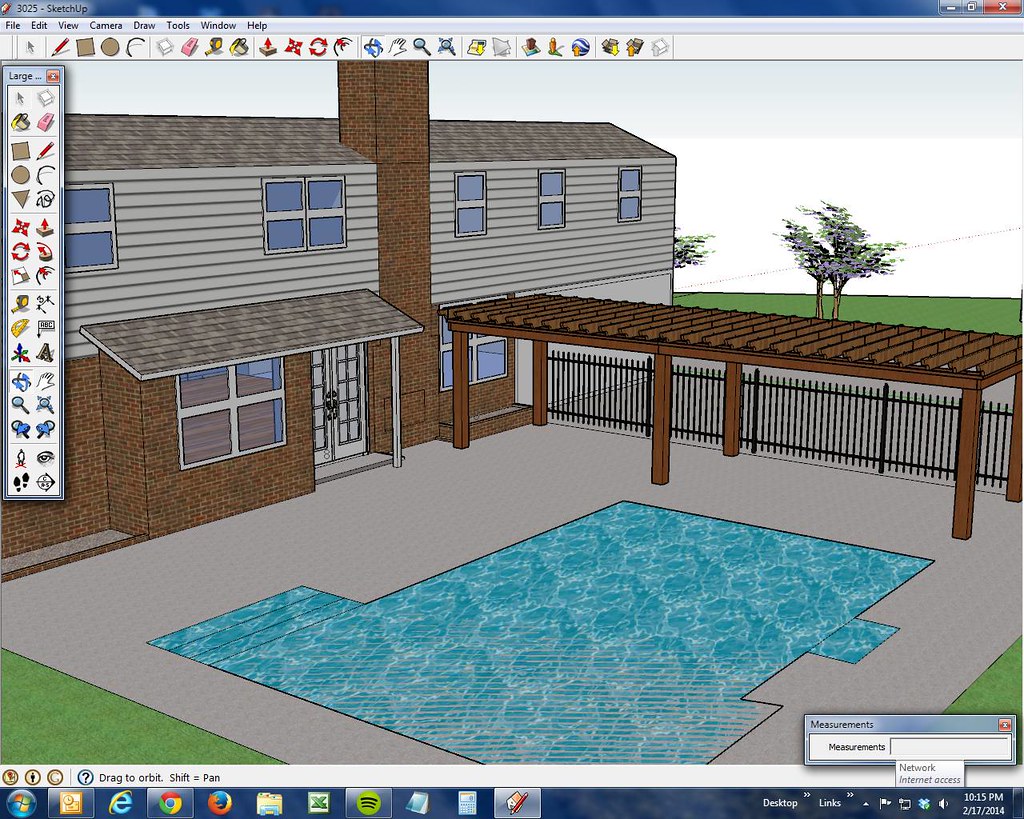
Versus version one:

Conduit mockup:
Street-level render (have to re-do the area by the pool steps - our shell has another little jog so the deck is really more walk-way width there):

In other good news, coping pour is today! There were workers actually on site today (first time in a month!!!!) and I'm ecstatic to move forward.
So, we paced it out and even laid it out with spare electrical conduit the electrician has left in our driveway, and I think this is what we're going with:
Versus version one:
Conduit mockup:
Street-level render (have to re-do the area by the pool steps - our shell has another little jog so the deck is really more walk-way width there):
In other good news, coping pour is today! There were workers actually on site today (first time in a month!!!!) and I'm ecstatic to move forward.
Six guys working today and they are making tons of progress! Wish they were here everyday - we'd be done by the weekend! ")
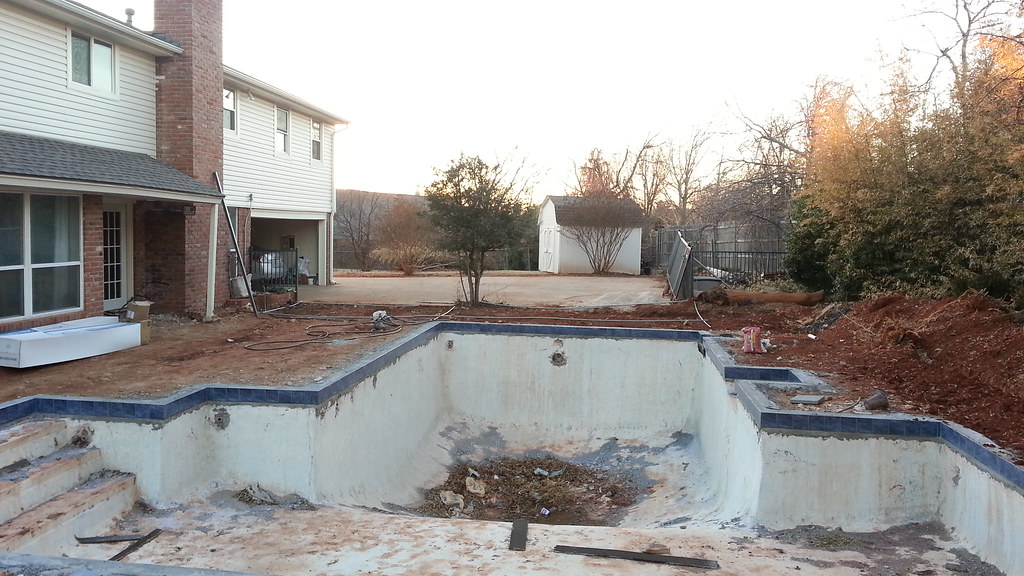
About 3 yards concrete poured for the coping. The forms were set in place (they look like styrofoam), and are held in place by wires affixed to the bond beam. I'd requested the PB discard the plastic tile strips since this isn't a cantilever deck so I don't have the plastic tile strip covering my lovely new tile. Then, 2x4s are staked out to create the back of the form. It only took the crew about an hour to unload and fill all the forms, and then spread the concrete level and smooth. They are waiting for it to set up a little and then they'll remove the styrofoam fronts and stamp the texture onto the surface. In the meantime, they are using the bobcat to level out the ground around the rest of the deck, dig the rest of the drainage channels by the retaining wall, and form up the 2x4s for the rest of the deck to be poured next time we get a nice weather window (probably not this week, I fear.)
PB also took a massive hammerdrill and started to get the hole in the shell made for the autofiller. That was a tense moment for me!
Mia - the pergola will be nice - that will give you plenty of shade when you want it. Glad to see they are back to work and hope the good weather continues!
I'm diggin it!  I like the pergola, and the drain trench will indeed move a whole lot of water. BTW, those concrete forms are styrofoam.
I like the pergola, and the drain trench will indeed move a whole lot of water. BTW, those concrete forms are styrofoam.- Jan 21, 2014
- 1,069
- Pool Size
- 20000
- Surface
- Plaster
- Chlorine
- Salt Water Generator
- SWG Type
- Pentair Intellichlor IC-40
I like the forms you chose. That's going to look great. (the tables have turned, now I get to envy the fact you're getting work done and I'm not).


Thanks, everyone! The color is starting to develop, I think I'm going to love it *fingers crossed*. The wet concrete is really dark, so as it's drying the lighter blue gray color (DCI Weathered Tin) is beginning to show. Here's a few pics, including one pour a lid that looks good but one that looks like it won't open (presumably there is some plan to free it from the skimmer top?)


Ummm, I think I see a problem.

Also today, a lone worker came by to work on installing the auto filler. This necessitates a big hole to be drilled through the shell, about 2" - 2 1/2" diameter, with a hammer drill. I happened to look out the window and saw the worker walk by with a work glove pressed to his face. I'd been thinking about stepping out to offer a Coke when he wasn't drilling, so I poked my head out the door in time to see that half his face was covered with blood! The drill bit had gotten bound up and the drill body got away from him, swinging around and clubbing him three times on the right side of his head. With his head sort of stuck between the wall of the pool and the drill body, he really got nailed with three large, jagged cuts and a whopper of a knot on his orbital socket. (Filler hole is on the wall just to the left side of the steps in the picture)

He was really irritated with himself for getting hurt through carelessness, said he'd have chewed out any young pup on a job site who operated the drill that way (with head too close/under the drill body). I got him cleaned up, bandaged and gave him some tylenol and an ice pack, thinking he might ice his head a bit. I looked out the window a minute later and he was back at it, plugging away with the drill! He lasted a while longer but ended up giving himself another wallop (I'm afraid he wasn't feeling too clear from the first incident) and a terrible headache so he decided to make for his home couch. After he left I got worried that he'd given himself a concussion so called the PB to ask him to check in on him this evening - luckily PB says he has a roommate so at least doesn't live alone. I told my husband if I hadn't happened to be working from home today due to construction on our office, that guy might have knocked himself out cold and been in the bottom of the pool all day!
Ummm, I think I see a problem.
Also today, a lone worker came by to work on installing the auto filler. This necessitates a big hole to be drilled through the shell, about 2" - 2 1/2" diameter, with a hammer drill. I happened to look out the window and saw the worker walk by with a work glove pressed to his face. I'd been thinking about stepping out to offer a Coke when he wasn't drilling, so I poked my head out the door in time to see that half his face was covered with blood! The drill bit had gotten bound up and the drill body got away from him, swinging around and clubbing him three times on the right side of his head. With his head sort of stuck between the wall of the pool and the drill body, he really got nailed with three large, jagged cuts and a whopper of a knot on his orbital socket. (Filler hole is on the wall just to the left side of the steps in the picture)
He was really irritated with himself for getting hurt through carelessness, said he'd have chewed out any young pup on a job site who operated the drill that way (with head too close/under the drill body). I got him cleaned up, bandaged and gave him some tylenol and an ice pack, thinking he might ice his head a bit. I looked out the window a minute later and he was back at it, plugging away with the drill! He lasted a while longer but ended up giving himself another wallop (I'm afraid he wasn't feeling too clear from the first incident) and a terrible headache so he decided to make for his home couch. After he left I got worried that he'd given himself a concussion so called the PB to ask him to check in on him this evening - luckily PB says he has a roommate so at least doesn't live alone. I told my husband if I hadn't happened to be working from home today due to construction on our office, that guy might have knocked himself out cold and been in the bottom of the pool all day!
Yesterday they came out and cut the relief joints in the coping. I cannot say I am totally happy with the placement of some of the joints, but not sure there's anything I can do at this point. Around each skimmer, it seems to me there should be a joint at the reentrant corners or I will definitely get cracks, so I think will need to ask for those, and I'm irritated that my pour-a-lids which are supposed to be hidden now stick out like sore thumbs since a joint has been run right into the lids. Ugh. Trying to focus on the positive, overall the coping looks good and I love how the color is turning out.


kgclark
0
One suggestion....
It appears from your SketchUp rendering that the view through the window from inside the house will be looking directly at the side of the pergola rafters. You might consider raising the height of the pergola so that the girders and rafters are above the window head.
It appears from your SketchUp rendering that the view through the window from inside the house will be looking directly at the side of the pergola rafters. You might consider raising the height of the pergola so that the girders and rafters are above the window head.
- Jul 16, 2012
- 7,212
- Pool Size
- 27000
- Surface
- Plaster
- Chlorine
- Salt Water Generator
- SWG Type
- Hayward Aqua Rite (T-15)
I see what you mean on the skimmer lids. You might give consideration to cutting a groove in the pour-a-lid covers as well. Perhaps a 1/4" groove done with a circular saw and an abrasive blade. If you do it carefully, you could start and stop just after and prior to the lip of the pour-a-lid cover to keep that rim intact.
Then if you always replace the lid in line, it will still blend in pretty well.
Another option is to have all those joints filled with matching caulk and they might blend in a lot and not bother with the skimmer lid groove.
I wouldn't see myself worrying about the potential cracking at the sides of the skimmer insets. Just a gut feel though.
Regardless, the pour-a-lids are invisible in comparison the the plastic. Love the color of the coping.
Well, it looks like they are moving along anyway. Good to see it Mia. I am getting ready for yours to be done as much as I am mine. I'll admit, I'm impatient I know, but when you get this far and then it slows down...its a little trying. So, good to see them working on yours! They were working on mine last week and some this week, then.....nothing. No one shows up for three days.
It just makes you
It just makes you
- Jan 21, 2014
- 1,069
- Pool Size
- 20000
- Surface
- Plaster
- Chlorine
- Salt Water Generator
- SWG Type
- Pentair Intellichlor IC-40
I'm liking the color of the concrete.
I'm with the fellow above. Score a line in the pour a lid concrete. I have noticed that expansion joints seem to almost always be dead center of the skimmers. I think there must be a reason for this. Your lids still look better than a white lid.
Hope the guy with the head injury is okay. That had to hurt.
Thanks, kgclark. We plan to have the roof structure of the pergola above the window line. I've got to wait to see what the deck pour places the baseline at before ordering my posts, currently planning for 8 foot posts (our ceilings inside are 8 feet, window tops are about 7 feet) but since the slab outside might not be exactly the same height as the slab inside, will need to wait to be sure.
I agree a cut line through the lid would make it blend in more, but I don't know that I'd love having such a specific way the lid needs to be reset to match. I think we'll see what it looks like with the rest of the deck poured (we are having the same color as coping, trying for a more seamless look) and decide then. Right now, I'm not sure if these particular lids are even workable, since one seems to be cemented in place and neither has the finger holes exposed to be able to lift the lids out. They may be able to cleanly chisel them to be workable, but this might be a mess-up on the part of the concrete guys. Dunno yet.
Our poor head injury guy did come yesterday and do some site cleanup, so I got a chance to talk with him. He's OK, but his face looks like he was on the losing end of a fight! Tough old bird.
Patrick - our 10 day forecast shows no good chances for our deck pour, so we are on a hold again for the foreseeable future. We were supposed to have a pressure test this week, but all the returns need to be rebuilt to be able to be plugged for the test, I think. They were just broken off when the sandblasters came through, presumably to be replaced with gray fittings to match the plaster.

After pressure test, when the weather is agreeable, we will have the deck poured and stamped, at the same time pouring the footing for the retaining wall. Then the wall can be built and the pool plastered. When looking at our forecast and the potential winter storm we are supposed to get first week of March, DH guessed we'd be done ... "Maybe April?"
I agree a cut line through the lid would make it blend in more, but I don't know that I'd love having such a specific way the lid needs to be reset to match. I think we'll see what it looks like with the rest of the deck poured (we are having the same color as coping, trying for a more seamless look) and decide then. Right now, I'm not sure if these particular lids are even workable, since one seems to be cemented in place and neither has the finger holes exposed to be able to lift the lids out. They may be able to cleanly chisel them to be workable, but this might be a mess-up on the part of the concrete guys. Dunno yet.
Our poor head injury guy did come yesterday and do some site cleanup, so I got a chance to talk with him. He's OK, but his face looks like he was on the losing end of a fight! Tough old bird.
Patrick - our 10 day forecast shows no good chances for our deck pour, so we are on a hold again for the foreseeable future. We were supposed to have a pressure test this week, but all the returns need to be rebuilt to be able to be plugged for the test, I think. They were just broken off when the sandblasters came through, presumably to be replaced with gray fittings to match the plaster.
After pressure test, when the weather is agreeable, we will have the deck poured and stamped, at the same time pouring the footing for the retaining wall. Then the wall can be built and the pool plastered. When looking at our forecast and the potential winter storm we are supposed to get first week of March, DH guessed we'd be done ... "Maybe April?"
Thread Status
Hello , This thread has been inactive for over 60 days. New postings here are unlikely to be seen or responded to by other members. For better visibility, consider Starting A New Thread.