Help on fixing my pool pump/piping and adding a threaded shaft??? Flooded yard today.

The piece still on your pump should turn (or screw) off and then you can install a new union kit. It doesn't have traditional threads, but it does turn on/off. Those 4 notches are basically threads. (http://www.aqua-man.com/images/row_num/14073.jpg)

Go here: Hayward Northstar Pump - SP4000, SP4000X Series Replacement Part Schematic

Then look at item number SPX40000UNPAK1

You need 1 of those kits, a piece of PVC pipe from Lowes, a coupler, and some pvc cement.

Install the gasket and small black pipe, and then screw the nut over it to fasten it to the pump housing. Then hacksaw off the broken part on the pipe still connected to your filter. The PVC will slide over the pipe in the union kit and in to the coupler you connect to the old pipe.
 
Right, in post 16 up above the item is from Lowes, it's like $8.00... :). I don't drive up to Lowes here. I live in Buckeye, AZ... the people here are idiots and nothing is ever in stock. I internet search first then call...

- - - Updated - - -

The piece still on your pump should turn (or screw) off and then you can install a new union kit. It doesn't have traditional threads, but it does turn on/off. Those 4 notches are basically threads. (http://www.aqua-man.com/images/row_num/14073.jpg)

Go here: Hayward Northstar Pump - SP4000, SP4000X Series Replacement Part Schematic

Then look at item number SPX40000UNPAK1

You need 1 of those kits, a piece of PVC pipe from Lowes, a coupler, and some pvc cement.

Install the gasket and small black pipe, and then screw the nut over it to fasten it to the pump housing. Then hacksaw off the broken part on the pipe still connected to your filter. The PVC will slide over the pipe in the union kit and in to the coupler you connect to the old pipe.

Thanks so much for all your time spent, but I don't want to do what was on there before and didn't work. I am going to do what was just posted above. It is a lot cheaper and better working... :) Also, the part can't be here reasonably quick as they all order from Hayward and it would take 7-10 days.
 
and how would you attach that adapter to the pump?

Here is a picture of your pump housing (please note the 4 notches on the outlet):

14073.jpg

and here is the union kit:

14079.jpg

If you look at your pump, you will see that the right-most piece from the union kit is still on your pump. Unless that piece has been glued to your pump (which I'll admit is quite possible based on this conversation), you can unscrew that piece. When you unscrew it, you will also probably see the broken section of the left-most piece of the union kit. The other part of that broken piece is glued to the pipe hanging off of your filter.
 
There seems to be some confusion re. the definition of 'union'.

Yes, there are 'unions' in the hardware store.

They are NOT what fits on the Hayward pump. The (proprietary) joint Hayward used is also called a 'union' - the term is used for any joint using a nut holding two pieces together.

If you have a gas line in your house, look at the pipes going in and coming out of the meter - meters are (almost, at least) ALWAYS installed with - you got it - UNIONS.

The correct pipe size coming out of that pump is 2". I don't know how/why/when the subject of 3" came up.

PVC Pipe comes in two flavors - Schedule 40 is the white stuff you see at the hardware stores. Schedule 80 is a dark gray and is usually found only in real plumbing supply stores. The difference is pressure ratings.

Since Sch 40 is rated to (IIRC) 80 psi and your entire equipment pad will blow up at approx. 50 psi, the use of sch 80 (rated for higher pressure) is not indicated.

If the pump fitting is intact, you are looking at a new union kit - MSL's second pic, above and enough 2" pipe to hold it and connect to existing (sch 40) pipe.

If you can get a close-up of the top fitting of the pump (a macro lens is really handy), we may be able to tell you if it can be used.

Trying to cut threads into an installed pump and then run over-spec pipe into the filter is a downright scary thought.

The four tabs on the pump housing are part of the piece - it does NOT unscrew. Your observation that continuing to turn the Hayward union will cause it to release is correct - it is also found on the basket cover - it is Hayward's way of specifying the exact torque to use.

Of all the pics posted, see post #28 - that is your pump and the mating fitting.

Yes, this post IS disjointed - there are too many side points to address.

Back to original issue: WHY DID IT BLOW?

Fix THAT FIRST, then worry about re-connecting the pipe.
 
Snip

If the pump fitting is intact, you are looking at a new union kit - MSL's second pic, above and enough 2" pipe to hold it and connect to existing (sch 40) pipe.

If you can get a close-up of the top fitting of the pump (a macro lens is really handy), we may be able to tell you if it can be used.

Snip

I believe the "nut" portion of the union kit is still on the pump housing. She needs to lefty lucy that piece off. That's the point I, apparently, haven't been able to convey.

-Matt
 

Enjoying this content?

Support TFP with a donation.

Give Support
Matt
OK - You have a better eye than I - yes, she blew out the nut - the top of it failed, and the connector blew through it.

This is not a good sign - it suggests the silicone held too well, and the housing and nut are now glued together. If the fellow with the 'cut threads in it' was responsible, it means he did not think the union could be restored to work as intended.

This is where we need hands and eyes on the ground - if the (remains of) the union nut (the rightmost piece in the second pic in post 28) cannot be removed from the housing, the pump is junk, and the 'cut threads in it' just might be the last, best hope for it.

Beachinmoney - try to get the remains of the nut off the housing.

Then figure out why it blew. Or just patch it back together and hope you get a different result.

If the remains of the nut will not come off, or if the result is a damaged housing, the thread cutting just may work. I, for one, would love to see how that is done on an installed pump with other equipment in the way.

But - once the problem is solved, try to put it together the way the manufacturer designed? With the union?

And, just for giggles - clean the filter before turning the pump back on, 'K?

THIS IS IMPORTANT:
Something generated some serious pressure to blow out that union. The line is likely blocked somewhere. I suggest the filter as an obvious starting point.
If you do not know how to open it and clean it, post the contents of the label and maybe someone here can go into detail on cleaning it.
A dirty filter can seriously block flow, creating back pressure.
Or look for a closed valve on the return line.

SOMETHING IS PROBABLY BLOCKING THE RETURN LINE - THE FILTER IS THE FIRST THING IT GOES INTO - CHECK IT BEFORE TURNING IT BACK ON!!!!
 
It just occurred to me - this thing blew the pressure line AND flooded the yard.
Yet there is still water in the pool.
Why did it stop?
Did the OP awaken and shut it off, or did it run by timer and the timer shut it off, or did it run and stop by itself?

What happens to a Northstar when it runs with no back pressure?

IIRC, I killed my first pump by using it to drain the pool (and annoyed the neighbor, whose yard I flooded - Hee.).

Did the motor seize up from this running?

IF so, it is time to just put everything away, cover the pool to keep out debris, and come back when have new pump.

So, once again: you may have dinged it and will see diminished performance, and eventual seizure. This is what happened to my first pump - at first, it would shoot water 12' into the air (I removed the filter cover) - then 10', then 6', then 0' as it seized completely.

(Disclaimer: The OP has pics of piping which I cannot identify. I do not, for instance, know what the three lines branching from the filter's outlet are - but it looks like 1/2 of the large-diameter pipes have valves turned to 'closed' - the only one open is the one that cannot be closed, so it may be entirely safe for that valve to be closed.)
 
Before i make a complete pest of myself:

If you can wiggle the nut on the housing, but cannot get it off for some reason:

A 'Dremel-type' tool with a cutting bit (it looks like a bizarre drill bit) can cut through the nut - cuts in opposing sides will get the nut off cleanly without harm to the housing. Tungsten-carbide cutters are expensive, but well worth it. Take your time and let the tool cut at its own speed.
 
I believe the "nut" portion of the union kit is still on the pump housing. She needs to lefty lucy that piece off. That's the point I, apparently, haven't been able to convey.

-Matt

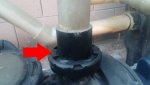
All of that information has been posted. you can't "lefty loosen it. It isn't threaded. Unless your talking about the nut that I am posting a picture of here. I just took it off. Of course I know how to clean my filters. They were not dirty. However, they have not been cleaned as often as I wanted them cleaned, due to my boyfriend that never does anything. Huh, gonna half to look. I see why all of this is so disjointed everyone. First, here is a picture of the nut and I can clearly see why and how it blew. 
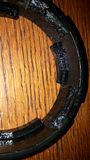
It melted. Now the thing is, I don't know if it was this way before as well or if it got too hot when this happened and that is what melted it... There was a ton of silicon on it. As for the comment about the threaded pipe and using nipple threaded 80. That came from the pool guy who wants to come and charge me $125 to do the job. What is said here about that not being needed because of the pressure etc. makes good sense. Why than would he want to do that? I explained to him that it wasn't threaded...??? That is what threw me off and why I have spent forever trying to find the right parts to manufacture the opening on the pump housing into a threaded. Now, logically thinking, obviously it is tight enough without that or the silicon alone wouldn't have held it... And, on that same note, I don't image that the union, and nut are made out of Schedule 40. They must be tougher than that. I can pretty much guarantee that the people that lost this house never once put any magic lube on any parts nor did they probably ever clean out the skimmer basket. They didn't even clean the shower here once I don't think! They were not really bright. This is my first pool. I research everything on the internet to learn how to do things. I am somewhat mechanically inclined. I repaired my washing machine by myself, using parts that I made and it has been working fine for two years since... And, I did install a garbage disposal last week :queen:... and also what about this here on this site "Schedule 40 plumbing is fine most places on a residential pool, but threaded into the pump directly it will almost always leak over time. We recommend that if you need to thread directly into the pump that you install a schedule 80 nipple and then transition to your regular plumbing. ".. http://www.aqua-man.com/techdisplay.asp?Ic=T2 When the problem started, my neighbor put a ton of silicon on it and we let it sit for 24 hours. You will really get a laugh out of this. Now be nice, I am going to post the picture of what I did when it didn't seal up right away.
20150906_185310_zpsbf431098.jpg
I thought I was so smart.... DUH!!!! View attachment 43723 Should there not have been a tone of silicon put on? I know that I shouldn't have used the things above to try and tighten it but heck, I thought I was being good and handy. I am a girl you all know!!!:crazy: What I didn't understand in the beginning was why it started to leak 8 weeks ago. I wasn't sure if the pipe that goes into the pump housing was suppose to be glued and my BF just left something out or what. I had a bunch of o-rings around and put a new one in. The reason I had a bunch around is because when my boyfriend puts things back together he leaves things out!

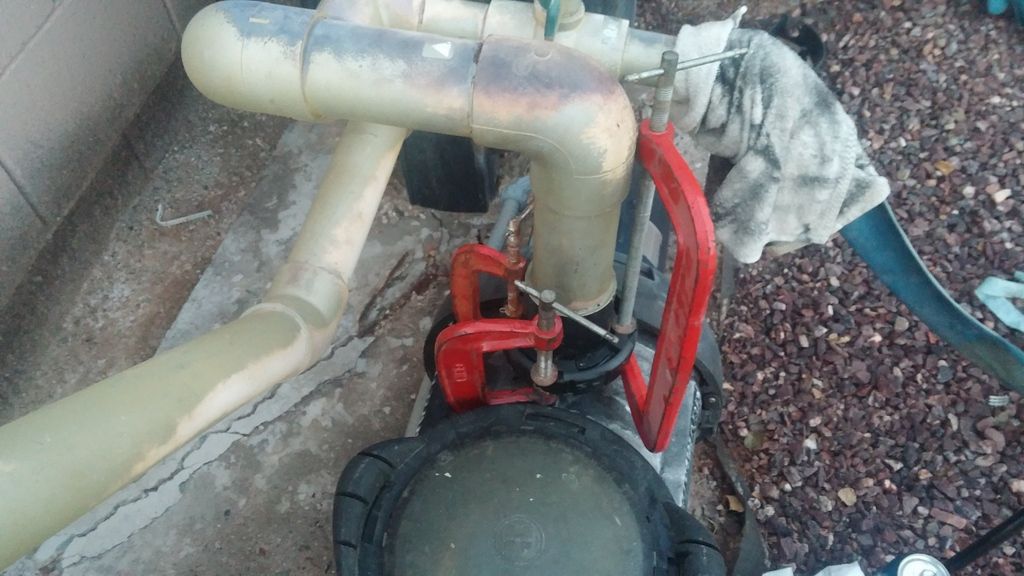
As for the question of why it didn't run all the water out and ruin my motor, posted already but, I was out there at 4:30 am letting the dog out. At 5:30 the cat wanted out. I went to see if the pump was running because it hadn't been at 4:30 and I thought I had set the time to start some time around then. Well, at 5:30 I found the problem and quickly shut it off. In looking at the piece of the kit that is still on there it is intact. Why then do I need as was said here, "You need 1 of those kits, a piece of PVC pipe from Lowes, a coupler, and some pvc cement."? Can't the new nut go on the existing bolt that is glued to my piping? Am I being dumb? See this picture, that is how it was and still is...20150905_185109.jpg

One more answer, in regards to this, "The correct pipe size coming out of that pump is 2". I don't know how/why/when the subject of 3" came up. Everyone keeps telling me I have to get a piece of PVC pipe, a couple, etc... well my pipes are different sizes so I need to figure out where to connect what things at and what sizes to buy depending on that. Oh, one more thing to clear up, here 
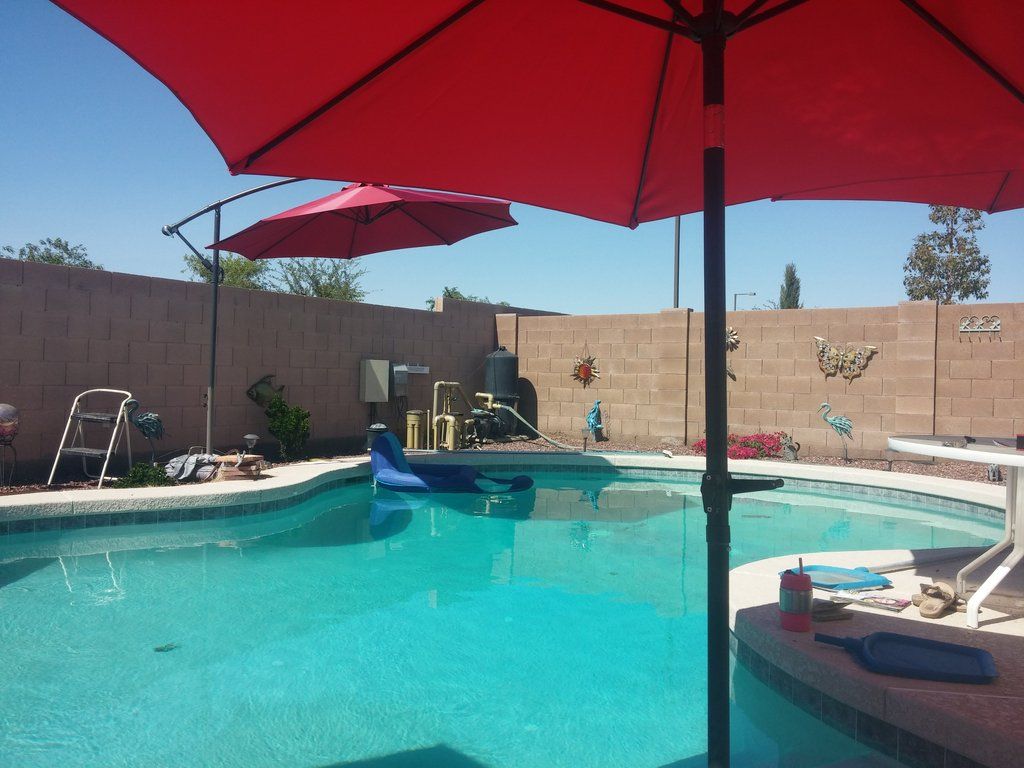
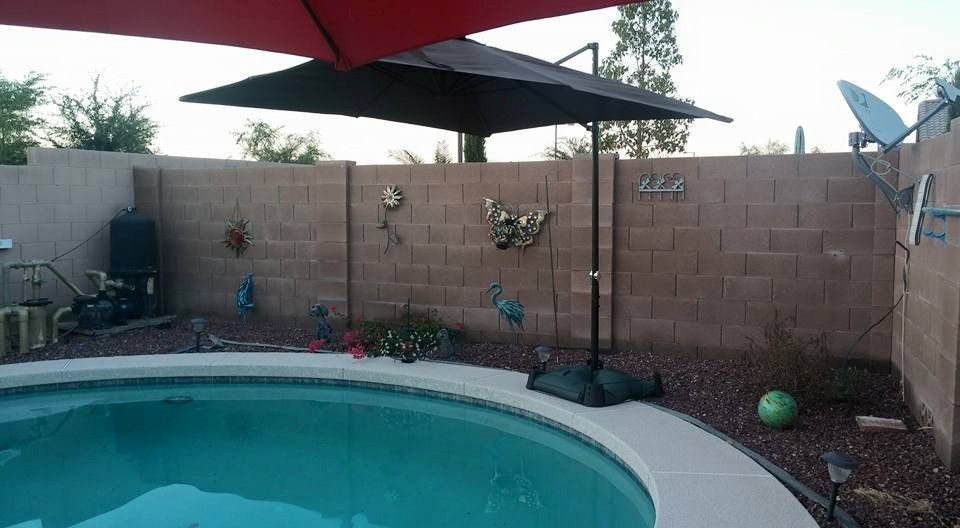
happyheaven says, (Disclaimer: The OP has pics of piping which I cannot identify. I do not, for instance, know what the three lines branching from the filter's outlet are - but it looks like 1/2 of the large-diameter pipes have valves turned to 'closed' - the only one open is the one that cannot be closed, so it may be entirely safe for that valve to be closed.) From the filter is the one with the valve closed, that is to drain water. the other goes from the top of the pump housing to the filter and the third is from the suction side of the pump....

I hope that clears things up. So, all I am waiting on is, why do I still need to add and cut and glue PVC pipe???:confused:

And lastly, thank you all so much for spending your time reading through this and trying to decipher what was going on, and what needs to be done. I can't tell you all how much I appreciate it... :handshake::whoot::grin:
 
The pic in the first post (or, WAS in the first post) shows the output/top/pressure line off the pump - the connector is still on the pipe, but the nut is still on the housing.

In the pic MSL repeated in post 35, the connector looks like it was somehow deformed - the portion under the gap in the nut appears partially melted.

beachinmoney - if you are dealing with a foreclosed pool as your first pool experience - welcome to the club. I burned up a pump and dinged a filter. maybe you can get off a bit cheaper.

Again - find out why this is a repeating problem.

I will not go into the subject of resorting to a threaded connection - your pool guy is probably right to suggest sch 80 for such a bizarre application.

Back to post 28 - see the second pic.

The terms I use for the 3 pieces: Connector, O-ring, nut.

In the first pic, the nut is still on the housing (aka 'pump'). Once you get it off, get a pic of the housing - if the housing is still viable, the fix is cutting off the old pipe above the failed connector, and replacing the pipe, nut, connector, and o-ring.

The length of the replacement pipe (and the connector used to splice it in) will be critical - too long or too short, and the connector will not sit squarely in the housing.

Once you get it re-connected, run it just long enough to notice the pressure gauge on the filter - if it is over 40 psi, shut it off and start looking for the problem.

The filter does not care about who cleans it or who should clean it - it just wants to be clean.

I have some suspicions about the shape of that outlet/pressure/top pipe shape - it looks like it is trying to keep water from flowing easily. That is a whole different conversation.

Now - if you are in AZ, the question of 'melted' connectors becomes interesting - did the weather do it, or did the pump overheat?

Have you cleaned the pump basket? Is the basket brittle? The lens on the basket cover shows the effect of AZ sun (and UV) on polycarbonite. Does the cover come off and re-seat? Are you applying proper lube to these parts? etc., etc.
 
It is not deformed. Like I said, I put Duck Wrap Fix on it to help stop the leaking. It is not a repeating problem. It's a problem that needs to be fixed, replaced. He is NOT MY POOL GUY. I DON'T HAVE A BIZARRE APPLICATION. I already took it off. The housing is viable as I said, there is nothing weird about the outlet/pressure/top pipe shape. I have been here now for 2.5 years. Things were just old and I repaired and replaced as I went along. The pump at one point in time over heated. I think the water was low. However the old motor is still working fine. I don't know when. It wasn't recently. It only started leaking 8 weeks ago. I tried to fix it and failed. The cover comes off of the pump and I have cleaned the basket. I have started lubing everything. I didn't know those things needed to be done til this year. My original pump was working fine. I took it out and put in a 2 speed to save some money. Everything is working fine, no clogs etc....The picture of the nut is in my post above. Post #34. As I said, why does the old pipe have to be cut off. The piece there is in perfectly good shape. My filters were cleaned 2 months ago. They certainly are not dirty enough to blow out anything. I am going to double check the lines tomorrow. I use my pool a lot in the summer. I also keep it very clean. Nothing is clogged. I would have known if it were.

We have the same equipment basically, same size motor, same size pool, same filter...
 
Here is a better look at the total pool. These were taken in the last 2 months.
20150607_105331_zpsvhcok5y7.jpg
20150510_114707_zpsb0dpbcpt.jpg
FB_IMG_14294802677447443_zpsf3tugx7t.jpg
20150923_184958_zpsucrtzdjp.jpg
Frys%20offset%20umbrella%20repaired_zpsxzc0sxvs.jpg


I put in the rocks surrounding the pool and the plants this year. I repaired both pool umbrellas. They had to be completely taken apart and I had to take parts out of older umbrellas because the crank shaft had crumbled apart and broken in the sun on the brown one. I got it 1/2 off at Fry's because there was nothing else here in Buckeye to purchase... I had to restring it and the other offset one. The red one. I then had to mix and match the poles that they were on depending on which one would hold the housing that I put them back together with. I am handy. But also busy...
 
The old pipe has to be cut off because you need a coupler between the new union kit on the pump and the old 2" plumbing. The black section of pipe is broken and needs to be removed by cutting just above it. You will then slide a coupler up on to the old pipe and a new small section of pvc pipe will connect the new union kit to the new coupler.

Everything Dave said up above is correct. If the connection melted (as you said), you need to figure out why. It certainly wasn't from the sun.
 

Enjoying this content?

Support TFP with a donation.

Give Support
Thread Status
Hello , This thread has been inactive for over 60 days. New postings here are unlikely to be seen or responded to by other members. For better visibility, consider Starting A New Thread.