Those markers look good! Great idea using the LightStreams tile. Denise is doing the same thing. Just make sure they don't get covered up with plaster!

Another in Texas - Cypress
- Thread starter twinkiesmommy2009
- Start date
You are using an out of date browser. It may not display this or other websites correctly.
You should upgrade or use an alternative browser.
You should upgrade or use an alternative browser.
Those markers look good! Great idea using the LightStreams tile. Denise is doing the same thing. Just make sure they don't get covered up with plaster!
Thanks! That was just me figuring out the placement. They haven't been installed yet and good thing! It's mess out there and they aren't very careful! We'll install them after the clean-up just before plaster.
My deck is supposed to be poured at 1:00 tomorrow. Woo hoo!
Sent from my iPhone using Tapatalk
Decking got moved to 11:00. PB was on site to make sure gas line for the fire pit was in the right spot and that they got my gutters tied to the deck drains correctly. 


 Should there be a control joint or expansion joint between existing decking and new? If so, they didn't put one.
Sent from my iPhone using Tapatalk


 Should there be a control joint or expansion joint between existing decking and new? If so, they didn't put one.
Sent from my iPhone using Tapatalk
For anybody else with that same question, joints are added after, not before like the polyvoid. 


Sent from my iPhone using Tapatalk


Sent from my iPhone using Tapatalk
Just ordered two of these! SwimWays Sonoma Chaise Lounge, Chocolate - Walmart.com
Sent from my iPhone using Tapatalk
Sent from my iPhone using Tapatalk
TM that deck is looking good! Do you have to water it so it doesn't dry out too fast?
TM that deck is looking good! Do you have to water it so it doesn't dry out too fast?
Yes, the PB told me to start watering tomorrow night, but I asked the deck crew before they left and they told that I should start watering it around 5:00 today since it's so hot. Watered once and headed to see The Secret Life of Pets with the kiddos. I'll water again tonight if it looks like it needs it. I should find out tomorrow when plaster is scheduled for! [emoji1303][emoji322]
Deck looks good and I like those loungers
Thanks Tommy!
Sent from my iPhone using Tapatalk
IrwinK
0
Been a busy day for you. Deck shaping up nice. You're almost there. Hope you get the plaster and start-up soon.
I think I see the Drain openings. Make sure they don't cement over or clog any.
In Florida they use the DecoDrains, but one of the few good ideas from my PB was to use the 4" Drains.
Got thru my start-up day.
I think I see the Drain openings. Make sure they don't cement over or clog any.
In Florida they use the DecoDrains, but one of the few good ideas from my PB was to use the 4" Drains.
Got thru my start-up day.
Been a busy day for you. Deck shaping up nice. You're almost there. Hope you get the plaster and start-up soon.
I think I see the Drain openings. Make sure they don't cement over or clog any.
In Florida they use the DecoDrains, but one of the few good ideas from my PB was to use the 4" Drains.
Got thru my start-up day.
Thanks! They had the drains sealed with some kind of plastic when pouring the cement. One of the pipes rolled under the cement and they had to quickly roll it back up so that was interesting to watch but the cover held. I texted PB to ask what kind they are.
I'll go check out your build looking for those pictures!!
Sent from my iPhone using Tapatalk
Ours is a little different, but they did 4" pipe and cut slits in the travertine tile above them for the drains.
IrwinK
0
Glad you got the 4" pipe. Thanks for the interesting idea for the drains. Maybe I could do something like that with pavers instead of the cheap plastic drain covers they gave me. I was considering painting them beige but will see how yours look when everything is done.
TM, I'm catching up!!
Your stone work turned out amazing!!! My absolute favorite look!! I just LOVE those stones and those colors!!
What a difference in the light in your kitchen! I love the changes you made but really glad you stuck with the diamond pattern in the backslash. It adds interest. Your kitchen turned out lovely!!
And yay for decking!!! Looking good! I hope you are happy with it all! Getting close to the finish!!! I'm excited for you!!!
I hope you have been able to enjoy your family and not stress too much!
Ours is a little different, but they did 4" pipe and cut slits in the travertine tile above them for the drains.
Glad you got the 4" pipe. Thanks for the interesting idea for the drains. Maybe I could do something like that with pavers instead of the cheap plastic drain covers they gave me. I was considering painting them beige but will see how yours look when everything is done.
I was able to confirm that ours are 4". I think they'll spray over ours with spray deck to help them blend in. At least I hope so.
TM, I'm catching up!!
Your stone work turned out amazing!!! My absolute favorite look!! I just LOVE those stones and those colors!!
What a difference in the light in your kitchen! I love the changes you made but really glad you stuck with the diamond pattern in the backslash. It adds interest. Your kitchen turned out lovely!!
And yay for decking!!! Looking good! I hope you are happy with it all! Getting close to the finish!!! I'm excited for you!!!
I hope you have been able to enjoy your family and not stress too much!
Thank you Nini!
They came out today to work on the fire pit and tiling the table. Hard to see anything on the fire pit yet but I'm happy about the placement and size. PB worked with me this morning to get it just right before instructing the crew.


 And shout out to Suz for pointing out that we didn't have to stay round!
We changed the table finish since my PB liked the travertine top better than the tile in the pictures I showed him. Worked for me since I thought that would have cost more and he's just doing it. They've only done tables in travertine tiles before and not the coping so I think he wanted to try it maybe and have that to show others.


I'm not too excited about how the table is coming out. I need symmetrical and the middle is not living up to expectations. The guy building it (Carlos) asked me what I thought before he left and when I told him I liked the outside but the inside needed to be the same he got a bit upset with me, told me it was too hard, and that he would call my PB. They're supposed to be back in the morning after picking up more coping for the fire pit. I texted PB with a picture but I didn't expect to hear from him again today. I suspect he'll be out again in the morning.


Sent from my iPhone using Tapatalk
nice progress... yes have them re-do the inside... IMO those inside cuts do not look but that's just me, hope they change it up so you can be happy with it... I think I have a pic of mine on my build thread somewhere.
If it were me I think the center of the table would look good with a random rubble mosaic to contrast the geometric exterior pattern.
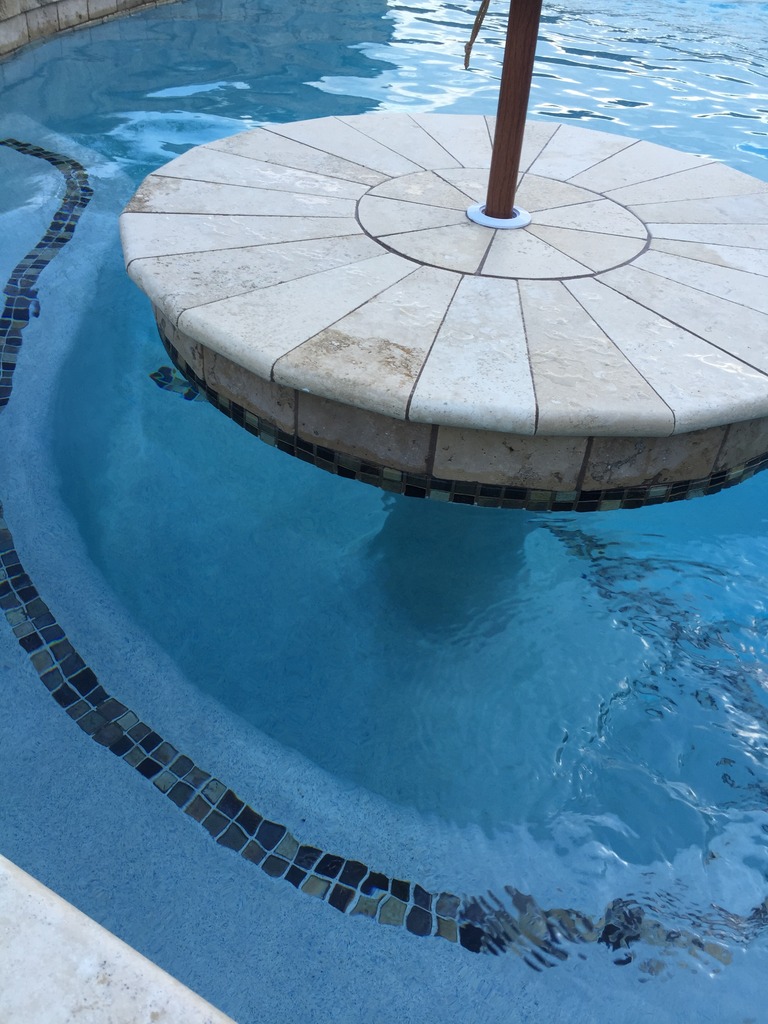
Here is a pic of mine is to give u an idea just incase you decide to go another route.
Love how they worked with you on the fire pit and made sure they understood what you wanted. You might be a trend sitter with that!
That table top-nope. Print out and show them ap's! NICE!
Kim:cat:
That table top-nope. Print out and show them ap's! NICE!
Kim:cat:
Doesn't ANYONE in the pool industry own a wet saw?? The reason none of these people can accomplish straight cuts and consistant joints is that they try to freehand everything with an angle grinder. It's like going into a butcher shop and all they have is hatchets. I realize that curves need to be freehanded, but you can tighten up those radius edges with the right wheel and a little patience. Grout, like caulk, makes every amatuer look like a professional, but you need joints to get grout into. On the table top in question, he just needs to trim a little here and there and smooth out some choppy radiuses and it'll all be golden.
Thread Status
Hello , This thread has been inactive for over 60 days. New postings here are unlikely to be seen or responded to by other members. For better visibility, consider Starting A New Thread.