I know I'm a little late to the party but hopefully what I did can help somebody out. This is a somewhat editted form of what happened over two separate years of prep:
- Center point: measure center and place a garden stake (green-coated metal kind) in the middle, then use a rope to get a feel for the circle to be leveled.[/*:m:2zl2vwi9]
- Reference level: I wanted my pool to be level with the adjacent concrete pad, so I borrowed a laser level and measured everything with that. A line level would have been extremely useful because I had to keep re-aiming the laser to each point I was working on.[/*:m:2zl2vwi9]
- Rim trench: I dug a trench to about 3" below that level all the way around the circumference as per the rope tied to the center. The trench was about a foot wide, enough for 2 ranks of 4x8" bricks.[/*:m:2zl2vwi9]
- Center level: the first year I used a paver carefully leveled to the concrete, but that was a little painful to land on through the liner. The second year (this year) I just stuck with the garden stake and seriously compacted the surrounding dirt until it was level to the pad and not going anywhere.[/*:m:2zl2vwi9]
- Rim bricks: I worked all the way around the perimeter carefully laying bricks in a "circle", with two total ranks. The first year there was only one rank and the bricks quickly "fell over", so this year I have two ranks supporting each other. Every brick is carefully leveled with the laser.[/*:m:2zl2vwi9]
- Remove high spots: going over the entire pool area, remove any dirt that's higher than roughly 1/2" below the intended level. Sort that dirt somewhere to break up clumps and remove rocks, you're going to need some of it again.[/*:m:2zl2vwi9]
- Handy leveler: I took a 2x2 that had a decent straight edge and drilled a hole through it, then dropped it over the stake in the center. It just reached the bricks, so I could spin it around and around to get a handle on how level or not the ground was.[/*:m:2zl2vwi9]
- Compact, fill, compact: do a lot of tromping around on the pool area and seriously compact the dirt. Where it compacts too much or was just plain already low, grab some of your saved loose dirt and fill it in, then stomp on it some more. I did some quick mental math while doing the "compactor dance" and determined that bouncing on your toes (shoes) is about 10x the PSI of a 4' deep pool, but if you don't you'll get settling just from moisture...[/*:m:2zl2vwi9]
- Lots of sand: dump bags of sand as needed until your leveler 2x2 goes around and around constantly pushing a tiny mound ahead of it. Watch very carefully to make sure you don't have any low spots. Key things: sand should be mostly dry and you absolutely want to spend the extra $0.01 per pound to get "play sand" rather than just general-purpose or paver sand. Play sand doesn't have the little pebbles that the leveler catches and rolls around.[/*:m:2zl2vwi9]
- Remove the center stake: I had a set of 12x12" pavers for an adjacent project that I carefully laid out in front of me as stepping-stones, then picked up the one behind and moved forward until I was at the center, then yanked out the center stake and filled it with some dirt, compacted it, and covered with sand by hand. Then work your way back out of the leveled area with the pavers again.[/*:m:2zl2vwi9]
- Weed treat: I liberally sprinked Caseron all over the place, then watered it in with Moss-Out.[/*:m:2zl2vwi9]
- Weed block: I grabbed 3' wide rolls of weed-block fabric, and carefully rolled them across the now level pad (which you don't want to walk on, so use a stick to coax the roll across). The weedblock goes over the inner rank of perimeter bricks, then under the outer rank to hold it in place. Set one end, then pull it tight and block it in place on the other side.[/*:m:2zl2vwi9]
- Foam: at this point (having obtained the "exact" pool for the spot - a 16'x48" ultraframe) I decided to just get it all done right, and went and bought a bunch of 4x8' sheets of 1" thick foam insulation. I almost cheaped out and got the myler-covered white stuff (from Home Depot) but it looked like it would squish pretty badly. Turns out I was very right: I got the pink stuff for about 60% more, and am very very glad I did. Not only is the surface better, the edges are tongue-and-groove, which made installation easier. I put 2x2 in across the center, 2 more on the wings, then quartered up the last panel for the corners. Some high-tack duct tape to hold it together and all is good.[/*:m:2zl2vwi9]
- Carefully drag the pool over and set it up.[/*:m:2zl2vwi9]
Now, a caveat that I found the hard way and still have to fully deal with: the foam was 16' from edge to edge, but a little bit more where I was
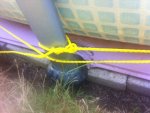
not agressive about trimming the extra to a circle yet. The feet of the 16' UltraFrame come to that 16' edge. The problem is, as the pool filled and the weight came down on the legs, the feet started crushing the foam, down about 1/4" of the 1" thickness. This caused the 4 legs along the squared edges of the foam to push out and completely off the foam and the bricks. They currently sit 1/2" to 3/4" lower than the rest and had to be quickly blocked from slipping any further. I'll need to jack the frame up carefully, then try to at least get something under those feet to support it, while also running a strap of some kind around the bottom of the pool to try to pull the legs in a little and make sure they never slip further out.
Off the top of my head, I think the easiest solution is to *not* cut the foamboard more than you absolutely have to until the pool is fully filled and settled,
and arrange for none of the legs to actualy sit at the original edges of the foam (e.g. rotate it 1/32 around so the edges line up with the space between the feet).
If you have any questions or need pictures/diagrams, post here and I'll try to get more info here as I can.