I have been meaning to hard plumb my pool for ages. Due to a breakage my hand was forced and today I finally got it done.
As there are always loads of questions on this topic and complaints that the photo links are dead. I thought I should document the process with lots of embedded photos that will remain with the post.
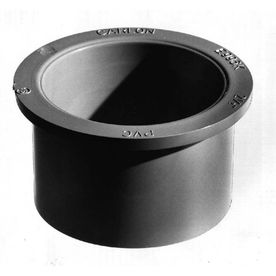
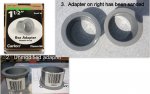
First go to Lowes to the electrical aisle and get a 1-1/2" box connector made by Carlon (E996H) for each connection you need to make. See photo 1
[attachment=1:mlgb9yk7]collage 1.jpg[/attachment:mlgb9yk7]
I believe the is also an identical item made by Cantex, this may be the E950HG adapter from Home Depot.
When you get these home you will seem some raised lettering on the flanged end(Photo 2)
Lay a piece of sandpaper on a flat surface and rub the adapter up and down a few times tosmoothe the flange surface. I'm not sure whether this is strictly necessary but won't do any harm and may prevent a leak(Photo 3)
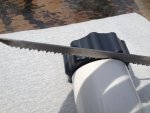
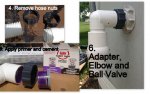
Next cut the hose nuts from your Intex hose (Photo 4)if you are using the one piece nuts. Obviously if you are using the 2 piece ones just unscrew them.
[attachment=0:mlgb9yk7]Collage 2.jpg[/attachment:mlgb9yk7]
You are now ready to glue the adapter into the fitting or coupling you are using m In photo 5 I am gluing it into a 90 degree elbow. Just remember to thread the adapter through the nut before you glue it! You also will want to leave a small gap that you can slip a saw into to cut the nut free should you ever need to re-plumb for any reason.
Next remove the old plunger valve from the pool and screw on the new adapter/fitting assembly using the black "L" gasket from the old valve (Photo 6). I managed to swap it out without much water loss by placing a thin plastic bag over the outlet inside the pool.
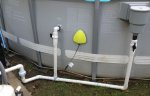
In the final picture the pipes are all assembled but are not yet glued.
[attachment=2:mlgb9yk7]finished product.jpg[/attachment:mlgb9yk7]
Amazingly when I turned the pump on there were no leaks nor did there seem to be any air being sucked into the lines. It looked like it may be difficult to re-attach once everything was glued up, so given thatthis is on suction side, I am debating whether to leave it as is. Some of the parts I am not even sure if I can get apart to glue even if I want to.
I hope this has been helpful, feel free to ask for clarification.
Jeremy.
As there are always loads of questions on this topic and complaints that the photo links are dead. I thought I should document the process with lots of embedded photos that will remain with the post.
First go to Lowes to the electrical aisle and get a 1-1/2" box connector made by Carlon (E996H) for each connection you need to make. See photo 1
[attachment=1:mlgb9yk7]collage 1.jpg[/attachment:mlgb9yk7]
I believe the is also an identical item made by Cantex, this may be the E950HG adapter from Home Depot.
When you get these home you will seem some raised lettering on the flanged end(Photo 2)
Lay a piece of sandpaper on a flat surface and rub the adapter up and down a few times tosmoothe the flange surface. I'm not sure whether this is strictly necessary but won't do any harm and may prevent a leak(Photo 3)
Next cut the hose nuts from your Intex hose (Photo 4)if you are using the one piece nuts. Obviously if you are using the 2 piece ones just unscrew them.
[attachment=0:mlgb9yk7]Collage 2.jpg[/attachment:mlgb9yk7]
You are now ready to glue the adapter into the fitting or coupling you are using m In photo 5 I am gluing it into a 90 degree elbow. Just remember to thread the adapter through the nut before you glue it! You also will want to leave a small gap that you can slip a saw into to cut the nut free should you ever need to re-plumb for any reason.
Next remove the old plunger valve from the pool and screw on the new adapter/fitting assembly using the black "L" gasket from the old valve (Photo 6). I managed to swap it out without much water loss by placing a thin plastic bag over the outlet inside the pool.
In the final picture the pipes are all assembled but are not yet glued.
[attachment=2:mlgb9yk7]finished product.jpg[/attachment:mlgb9yk7]
Amazingly when I turned the pump on there were no leaks nor did there seem to be any air being sucked into the lines. It looked like it may be difficult to re-attach once everything was glued up, so given thatthis is on suction side, I am debating whether to leave it as is. Some of the parts I am not even sure if I can get apart to glue even if I want to.
I hope this has been helpful, feel free to ask for clarification.
Jeremy.

 Many people ask about this.