Inground Total Redo - Going For Broke!

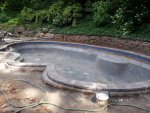
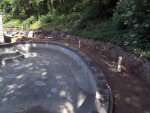
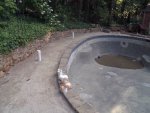
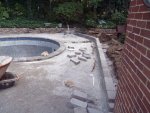
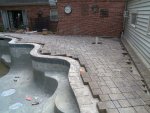
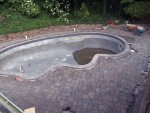
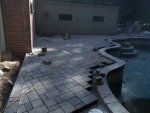
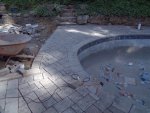
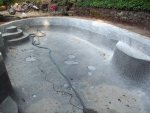
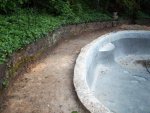
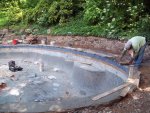
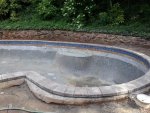
We had some rain, the PB got backed up on other jobs, and we have been without workers. I'm standing on his claim to have it done within 30 days from start, have talked to him numerous times, and it looks like tile and coping will begin Monday the 30th. No workers around has given me lots of time to work on the things that I need to get done and my progress has been good.

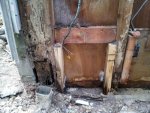
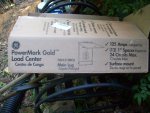
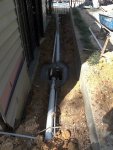
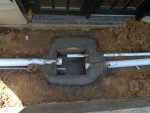
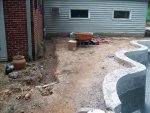
I had another electrician come who seemed to really know pool code and safety. He is a master electrician and knowledge comes with a price. He will need to run a 4 wire from one end of the house to the next, panel to panel, 77 feet in the crawlspace. He will install a new panel with about 12 breakers, GFCI. The panel feeding the panel at the pool equipment has aluminum wiring which he says needs to be replaced from it to the main house panel. Looks like it will be $1300. I didn't expect that but not surprised as the house was built in '69 and the pool around '81. A 3 wire single breaker panel was normal in '81 but not now.

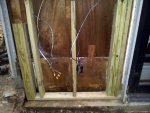
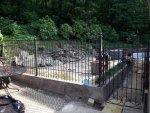
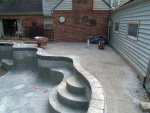
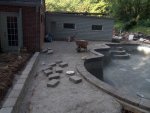
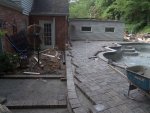
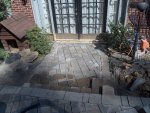
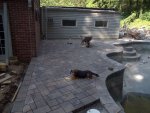
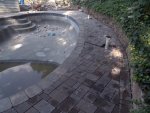
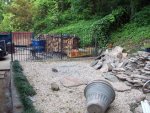
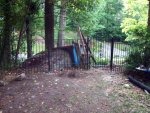
We wanted to take down all of the black wrought iron fence but didn't want to just scrap it. It's in great shape and good quality so we decided to re-purpose it. In the picture just before this next one you can see straight ahead that there was a chain link fence covered with ivy. We liked the cover but decided to tear it all down, update the look, and open it up. I moved the fence that was on the left and cut it down a little to fit. Tomorrow I'll weld the right side end post, replace the gate hinges, and set the latch post into cement. I borrowed a wire feed welder from a friend and another friend came by a few days ago to show me how to use it.

This entire area already feels much more open.

[attachment=2:2uqtl135]10.JPG[/attachment:2uqtl135]
[attachment=1:2uqtl135]11.JPG[/attachment:2uqtl135]
[attachment=0:2uqtl135]12.JPG[/attachment:2uqtl135]
 

Attachments

  • 10.JPG
    10.JPG
    291.9 KB · Views: 264
  • 11.JPG
    11.JPG
    282 KB · Views: 264
  • 12.JPG
    12.JPG
    280 KB · Views: 264
This area had a chain link fence and gate that I also decided to replace. It was old and tired. The friend that showed me how to use the welder joined this section. So far we have reused about 70% of the black wrought iron fence. This side is parallel to the front of the house and looks good from the street. I need to put that swing set back together. It's been sitting there too long.
[attachment=0:1b0kg7pv]16.JPG[/attachment:1b0kg7pv]
 

Attachments

  • 16.JPG
    16.JPG
    274.3 KB · Views: 264
I'm not sure what's in there now, but I assume a three wire service either means a single phase 120V service (black line wire, white neutral and green ground), or a 220V service with 2 lines (black/red or black/black) plus a ground. The advantage of having a 4 wire service is that you get both 120V and 220V which may be an advantage with some loads, and you can add a 120V outlet which can come in handy if you need power tools nearby. I would run a minimum of a 50A sub-panel from the main breaker. The sub-panel should have its ground un-bonded from the neutral, but I don't think it will need a separate ground rod since it's part of the main structure. It will require at least one 220V breaker with GFCI protection, which are somewhat expensive. The filter pump and heater can be handled by one, assuming both are 220V. HD sells ones for Murray panels for around $65 each in the 20A variety (which is plenty for typical 220V pumps). For a 50A sub-panel, you will want to run 6 gauge THHN/THHW wires run in 1 x 1/4 conduit (minimum rating for both) from the 50A breaker on the main panel. If you can verify that this is what the electrician plans to run, I think the quote is reasonable. I recently ran a 60A 4-wire underground service from our house to the pool-house sub-panel through 1 1/4 PVC conduit, and the wire alone cost around $375 (about 150 feet)! All of the other stuff does start to add up as well, so not a bad deal.
 
I do appreciate the comments. Please keep them coming.

Here is what has been going on in the last several days.

We did go ahead and pressure wash the wall. I do like old patina on stuff, but we really wanted to bring out the color of the stone in the wall. I think it turned out pretty well. The goal is to have the color of the pavers look good against it.

The waterline tile and coping are finished! A 3 man crew came from Atlanta and worked Friday from 9:00 am to 9:30 pm to do the whole job in a day. The PB uses these guys often and sends them all over the place. I was around for most of the afternoon and evening and only asked them to correct one thing. In the 3rd pic you can see the most severe curve has 3 pie shaped pieces. The gap wasn't right on one of them and the surface was much more porous and rough. He redid it and they match well. I don't know what else could be done on such a curve. These guys put in a serious day of work considering Atlanta is a 2 hour drive.

The coping, and entire property, in very dirty from the dust that came from cutting the stone. Clouds of it would rise up and it almost looked like smoke from a fire. No reason to clean it as the paver guys will probably do the same and more. I'll be happy to see the coping clean. We may seal it to set it off, give it contrast, and protect from SWG.

[attachment=2:2usshxzb]1.JPG[/attachment:2usshxzb]
[attachment=1:2usshxzb]2.JPG[/attachment:2usshxzb]
[attachment=0:2usshxzb]3.jpg[/attachment:2usshxzb]
 

Attachments

  • 1.JPG
    1.JPG
    265.1 KB · Views: 212
  • 1.JPG
    1.JPG
    265.1 KB · Views: 212
  • 2.JPG
    2.JPG
    185.3 KB · Views: 210
  • 2.JPG
    2.JPG
    185.3 KB · Views: 212
  • 3.jpg
    3.jpg
    184 KB · Views: 210
  • 3.jpg
    3.jpg
    184 KB · Views: 210
[attachment=2:p8q5vqxr]4.jpg[/attachment:p8q5vqxr]

Earlier I said that we had a water problem along the path that leads from the driveway to the pool. It has been this way for a long time. They dug the hole for the sump pump and the drain lines will be installed soon. When they took out the old stairs the lower wall and corner of the house showed bad water damage and old termite damage. This has been the case along several of the backyard walls and I've already repaired some of those areas in the past. I ripped it all out, cleaned it up, put in new outlet and box, pressure treated wood, tons of caulk, new insulation, then hardie-board, new sheathing, and replaced most of the siding. I left the lower part without siding to wait and see where the new steps would go. The problem before was that the lower siding was under ground level and covered by the stairs. No wonder water came in.

[attachment=1:p8q5vqxr]1.JPG[/attachment:p8q5vqxr]
[attachment=0:p8q5vqxr]3.jpg[/attachment:p8q5vqxr]
 

Attachments

  • 4.jpg
    4.jpg
    193.4 KB · Views: 210
  • 4.jpg
    4.jpg
    193.4 KB · Views: 209
  • 1.JPG
    1.JPG
    100.6 KB · Views: 211
  • 1.JPG
    1.JPG
    100.6 KB · Views: 211
  • 3.jpg
    3.jpg
    183.9 KB · Views: 209
  • 3.jpg
    3.jpg
    183.9 KB · Views: 209
[attachment=2:13laa6s6]6.jpg[/attachment:13laa6s6]

Here is a pic of the finished fence and gate.

[attachment=1:13laa6s6]Fence 2.jpg[/attachment:13laa6s6]

And a preview of what is to come

[attachment=0:13laa6s6]5.JPG[/attachment:13laa6s6]
 

Attachments

  • 6.jpg
    6.jpg
    169.9 KB · Views: 209
  • 6.jpg
    6.jpg
    169.9 KB · Views: 210
  • Fence 2.jpg
    Fence 2.jpg
    214.7 KB · Views: 209
  • Fence 2.jpg
    Fence 2.jpg
    214.7 KB · Views: 209
  • 5.JPG
    5.JPG
    181.5 KB · Views: 208
  • 5.JPG
    5.JPG
    181.5 KB · Views: 210

Enjoying this content?

Support TFP with a donation.

Give Support
We are making some more progress. Here are some pictures of the drainage system. They built a cement housing/cistern for the sump pump and a cement lid in case it needs to be accessed in the future. There are 4 drains - one will be at the door near the pump, 2 are along the stone wall, and 1 is in the center area where the brick wall meets the siding wall. All water will flow to the pump and shoot out into the driveway. I think it looks good and should solve the water problems we have had for years.

[attachment=2:y5mjqf1l]Drainage 1.JPG[/attachment:y5mjqf1l]
[attachment=1:y5mjqf1l]Drainage 2.JPG[/attachment:y5mjqf1l]
[attachment=0:y5mjqf1l]Drainage 3.JPG[/attachment:y5mjqf1l]
 

Attachments

  • Drainage 1.JPG
    Drainage 1.JPG
    55.1 KB · Views: 167
  • Drainage 2.JPG
    Drainage 2.JPG
    64.1 KB · Views: 166
  • Drainage 3.JPG
    Drainage 3.JPG
    85.2 KB · Views: 167
A dump truck delivered the crushed gravel and it was spread and packed down. Looks like they will need more later. They also started on the small wall that runs where the wrought iron fence used to be. There will be stairs and a paved path to the bedroom french doors. They will be the width of those doors. The gravel has made it less of a mess outside. With the rain it was a swamp and now it is much easier to walk around. The dog is happier and it already feels much more open.

We have met the 30 day mark and of course we are not close to being finished :x We'll see how much longer.

[attachment=2:ge6wjgd0]Gravel 1.JPG[/attachment:ge6wjgd0]
[attachment=1:ge6wjgd0]Gravel 2.JPG[/attachment:ge6wjgd0]
[attachment=0:ge6wjgd0]Gravel 3.JPG[/attachment:ge6wjgd0]
 

Attachments

  • Gravel 1.JPG
    Gravel 1.JPG
    174.3 KB · Views: 166
  • Gravel 2.JPG
    Gravel 2.JPG
    182.8 KB · Views: 164
  • Gravel 3.JPG
    Gravel 3.JPG
    177.8 KB · Views: 165
Thank you. It is very private. Maybe before this finishes I'll take a pic of our hill behind the pool. It is like a dense forest up there.

Here are some pictures showing most of the pavers laid out. The last one is a shot from the flat roof where I have been building the solar panel frames. I'll get some pictures of that up soon.

[attachment=2:2r7amkef]Pavers 1.JPG[/attachment:2r7amkef]
[attachment=1:2r7amkef]Pavers 2.JPG[/attachment:2r7amkef]
[attachment=0:2r7amkef]Pavers 3.JPG[/attachment:2r7amkef]
 

Attachments

  • Pavers 1.JPG
    Pavers 1.JPG
    189.4 KB · Views: 115
  • Pavers 2.JPG
    Pavers 2.JPG
    188.6 KB · Views: 115
  • Pavers 3.JPG
    Pavers 3.JPG
    176.9 KB · Views: 115
Today they made good progress.

The sump pump was installed, drainage lines connected, and the cement cap put in place. Wire still needs to be pulled through.

Plumbing to the solar valve is finished, valve is attached, and it's my turn to take the plumbing to the roof.

The 2 sets of stairs were installed and almost finished. We weren't sure about the look because they used the same block paver as they did with the small retaining wall. They did this to be able to have a 12 inch step. The color of the steps and the other pavers is the same so it should look better when clean. I also wonder about how they have been setting the wall and stair treads. For the wall and stairs they have been using caulk gun tubes of liquid nails to set them. I have some doubts about the long term holding strength of liquid nails. I guess the benefit for them is that it is fast to do, and for us it would be easy to re-glue one if it is loose. Easier than re-bedding it into cement. On the other hand, it would probably take years before they would loosen from an original cement bed. Anybody ever seen liquid nails used like this? Maybe it's more common that I think, or it's a big mistake.

The pathway to the back bedroom french doors is nearly finished.

The electrical is done and it passed inspection. I'm very happy with it and the location of the new panel and everything else. I'll try and take some pics of that as well.

The new Hayward light was installed but left to sit on the coping ledge. It's been there several days and somebody unknown broke the bulb. When it was pointed out to the PB he lost his mind. Rather than replace the bulb he will put in a whole new housing. He said once the seal is broken it never closes right. That's a $500 loss for somebody's stupid mistake. Pointing fingers didn't solve the mystery.

Most of the outer edging of the pavers has been cut. These are the easy cuts - straight. The ones around the coping are insane. First they cut from the top to get the size then they turn the paver on its edge and sweep cut to form the curve. They walk it back and forth to the saw to check the fit until it is right. Major labor. It looks like they will finish those tomorrow.

[attachment=1:17m560bt]Pavers 5.JPG[/attachment:17m560bt]
[attachment=0:17m560bt]Pavers 6.JPG[/attachment:17m560bt]
 

Attachments

  • Pavers 5.JPG
    Pavers 5.JPG
    202.3 KB · Views: 96
  • Pavers 6.JPG
    Pavers 6.JPG
    189.5 KB · Views: 97
With this many cuts you better be good friends with your neighbors. The dust is unimaginable! It clouds and plumes up like smoke from a forest fire. I asked why they don't wet cut and the PB said that the water drops coming from the pavers after a cut will drip onto the other pavers and leave a permanent stain. It is like cement residue and tough to get out.

Be prepared for major dust! I don't think we will have workers tomorrow because they will all die tonight from breathing the stuff all day. We don't need no stinkin masks!

[attachment=2:38v86esy]Pavers 7.JPG[/attachment:38v86esy]
[attachment=1:38v86esy]Pavers 8.JPG[/attachment:38v86esy]
[attachment=0:38v86esy]Pavers 9.JPG[/attachment:38v86esy]
 

Attachments

  • Pavers 7.JPG
    Pavers 7.JPG
    46.5 KB · Views: 97
  • Pavers 8.JPG
    Pavers 8.JPG
    59.9 KB · Views: 97
  • Pavers 9.JPG
    Pavers 9.JPG
    60.4 KB · Views: 97
More progress. It looks like they could be done cutting in a day, day and a half. For the most part both the coping and side edge paver work is finished. I'm pretty happy with the curved cuts around the coping. Drainage covers and skimmer lid area look to be last on the list. The skimmer is supposed to get a new ring and lid which will raise it flush to the new level.

[attachment=2:3cg21plr]Pavers 10.JPG[/attachment:3cg21plr]
[attachment=1:3cg21plr]Pavers 11.JPG[/attachment:3cg21plr]
[attachment=0:3cg21plr]Pavers 12.JPG[/attachment:3cg21plr]
 

Attachments

  • Pavers 10.JPG
    Pavers 10.JPG
    183.3 KB · Views: 74
  • Pavers 11.JPG
    Pavers 11.JPG
    179.3 KB · Views: 74
  • Pavers 12.JPG
    Pavers 12.JPG
    193.3 KB · Views: 75

Enjoying this content?

Support TFP with a donation.

Give Support
Thread Status
Hello , This thread has been inactive for over 60 days. New postings here are unlikely to be seen or responded to by other members. For better visibility, consider Starting A New Thread.