Anyone who owns an Above Ground pool with the Aqualuminator light will know that the bulbs tend to blow up quite regularly and are about 40-50 shipped to replace each time - sometimes yearly. Although the design of the light is very good and is likely the best AG pool light available, this can become relatively frustrating and costly. Pentair has made a new light using LEDs that also allow you to choose a spectrum of colors or light shows, however, this light is really expensive and the upgrade kit from your regular aqualuminator to the LED version is also very costly at about 200 dollars shipped.
My Aqualuminator bulb (regular halogen) finally bit the dust, so I spent the last weekend doing a simple and more cost effective conversion - anyone with basic handyman/woman skills can undertake this project and have their Light converted to a multicolored LED bulb in a matter of about 1 hour. (remember - use at own risk!)
The first thing you must do is find out whether your aqualuminator model is 12V AC or 12V DC - the newer models are all AC.
The way to do this is to look at the transformer with the on/off switch - this will have the specs printed right on it.
If you just envisioned a bunch of "???'s" after reading the word transformer", let go of the mouse and back away slowly...I mean it - what are you still doing reading this....STOP!!! - do not read further....
Ok, for those of you who made it this far, let's continue....
If your unit is DC, you are in and out of luck since your conversion will end up being cheaper due to a lesser cost involved with the replacement light assembly. (DC bulbs come in a variety from white to any other common color to a multi color bulb. However, most likely, the end result will not have as much WOW factor as the AC version.
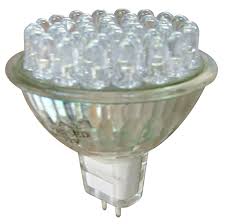
12V DC MR16 LED bulbs can be ordered from: (choose whichever 12V DC MR16 you like - read up on the color changing models)
http://www.superbrightleds.com/bi-pin.html
If your unit is 12V AC (likely) your choices are more limited, I have only been able to source one manufacturer for the multi colored type of bulb, however, it will allow you to use the ON/OFF switch as your controller to cycle through individual colors or color wheel selections.
12V AC MR16 LED bulbs can be ordered from:
http://www.bestnest.com/bestnest/RTProd ... LIG-566224
http://www.drsfostersmith.com/product/p ... atid=16859
The AC powered MR16 type multi colored bulb can be purchased for 80 shipped (in US) and has built in circuitry that works from the on/off switching to cycle the patterns.
OK, if you saw a bunch of "???'s" after reading "MR16" or somehow are thinking "GUNS" - once again, back away from the computer, get a coffee, and read up on "Chlorinating the gene pool" or something instead.....
On to the retrofitting instructions (AC Instructions - DC Changes will be noted as DC at each step) (once again and for the last time - USE AT YOUR OWN RISK):
1. Remove your Aqualuminator bulb from your return jet and temporarily block the opening with a stopper or a terrycloth towel stuffed through the hole.
2. Boil a pot of water.
3. Submerge the dead bulb assembly in pot for about 3-5 minutes, this will soften the cream colored glue you see at the perimeter of the lens (a type of Acrylic caulk or mastic).
4. using a towel to protect your hand from the hot plastic, it should just unscrew relatively easy with a 3/4" twist and then pull off.
5. The goop can be scraped off with a knife and/or a small flathead screwdriver.
6. Gut the assembly by removing the old bulb, leaving the wire that is in there intact. (if you've gone this far and decide this conversion is NOT for you, tough - you're up "you know what without a paddle" now!)
7. My unit barely had enough wire for me to attach extensions by soldering on lengths of wire to each of the two leads and sealing the solder joints with shrink tubing but I managed to do it - if you do not have shrink tubing, I recommend purchasing some or performing step 7a instead.
7a. If you are unable to do step 7 due to lack of soldering skill or your wires are too short, you can drill a 1/4" (or bigger) hole through the resin seal from the rear of the assembly and feed 2 new, longer wires (crimp proper ends on them after) - cut off the old wires to avoid space constraints or confusion later.
8. Retrofit your NEW bulb into the chassis, dry fit it first before making permanent connections to make sure it will sit properly in the housing - I had to break off some of the white plastic housing on my bulb, but this does not matter to the end product - MR16's (DC) will go in easier with less manipulation.
9. Once you are happy with the way the bulb sits and you have verified that your lens will go on without obstruction, you can attach the wires to the bulb - once again, I did this using solder.
9 (DC) - you have to pay attention to the positive and negative wire connections and trace them through the housing to the rear connectors since LED's will only work if connected to the right polarity unlike incadescent bulbs.
10. Test by connecting to the power supply and turning on - the AC bulb listed above will change through 7 colors with each on/off/on cycle (signal) it receives and a multi color and 3 speeds of a color wheel.
DC bulbs will vary depending on the type you purchase from just the single color bulb to whatever features were supplied in the multi color bulb.
10a. If you performed step 7a, now is the time to seal the 1/4" or larger hole you drilled using 2 part epoxy - try and get the epoxy to seal as deep as possible - preferably the same depth as the original epoxy.
11. Use epoxy to glue the bulb into the housing so it sits square to the front of the fixture.
12. Reseal the lens in place using acrylic caulk or silicone - since LEDs last forever (pretty much) you will never have to get inside again so choice of product is up to you as long as it will be waterproof. Make sure you give it enough time for the caulk to set up before submerging in water.
13. Reinstall in pool, reconnect your wires and enjoy for a lifetime.
Ha - fooled ya - here's the long version of USE AT YOUR OWN RISK!!!!
Because I can not be there to hold your hand, I shall not be held liable for any improper or incorrect use of the information described or contained herein and assume no responsibility for anyone’s use of any of that information. In no event shall I be liable for any direct, indirect, incidental, special, exemplary, or consequential damages (including, but not limited to, procurement of substitute goods or services; loss of use, or profits; or business/pool interruption) however caused and on any theory of liability, whether in contract, strict liability, or tort (including negligence or otherwise) arising in any way out of the use of these instructions or its links, even if advised of the possibility of such damage. The user specifically acknowledges that I am not liable for defamatory, offensive or illegal conduct of other users, links or third parties and that the risk of injury from the aforementioned rests entirely with the user. This disclaimer of liability also applies to any damages or injury, including but not limited to those caused by any failure of performance, error, omission, interruption, deletion, defect, delay in operation or transmission, communication line failure, theft or destruction or unauthorized access to, alteration of, or use of record, whether for breach of contract, tortious behavior, or negligence or under any other theory or cause of action.
In other words - USE AT YOUR OWN RISK!!! ELECTRICITY AND WATER MAKE A DEADLY COMBINATION - if you question the above modifications in ANY way, be smart and DO NOT attempt them!!!!
On a brighter note :
I'm loving this AC bulb, it is SO worth the cost, really, it's only the cost of 2 plain white replacement bulbs which can be incurred in less than 2 years depending on your luck.
My Aqualuminator bulb (regular halogen) finally bit the dust, so I spent the last weekend doing a simple and more cost effective conversion - anyone with basic handyman/woman skills can undertake this project and have their Light converted to a multicolored LED bulb in a matter of about 1 hour. (remember - use at own risk!)
The first thing you must do is find out whether your aqualuminator model is 12V AC or 12V DC - the newer models are all AC.
The way to do this is to look at the transformer with the on/off switch - this will have the specs printed right on it.
If you just envisioned a bunch of "???'s" after reading the word transformer", let go of the mouse and back away slowly...I mean it - what are you still doing reading this....STOP!!! - do not read further....
Ok, for those of you who made it this far, let's continue....
If your unit is DC, you are in and out of luck since your conversion will end up being cheaper due to a lesser cost involved with the replacement light assembly. (DC bulbs come in a variety from white to any other common color to a multi color bulb. However, most likely, the end result will not have as much WOW factor as the AC version.
12V DC MR16 LED bulbs can be ordered from: (choose whichever 12V DC MR16 you like - read up on the color changing models)
http://www.superbrightleds.com/bi-pin.html
If your unit is 12V AC (likely) your choices are more limited, I have only been able to source one manufacturer for the multi colored type of bulb, however, it will allow you to use the ON/OFF switch as your controller to cycle through individual colors or color wheel selections.
12V AC MR16 LED bulbs can be ordered from:
http://www.bestnest.com/bestnest/RTProd ... LIG-566224
http://www.drsfostersmith.com/product/p ... atid=16859
The AC powered MR16 type multi colored bulb can be purchased for 80 shipped (in US) and has built in circuitry that works from the on/off switching to cycle the patterns.
OK, if you saw a bunch of "???'s" after reading "MR16" or somehow are thinking "GUNS" - once again, back away from the computer, get a coffee, and read up on "Chlorinating the gene pool" or something instead.....
On to the retrofitting instructions (AC Instructions - DC Changes will be noted as DC at each step) (once again and for the last time - USE AT YOUR OWN RISK):
1. Remove your Aqualuminator bulb from your return jet and temporarily block the opening with a stopper or a terrycloth towel stuffed through the hole.
2. Boil a pot of water.
3. Submerge the dead bulb assembly in pot for about 3-5 minutes, this will soften the cream colored glue you see at the perimeter of the lens (a type of Acrylic caulk or mastic).
4. using a towel to protect your hand from the hot plastic, it should just unscrew relatively easy with a 3/4" twist and then pull off.
5. The goop can be scraped off with a knife and/or a small flathead screwdriver.
6. Gut the assembly by removing the old bulb, leaving the wire that is in there intact. (if you've gone this far and decide this conversion is NOT for you, tough - you're up "you know what without a paddle" now!)
7. My unit barely had enough wire for me to attach extensions by soldering on lengths of wire to each of the two leads and sealing the solder joints with shrink tubing but I managed to do it - if you do not have shrink tubing, I recommend purchasing some or performing step 7a instead.
7a. If you are unable to do step 7 due to lack of soldering skill or your wires are too short, you can drill a 1/4" (or bigger) hole through the resin seal from the rear of the assembly and feed 2 new, longer wires (crimp proper ends on them after) - cut off the old wires to avoid space constraints or confusion later.
8. Retrofit your NEW bulb into the chassis, dry fit it first before making permanent connections to make sure it will sit properly in the housing - I had to break off some of the white plastic housing on my bulb, but this does not matter to the end product - MR16's (DC) will go in easier with less manipulation.
9. Once you are happy with the way the bulb sits and you have verified that your lens will go on without obstruction, you can attach the wires to the bulb - once again, I did this using solder.
9 (DC) - you have to pay attention to the positive and negative wire connections and trace them through the housing to the rear connectors since LED's will only work if connected to the right polarity unlike incadescent bulbs.
10. Test by connecting to the power supply and turning on - the AC bulb listed above will change through 7 colors with each on/off/on cycle (signal) it receives and a multi color and 3 speeds of a color wheel.
DC bulbs will vary depending on the type you purchase from just the single color bulb to whatever features were supplied in the multi color bulb.
10a. If you performed step 7a, now is the time to seal the 1/4" or larger hole you drilled using 2 part epoxy - try and get the epoxy to seal as deep as possible - preferably the same depth as the original epoxy.
11. Use epoxy to glue the bulb into the housing so it sits square to the front of the fixture.
12. Reseal the lens in place using acrylic caulk or silicone - since LEDs last forever (pretty much) you will never have to get inside again so choice of product is up to you as long as it will be waterproof. Make sure you give it enough time for the caulk to set up before submerging in water.
13. Reinstall in pool, reconnect your wires and enjoy for a lifetime.
Ha - fooled ya - here's the long version of USE AT YOUR OWN RISK!!!!
Because I can not be there to hold your hand, I shall not be held liable for any improper or incorrect use of the information described or contained herein and assume no responsibility for anyone’s use of any of that information. In no event shall I be liable for any direct, indirect, incidental, special, exemplary, or consequential damages (including, but not limited to, procurement of substitute goods or services; loss of use, or profits; or business/pool interruption) however caused and on any theory of liability, whether in contract, strict liability, or tort (including negligence or otherwise) arising in any way out of the use of these instructions or its links, even if advised of the possibility of such damage. The user specifically acknowledges that I am not liable for defamatory, offensive or illegal conduct of other users, links or third parties and that the risk of injury from the aforementioned rests entirely with the user. This disclaimer of liability also applies to any damages or injury, including but not limited to those caused by any failure of performance, error, omission, interruption, deletion, defect, delay in operation or transmission, communication line failure, theft or destruction or unauthorized access to, alteration of, or use of record, whether for breach of contract, tortious behavior, or negligence or under any other theory or cause of action.
In other words - USE AT YOUR OWN RISK!!! ELECTRICITY AND WATER MAKE A DEADLY COMBINATION - if you question the above modifications in ANY way, be smart and DO NOT attempt them!!!!
On a brighter note :
I'm loving this AC bulb, it is SO worth the cost, really, it's only the cost of 2 plain white replacement bulbs which can be incurred in less than 2 years depending on your luck.