Back Flow Preventer Supply line pin hole leak

martink

Well-known member
May 3, 2023
136
Katy, TX
Pool Size
18000
Surface
Plaster
Chlorine
Liquid Chlorine
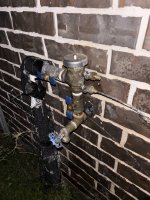
I was opening the pool back flow preventer after it was winterized that is connected to an outside spigot (it was existing before pool was built) when I discovered a pin hole leak in the pipe threading coming out of the house. it is not copper or Pex or any other common material used for supply lines. My guess is it is galvaniced steel, but not really sure.

I will use plumbing Epoxy for a temp fix, but can't really figure out how to replace this pipe, how it is connected inside the wall and the pipe material to use so it can support the weight and does not rust like this pipe and can withstand freezing. The house is on slab so no basement or crawl space, this rusted pipe is only 4 years old. any advice is appreciated.
 

Attachments

  • IMG_0425.jpg
    IMG_0425.jpg
    454 KB · Views: 22
  • IMG_0426.jpg
    IMG_0426.jpg
    464.4 KB · Views: 22
  • IMG_0427.jpg
    IMG_0427.jpg
    550.4 KB · Views: 22
You'll probably have to break out the brick around it if you can't get to it from the other side. That nipple has to be replaced, as you know.
From what I have seen online, but I am not really sure. I think I can unthread the nipple and replace it with a new one through the hole without breaking the brick wall. I am guessing that is how this one was installed without breaking the brick wall
 
They used a galvanized steel nipple to make the connection to what is most likely a brass union on the inside. You'll need to use a pipe nipple extractor (most likely 3/4" but they come in different sizes), to unscrew what's left of that nipple and replace it with brass. The other option is to open up the other side of that wall (drywall?) and check there as well. I had to make a very similar repair. It's caused by a person doing the work that doesn't understand basic plumbing and, because they didn't have the right materials, they just used whatever they had to get the job done and go. It's a common mistake that is made but it is fixable.
 
They used a galvanized steel nipple to make the connection to what is most likely a brass union on the inside. You'll need to use a pipe nipple extractor (most likely 3/4" but they come in different sizes), to unscrew what's left of that nipple and replace it with brass. The other option is to open up the other side of that wall (drywall?) and check there as well. I had to make a very similar repair. It's caused by a person doing the work that doesn't understand basic plumbing and, because they didn't have the right materials, they just used whatever they had to get the job done and go. It's a common mistake that is made but it is fixable.
Can I just use a pipe wrench to unscrew the pipe from the brass union and install the new one through the wall. why do I need the nipple extractor?
 
Unscrew the brass from the galvanized pipe nipple and then dig out the caulk around the pipe so we can look into the wall and see what is inside.

Show the opposite side of the wall from the inside.

1742244270067.png
 
A pipe nipple extractor makes it easier to remove the corroded galvanized nopple. Depending on how compromised it is, putting the jaws of pipe wrench on it may crush it and make it impossible to remove from what we it is screwed into. A nipple extractor exerts radial force on the inside of the pipe which helps to grab as much material as possible. It’s up to you, but an internal nipple extractor is the right tool for the job.

DURATECH Internal Pipe Wrench Set, Pipe Nipple Extractor Set, 3-Piece, 3/8",1/2" and 3/4" Pipe Capacities, Organizer Pouch Included
Amazon.com
 

Enjoying this content?

Support TFP with a donation.

Give Support
A pipe nipple extractor makes it easier to remove the corroded galvanized nopple. Depending on how compromised it is, putting the jaws of pipe wrench on it may crush it and make it impossible to remove from what we it is screwed into. A nipple extractor exerts radial force on the inside of the pipe which helps to grab as much material as possible. It’s up to you, but an internal nipple extractor is the right tool for the job.

DURATECH Internal Pipe Wrench Set, Pipe Nipple Extractor Set, 3-Piece, 3/8",1/2" and 3/4" Pipe Capacities, Organizer Pouch Included
Amazon.com
I was going to use the pipe wrench on the T connection not the pipe. But I will get the right tool you mentioned so I don't complicate the job.

I am quite handy and planning to use pipe dope and Teflon tape to secure the connection in the wall. But I am concerned of leaks in the wall after I am done that I can't see so I am considering hiring a plumber. I called one today and they quoted me 649 to change the pipe so I am considering just doing it myself
 
Master bedroom is on the other side of the wall.
Can you get to the part from the inside?

Show the exact place on the opposite side of the wall.

If it is drywall, you probably need to cut into it to allow access to the actual plumbing to see what you have and remove all galvanized as it is compromised and it might be leaking from the inside as well.
 
just an update, The JB weld failed miserably and couldn't hold the pressure for 5 mins, so I went ahead and took apart the whole piping assembly to see how hard it is, and it is so easy. the galavnised pipe is screwed in a fitting in the wall and was able to rotate it with a pipe wrench by holding on the tee connection. it only took 15 mins max to take it all apart. I cut the PVC pipe, removed the BFP drains and valves. not sure why a plumber would charge $650 for an hour of work.

I will use brass pipe instead of the galvaniced steel so it does not rust. will change the tee connection (too much corrosion on it) and the inlet valve (it was frozen anyway).

I attached a picture to show what it looks like. didn't expect it to be so easy
 

Attachments

  • IMG_0429.jpg
    IMG_0429.jpg
    472.6 KB · Views: 14
The plumber'a price is reminiscent of back in my first house in about 1989 (with my first pool anecdotally) when I had a kitchen drain leak inside my slump block wall. Pipes were run through the cavities in the blocks. I was quoted something like $350 flat for them to fix it or I could choose to pay the hourly rate of about $60. Hourly would have won but I chose flat rate and lost that bet. My wallet was $350 lighter and I had a new cleanout where the fix was and a large hole in my slump block.
 
How deep was the galvanized pipe in the wall?

Can you show inside the wall with the galvanized pipe out?
I didn't take it all out as it was starting to get dark and didn't want the house pipes to drain inside the wall., I didn't have the replacement nipple. I am guessing it is 8 inch that is why the pool contractor uses galvanized steel. I can't find 8 inch brass nipple at home Depot, max is 6 inch. But galvanized are available at all lengths

I will continue tomorrow morning, will take more pictures and update the post.
 
You may need to go to plumbing supply store. They typically carry a wider variety of stock. They might also be able to cut threads onto an exact length of pipe. The other option would be to use two 6” pieces, or some combination that gets you close, with a brass coupler. Then, if a more exact length is needed, you can cut the exposed end and braze a threaded fitting or tee onto the cut end.
 
For future reference, no pipes can withstand freezing. You’ll need to winterize that area in the future if it’s gonna freeze again.
The problem is this pipe will always be wet as the shut off valve is before the back flow preventer, I winterize the baclflow preventer, but there is always the risk the the valve will bust or the pipe coming from the wall, I will send update pictures after the job is done. let me know if you have suggestions on how to winterize it.

I think galvanized steel can withstand more pressure and resist freezing more than Brass, that is probably why the pool coomany used it
 
The backflow should be covered over the winter to avoid freezing. There are seals and diaphragms in it that can crack from freezing and cause leaks. Most hardware stores sell various sizes of insulating sprinkler valve covers that should do the trick. All pipes and fitting should be sealed up with foam insulation and 20mil thick PVC plumbing tape.

You can foam insulate everything up to the wall, most hardware stores have all kinds of premade foam covers for all sorts of fittings. The spigot can be covered as well.

There will be enough ambient heat from the brick wall and the house to keep the plumbing safe inside that wall unless it’s in a part of your home that isn’t conditioned (like a garage). It’s just the external pipes that need insulation. Heck, you can even just throw a heavy blanket over it all.

There are also pipe heating tapes with thermostats that you can plug into a nearby outlet. The heat tape wraps around the pipe. When the thermostat senses that the pipe is getting close to freezing, it turns on and gently heats the tape using about as much power as a household heating pad. You’re not in a particularly cold part of the country so just insulating the pipes and covering stuff up over winter should suffice in most cases. For a severe cold snap that lasts longer than a day, you can just using a contractor lamp with an incandescent light bulb to throw some heat at it.
 

Enjoying this content?

Support TFP with a donation.

Give Support