- Apr 14, 2022
- 7
- Surface
- Plaster
- Chlorine
- Salt Water Generator
- SWG Type
- Hayward Aqua Rite (T-15)

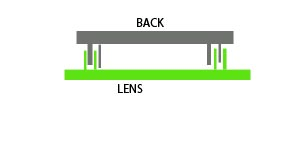
Many of us are familiar with this beast...and have suffered the excruciating pain in the wallet when it fails so soon. You "might" be able to repair it. I have the 12V model and it's about 3 years old...only used seldomly. One day it up and quit. The search for a replacement gave me sticker shock. Absolutely ridiculous what they are charging for these. The light is sealed and "non-repairable." Some have had leaks and when they dried it out and resealed, it worked...not the case for me. On the back you'll see four divets--one of which will be filled with sealant over an access hole. When I pulled off the sealant I heard a hiss...meaning it was under vacuum (or pressure) and no leak. Since it was trash, I figured why not rip it open and see what's inside. Of course I did verify the power supply was working first. I should have taken photos to document this process, but didn't think it I could fix it and was just tinkering to see how it worked. Opening is a messy process...imagine two "U"s, now invert one and put them together...
 Crude drawing of light. Green represents the clear plastic.
Removing the light from the pool took me a minute...I've never done it or seen it done. Turns out it was so much easier than the confusing manual. Take two flat screwdrivers...small sized. The pic on the top of the page shows four "slots" where the rings meets the lens. The cover has to be rotated counter clockwise to be taken off (to the left for those raised in the digital clock era). Insert a screwdriver in one slot and the second in the diagonal slot (upper left and bottom right for example). You don't have to pry or twist--just use the screwdrivers to rotate the cover and it'll come off with very little effort. Under the ring there are two options to mount the light to the niche...mine was a single screw on the top. Other option requires a #2 phillps screwdriver (only the round shaft not the tip)...insert into the round hold at about the 10-11 o'clock location to unlock a clip. Tilt the top toward you slightly and lift the light straight up out of the lower slot. Make your life easy and tie a string on the end of the power cable and pull it through the conduit when you remove the light.
Now that you have the light on your bench, grab your Dremel and cut off the first "ring" from the clear front...then cut off the second ring from the gray back. Carefully use a screwdriver or two to break the glue between the last two rings...less damage equals easier re-assembly. The circuit board will lift straight up...it's just pressed on to the power pins and LED board pins. Inspect it well...what I found was an exploded Capacitor. It damaged a trace on the circuit board that was easily fixed...scraped, cleaned, and soldered a jumper wire. I researched the part and found it's made by Panasonic and the manufacturer no longer makes them and states to not use them in new designs--perhaps because they suck and fail. I found an alternate part of equal specs from Mouser.

 The grid lines are 1/2". Capacitor is 220uF 50VDC SMD...part number is in the photo.
They are about $4 with tax...shipping was $10 for second day ($8 for snail mail)--I bought two and shipping was the same...in case I messed up or it fries again.
Solder in the same orientation as the original (black line)...easier to tin both sides first. I tested and it worked. Now it's re-assembly time. I cleaned up everything and smoothed out the edges. I put sealant on both pieces and pressed together...make sure the two rings are full where they come together. Then I filled the void from where I Dremeled off the two outer rings. After two days I put a second coat on the outside...don't forget the small hole in the back--very important. After two more days I put more sealant on any place I suspected were not good enough. Put on lots and smear it over the sides. I let it dry for 5-days before installing. Tied the end of the wire to the string I left in the conduit and it pulled right up. BOOM! Light works and it cost around $30. How long it'll last...who knows. I chose to use Locktite Marine from Lowe's. There is another marine sealant, but it's polyurethane and not easily removed...has to be chiseled off.

Can the Hayward LED light be fixed...perhaps, but it's not for everyone. It takes some skill and tools. Most people have more time than money--especially when you're talking about a $750 light vs $30 repair. If it's broke, you're not out that much if you try.


