We made it to gunite... finally!

My plumbing installed for a future glacier chiller matches what you are planning and matches the glacier manual for a new installation. However another TFP’er messaged me that when he checked with glacier they told him of a limitation for this configuration. The return can only be about 25’ long since it only uses a sump pump to empty water at the bottom of the chiller. I’d suggest confirming with glacier asap. I can reconfigure my plumbing at the pad fairly easily if I need to change it around to dump the chiller output into the suction side of the pump. Hard to believe they don’t state this in the manual.

That's interesting... I contacted Glacier this morning and they would not provide a maximum recommended distance from the chiller to the pool. They just said shorter is better. I did tell Glacier my pool is about 50 feet from my equipment pad, and they didn't tell me it wouldn't work. I guess we'll see.
 
Update... Rebar and Plumbing are done. Now we're waiting for inspection and we'll likely gunite early next week.

The plumbing looked as follows:

Pool
Main Drain: 2.5" Dedicated Line
  • My builder is having trouble sourcing the pebble covered channel drain from SCP.
  • Are there recommended brands and are they all pretty universal?
Skimmers (x2): 2.5" Independently Plumbed
  • What are the two pipes under one of the skimmers?
Returns: 2" Feed to 1.5" Loop
  • I think I ended up with 5 returns instead of 4
Waterfall Feature Wall (Left 2', Center 3', Right 2'): Single 2" Feed to 1.5" at each Waterfall (each waterfall as a valve to control flow behind the feature wall).
  • Builder said the waterfalls would have dedicated suction lines on the wall plumbed back to the second pump
  • Waterfalls and Bubblers will work off the same secondary pump
Bubblers (x3): 1.5" Looped
  • Plumbed to secondary pump for water features
Chiller: 2" Dedicated Return to center of pool floor with two outlets
  • Does anyone know if there is truth to the fact that the Glacier chiller can't be more than 25' from the pool.
  • Glacier had no guidance

Spa
Spa Drain: 2.5"
Spa Jets (x8): 2.5" Feed to 1.5" Loop

I believe all sweep 90's and 45's were used too.
 

Attachments

  • IMG_4147.jpeg
    IMG_4147.jpeg
    707.7 KB · Views: 40
  • IMG_4151.jpeg
    IMG_4151.jpeg
    771.2 KB · Views: 41
  • IMG_4152.jpeg
    IMG_4152.jpeg
    722.3 KB · Views: 39
  • IMG_4149.jpeg
    IMG_4149.jpeg
    775.8 KB · Views: 40
  • IMG_4156.jpeg
    IMG_4156.jpeg
    501 KB · Views: 37
  • IMG_4155.jpeg
    IMG_4155.jpeg
    615.7 KB · Views: 38
  • IMG_4153.jpeg
    IMG_4153.jpeg
    350.9 KB · Views: 40
Last edited:
Skimmers (x2): 2.5" Independently Plumbed
  • What are the two pipes under one of the skimmers?
Do you have a water feature pump? Those 2 horizontal pipes will be a wall drain for a second pump. It is hard to see where they go under the skimer but they should join to a single line back to the equipment pad. Are they connected to the skimmer?
 
Waterfall Feature Wall (Left 2', Center 3', Right 2'): Single 2" Feed to 1.5" at each Waterfall (each waterfall as a valve to control flow behind the feature wall).
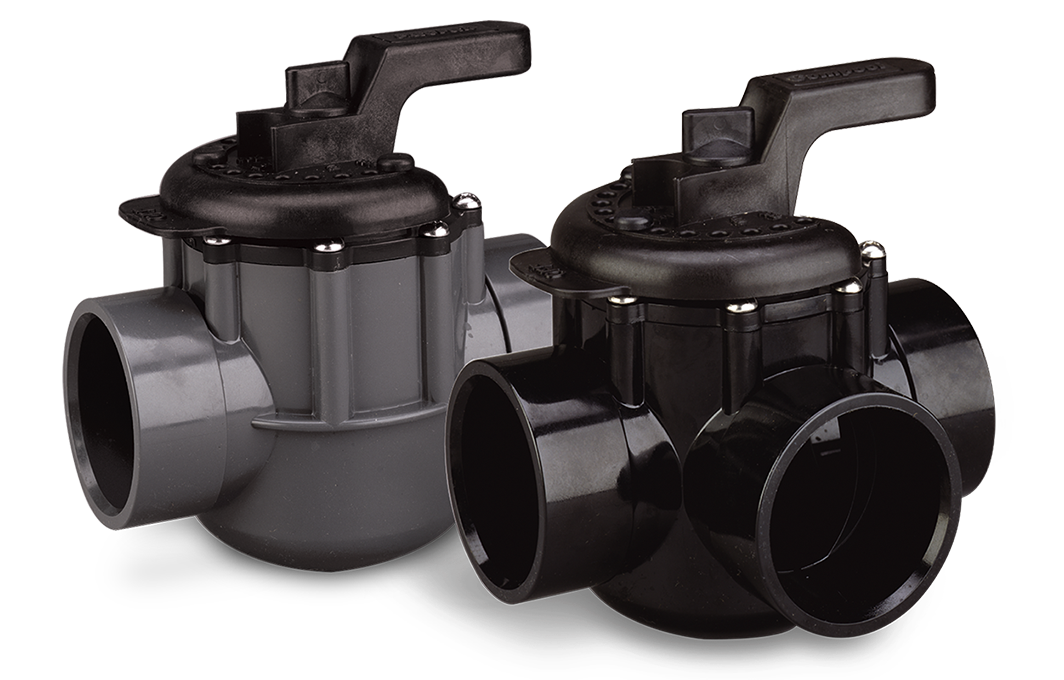
What type of valve did they plumb in? You do not want a PVC ball valve as they break over time and only way to repair is to remove from the pipe and install another one. Best to use a Jandy type 2-way valve.
 
Do you have a water feature pump? Those 2 horizontal pipes will be a wall drain for a second pump. It is hard to see where they go under the skimer but they should join to a single line back to the equipment pad. Are they connected to the skimmer?

I will have a water feature pump dedicated to the three sheer descents and the three led bubblers.

Upon further inspection, it appears the two wall suctions go right under the skimmer and back to the equipment pad on it's own line.

What type of valve did they plumb in? You do not want a PVC ball valve as they break over time and only way to repair is to remove from the pipe and install another one. Best to use a Jandy type 2-way valve.
I just checked and they plumbed in three ball valves which they'll need to fix because the contract states all jandy style valves.

1700614242155.png

The piping goes back behind the retain wall for access to the valves before turning back into the wall.
  • Should I ask them to replace these now or will it be just as easy to replace once gunite is complete.
Is there any difference in performance between the Jandy Neverlube and Pentair lube free valves?
  • I could see my builder insisting we use Pentair valves because everything is Pentair in my system, but if the Jandy ones really are better, and I don't mind insisting on Jandy.
Never Lube Jandy Valve: Jandy Pro Series Valve | Jandy

Diverter and Check Valves – 1-1/2 in. and 2 in.
neverlube_2port1min.png


DiverterValve-banner.png.thumb.1280.1280.jpg
 
Last edited:
  • Like
Reactions: HermanTX
Is there any difference in performance between the Jandy Neverlube and Pentair lube free valves?
  • I could see my builder insisting we use Pentair valves because everything is Pentair in my system, but if the Jandy ones really are better, and I don't mind insisting on Jandy.

Jandy and Pentair (and Hayward and CMP) diverter valves are functionally identical and of equal quality.

However replacement parts are not interchangeable and you need to use the matching parts for repairs.
 
  • Like
Reactions: sll0037
I have some aesthetic questions based on our decision to go with a dark/black pool finish.

1. How much of the skimmer will be visible once the pool is complete?
  • Should the skimmers have been a darker color like black or gray?
  • What are the preferred fittings for the wall returns, wall suction, and wall fittings?
2. For the channel drain, should the two stub outs be a certain distance apart to accommodate a channel drain?
  • This is what I asked the pool builder to use.
  • UNBLOCKABLE CHANNEL PEBBLE TOP DRAIN COVER
  • 1700613321420.png
  • Of course, the builder just tried to source whatever they get from SCP, but he said they didn't have any available and if gunite came before he had one, he would just cut the gunite later to install. Does that sound right?
3. Now that I'll have two floor returns for the chiller, what can do similar to the channel drain above to conceal those returns and not have them be places for the robot to get stuck?

Lastly, how concerned should I be with this caving in of the wall. I don't expect gunite until early to mid-next week, but it's been growing bigger since the initial dig.

1700613934957.png
 
Rebar needs to be spaced at least 3" from the dirt floor and walls to allow for complete rebar encapsulation and proper gunite thickness.

The debris at the bottom curve of the pool needs to be removed.

The hole need to be filled so the gunite has a backing.

I question if the rebar has adequate separation from the dirt.

Let's see what @AQUA~HOLICS thinks.

1700613934957-png.541598
 
1. How much of the skimmer will be visible once the pool is complete?
  • Should the skimmers have been a darker color like black or gray?
  • What are the preferred fittings for the wall returns, wall suction, and wall fittings?

Depends how the skimmer mouth is formed under the bond beam. The skimmer is usually recessed behind the bond beam and the mouth is all tiled. But builders do strange things so you need to look at what your builder is doing or post pics of it.

2. For the channel drain, should the two stub outs be a certain distance apart to accommodate a channel drain?

Yes, whatever the channel drain specifications are.

Of course, the builder just tried to source whatever they get from SCP, but he said they didn't have any available and if gunite came before he had one, he would just cut the gunite later to install. Does that sound right?

No, I would not accept cutting the gunite later for the drains.

3. Now that I'll have two floor returns for the chiller, what can do similar to the channel drain above to conceal those returns and not have them be places for the robot to get stuck?

Use another channel drain in the floor as the chiller return.

There are also flat floor returns.

IMG_0061 (Medium).jpg
 

Enjoying this content?

Support TFP with a donation.

Give Support
Rebar needs to be spaced at least 3" from the dirt floor and walls to allow for complete rebar encapsulation and proper gunite thickness.

The debris at the bottom curve of the pool needs to be removed.

The hole need to be filled so the gunite has a backing.

I question if the rebar has adequate separation from the dirt.

Let's see what @AQUA~HOLICS thinks.

1700613934957-png.541598

Would they just fill that with gunite? Or what's the best solution here?

I also question the spacing between the rebar and the dirt.
  • Would the city inspector tag this tomorrow?
 
Would they just fill that with gunite? Or what's the best solution here?

I think they should pack the hole with dirt.

Someone is paying for the gunite they are pouring into an empty hole.

Would the city inspector tag this tomorrow?

Nope, nada, no. I would not count on that happening. The city inspector simply looks if your job meets current codes not the engineering drawing or proper construction practices. He may do more or less but what he does or says is up to him.
 
  • Like
Reactions: sll0037
Compare this clean wall and floor spacing to the rebar with yours...

full


full
 
  • Like
Reactions: sll0037
Yes they should remove that debris under the rebar to a depth of like three or four inches. The rebar needs to be in the middle of the gunite.

When it rained for days and the bottom of my pool filled with mud to the bottom of the rebar, a crew spent two full days “de-mucking” it by hand. Literally on hands and knees using little cups and implements to scoop out mud between the rebar grid to dig it down about five inches as I had twelve inch gunite on the bottom. Also they had to build wood walls on the sides due to huge cave Ins all over when we had six days of rain even though it was covered. Even then I still had dozens of yards of extra gunite required because the voids were so big from the cave Ins.

If the voids are large I would ask your builder to put in some forms for the gunite to back against.
 
Last edited:
Yes they should remove that debris under the rebar to a depth of like three or four inches. The rebar needs to be in the middle of the gunite.

When it rained for days and the bottom of my pool filled with mud to the bottom of the rebar, a crew spent two full days “de-mucking” it by hand. Literally on hands and knees using little cups and implements to scoop out mud between the rebar grid to dig it down about five inches as I had twelve inch gunite on the bottom. Also they had to build wood walls on the sides due to huge cave Ins. Even then I still had dozens of yards of extra gunite required because the voids were so big from the cave Ins.

Thanks for the insight.

I spoke to my project manager and he said they’ll just fill in the cave in with gunite. We’ll see.

Hopefully the rain this weekend isn’t too bad.

Between getting real rebar chairs in and addressing my concerns with the channel drains, I’m probably not going to make my builder happy.

It just feels like they are trying to do things their standard way vs what I’ve contracted for and asked.
If the voids are limited to what are in your pics, it’s probably not a big deal to just fill with gunite. If there are larger ones, I would at least inquire with the builder.
 
Chiller: 2" Dedicated Return to center of pool floor with two outlets
  • Does anyone know if there is truth to the fact that the Glacier chiller can't be more than 25' from the pool.
  • Glacier had no guidance
@sll0037 Hey there!

I am the individual @Schwimmbad mentioned in the previous posts about Glacier chiller. Here is a snippet of text from my email correspondence with them

“Account for 5 feet in head loss for each 90 degree turn. Which means the flow will not totally get there. Every turn you make it loses flow. We have tested in pools the pipe run can only be around 25 feet to get the flow into the pool for maximum cooling.”
 
  • Like
Reactions: sll0037
“Account for 5 feet in head loss for each 90 degree turn. Which means the flow will not totally get there. Every turn you make it loses flow. We have tested in pools the pipe run can only be around 25 feet to get the flow into the pool for maximum cooling.”
It does not work like that.

Every 90 is "Equivalent" to 5 feet of pipe.

This is not the same a 5 feet of head loss.

Head loss is a vertical measurement meaning that the water has the equivalent of 5 feet of height for potential energy or the equivalent of kinetic energy.

Head loss is a combination of flow, pipe size and pipe length.

You can have something 5 miles from the pump and it would work if the pipe is sized correctly.

Below is an example of the head loss at 100 GPM for a round trip of 10 miles.

If you used 8" pipe, the head loss is only about 12 feet.

If you used 2.2" pipe, then the head loss at 100 feet round trip is 12 feet.

As far as the pump is concerned, it cannot tell if the water is going 10 miles or 100 feet.

Of course, you probably would not want to buy 10 miles of 8" PVC pipe, but it would work as far as the head loss was concerned.

Plus, you would probably lose whatever heating or cooling you got from the heater or cooler.


1700622699964.png

1700622933880.png
 
Last edited:
You can place it as far away as you want as long as you size the pipe correctly.


For heating or cooling, there might be some heating or cooling losses at longer distances if the pipe is exposed to temperatures that are significantly different from the water temperature.

For example, if you are chilling the water and the pipes run across 200 feet of hot ground, the water will pick up some heat.

If you bury the pipe, the losses will be reduced.

You can use insulation on the pipes if you think that it will help reduce heating or cooling losses.
 

Enjoying this content?

Support TFP with a donation.

Give Support
Thread Status
Hello , This thread has been inactive for over 60 days. New postings here are unlikely to be seen or responded to by other members. For better visibility, consider Starting A New Thread.