The Last Pool I'll Build build thread

fortunate

Silver Supporter
Oct 24, 2022
58
Puerto Rico
I'm building a pool as part of a new home construction project. Well, I'm not personally doing the building, but it's getting built! The project has been going on for quite a while and I should have gotten feedback from you guys from the start, but better late than never. I'd love to hear if you see any ways to improve the pool that I might still be able to act upon.

I'd like to find main drain covers, return jets, etc that look nice. I've seen some real eyesores. Any suggestions?

Sorry if there's many pics, I thought you guys might get a kick out of seeing a sort of time lapse from the very beginning. They are now preparing the drains, coping, and waterline tiles.

Onward to the good part!
 

Attachments

  • 1.jpg
    1.jpg
    175 KB · Views: 93
  • 9.jpg
    9.jpg
    242.4 KB · Views: 89
  • 8.jpg
    8.jpg
    174.9 KB · Views: 95
  • 7.jpg
    7.jpg
    323.2 KB · Views: 99
  • 6.jpg
    6.jpg
    436.7 KB · Views: 94
  • 5.jpg
    5.jpg
    263.4 KB · Views: 83
  • 4.jpg
    4.jpg
    554.4 KB · Views: 84
  • 3.jpg
    3.jpg
    521.1 KB · Views: 86
  • 2.jpg
    2.jpg
    626.9 KB · Views: 92
  • 10.jpg
    10.jpg
    413.7 KB · Views: 93
Limited to 10 pics, so here's the second batch:
 

Attachments

  • 11.jpg
    11.jpg
    567.7 KB · Views: 65
  • 12.jpg
    12.jpg
    276.7 KB · Views: 63
  • 13.jpg
    13.jpg
    398.5 KB · Views: 59
  • 14.jpg
    14.jpg
    207.6 KB · Views: 61
  • 15.jpg
    15.jpg
    433.7 KB · Views: 65
  • 16.jpg
    16.jpg
    262.2 KB · Views: 65
  • 17.jpg
    17.jpg
    222.4 KB · Views: 59
  • 18.jpg
    18.jpg
    424 KB · Views: 58
  • 19.jpg
    19.jpg
    452.5 KB · Views: 57
  • 20.jpg
    20.jpg
    561.2 KB · Views: 64
A couple thoughts and some more info:
  • The pool is 32'7"x11'10" (9.9x3.6m), excluding the steps. It's 5' (1.5m) deep in the center, 4' (1.2m) on the side.
  • I did make it bigger than original planned, but I think I should have made it longer, like maybe 42'. The pool was one of the first things that had to be built, so it had the least time to agonize over and get it perfect. Don't make the same mistake, go big!
  • It has a SWG, propane heater, and solar water heater.
  • There's 4 pumps: pool filtration, spa filtration, infinity edge (to run 24/7), and spa "hydrotherapy" (plus a spa bubbler).
  • There's no skimmers, the infinity edge is the skimmer.
  • Apparently all the pipes in the walls are return jets except one larger one that is for suction (cleaning). The two pool main drains, spa drain, and outlet(s?) in the lower basin take water to be filtered. Does all that sound right? Is it common and good design for drains to be used as outlets like that? Dirt that sinks will be at the bottom, so maybe it'll work well.
  • If that's right, the pool (excluding the spa) has 9 return jets. That seems like a lot, no? What are the ramifications of having so many?
  • They didn't plan to use the waterline tile anywhere else. Do you think I should use it to trim the stairs and maybe spa seats? Maybe it's less busy without that.
 
Last edited:
These are the waterline tiles:
Picking tiles was an ordeal. The pics don't do them justice, in fact I had to order many samples of all kinds of tiles, because the pics can't be trusted at all. They look better in person than they do on the site!

The plaster will be Hydrazzo Gulfstream Blue. I hope it's not too white and not too blue. I went back and forth between that and Catalina Blue, which I think would have been too blue.

Thanks for the channel drain link! Looks cool. I doubt it could be hidden any better than that. I wonder if it requires any special preparation in the gunite. I'll look into it more deeply!
 
Last edited:
I LOVE that tile! One thing to think about is what color of mortar to use under it. Get some paint cards to put under them. White, off white, light gray, med. gray. See which one gives you the look you like. You can also pick out different grout colors. White will make each tile pop where a light gray will help them blend together a bit. BOTH are very pretty!

Those channel drains are really no different to prep for that the traditional round ones. Instead of two round spots there will be one longer oval one with the pipe coming up at about the same spots.
 
The GC is on the channel drains! If it can be done, they'll make it happen. They have been amazing, making all kinds of crazy stuff I've come up with a reality. Stupidly expensive though (cost plus). YOLO ;)

Putting the sample tiles on different shades to pick grout is a good idea! The plan so far is Bostik Dimension grout in the color Diamond, which was recommended by the tile website. Do you have any experience with that? It's a little bit sparkly. It's not the whitest (Snowflake is whiter) but it's pretty bright. My thinking was I don't want the semi-transparent tiles to look muted, but I'm a little scared that Snowflake would be too white. Attached are two pics I found online of Diamond.
 

Attachments

  • 5912-diamond[1].jpg
    5912-diamond[1].jpg
    167.4 KB · Views: 9
  • 5913-diamond2[1].jpg
    5913-diamond2[1].jpg
    140.3 KB · Views: 9

Enjoying this content?

Support TFP with a donation.

Give Support
I agree, at least for the pool it makes sense for the waterline to sparkle!

I didn't get pricing without the infinity edge, so I can't say, sorry. My pool is embarrassingly expensive, partly because it's done by a very reputable contractor and partly because it's quite remote, making everything cost more. I've been involved at every step with building this house, as I have all kinds of ideas on how to make it amazing. While I haven't picked up a hammer, it's still been an enormous amount of time and effort on my part. I loved doing it and love the results, but I don't think I'll ever do it again!

The upfront costs of the infinity edge are more for sure, as they need to build the lower basin and spillover. There are also ongoing costs dependent on the length of the edge because the falling water evaporates more and loses more chemicals. Also you may want to run the pumps more, possibly 24/7 if you're doing plaster all the way to the edge like I'm doing. That's not usually recommended, as the plaster will crack if exposed, but I didn't want to cap the infinity wall with coping. I'm hoping the plaster lets the edge blend better with the background.

While this is my first pool with an infinity edge, it seems pretty neat to use it for skimming because there are no skimmers along the sides of the pool, so no need for access panels and no flapping sounds.

Oh, it may not have been obvious in the pics, but there are two propane fire effects at the infinity edge. There's something primal about having fire near water! I've seen a lot of tiki torches, but I didn't want anything sticking up in the view. I'd do a stealth fire effect or none, so ended up finding a way to stick it in the coping. When it's not on, it shouldn't be noticeable, just a small bed of rocks. Attached are some renders, day and night.
 

Attachments

  • 5976-0Xb8[1].jpg
    5976-0Xb8[1].jpg
    275.1 KB · Views: 50
  • 5977-AUoQ[1].jpg
    5977-AUoQ[1].jpg
    169 KB · Views: 49
It's been a long time -- new pictures! No plaster or water yet. Progress is slow, as the pool gets paused to build the house and everything else. I hope it'll be done this year.

The waterline tiles should make a cool color and sparkly effect! One of the pics has a sample of the Hydrazzo plaster finish next to the waterline tiles and coping tiles.

The coping and spillover wall is all tile. The coping uses "step" pieces with a J shape, meant for stairs. Those have corners that are finished at the factory, so the tile coping looks good without showing the side of the tile. The square hole in the coping is for a flush fire feature.

7778-cmZh.jpg7779-ez5a.jpg7780-QTQk.jpg7781-V28U.jpg7782-CUX8.jpg7784-qKPU.jpg7785-KLmv.jpg7787-nFmq.jpg7788-j7SB.jpg7789-l3iH.jpg
 
Last edited by a moderator:
  • Love
Reactions: Newdude
Thanks! It's killing me that it's taking so long, but they are doing a great job. If they complete it by January 2023 it'll be almost 5 years since I started shopping for land, 4 years since I bought the land, and 3 years of construction time. I'm so ready! I've spent TONS of time on the project planning, making sure we're doing everything possible to make it super cool. Unfortunately that leads to adding stuff which is a large contributor to the slowness. The cool factor is through the roof though.
 
Although very pretty thus far I'm not a fan of those very sharp edges with the coping by the spa besides maybe it's only in the pictures but in reality it's not as bad but the overhang towards the inside may be uncomfortable while sitting inside.
 
  • Like
Reactions: kimkats
Who ever is doing your tile is doing a great job! Love the corners and how much care it looks like they are taking!

Thanks! Agreed, the tile guys in particular are really great. The most important thing is the GC is amazing and really stays on top of the subs. Most subcontractors want to come in, do what they always do, and GTFO as quickly as possible. Getting them to take extra care or do something nonstandard is like pulling teeth.

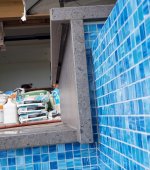
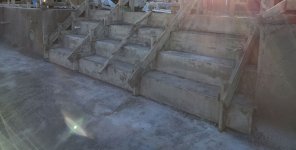
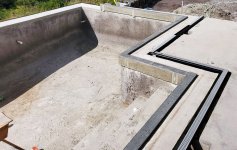
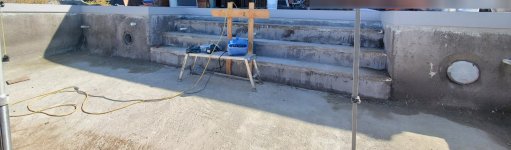
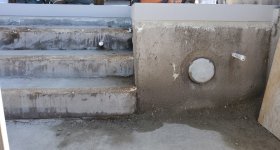
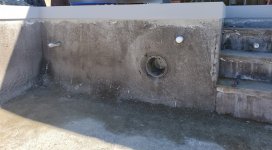
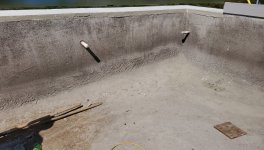
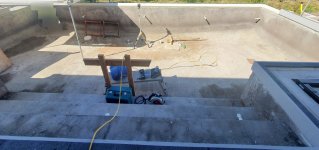
Attached are some pics of the spa spillover, which I'm sure was tricky. They also show the gap under the coping overhang that will have LED strips. Those are RGBW and will have 8 individually addressable segments. That is kind of fun, though I expect they'll be a warm white most of the time.

I find those spa rubber dome buttons confusing. They have just a blinking light and sometimes it's not clear what state it is in when a single button cycles through heat/pump/off. Did I press the button one too many times?! I'm super into home automation and my computer will be connected to everything. I'll know the spa state and temp, so when the spa is on I could have the spa LED strips change color based on the spa temp. With the 8 segments it could oscillate between 2 similar colors to give a subtle fiery effect!

Although very pretty thus far I'm not a fan of those very sharp edges with the coping by the spa besides maybe it's only in the pictures but in reality it's not as bad but the overhang towards the inside may be uncomfortable while sitting inside.

I had this same concern long ago. This is what my GC said:

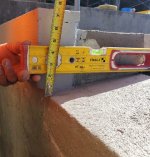
The coping overhang is 1-1/4" at the pool. It's 1-3/4" on the spa exterior and 1" on the spa interior. I looked at the spa interior overhang closely with the tile setter. I got in the spa and sat down to check it out, the overhang is in a good spot as it's above your shoulders but below your head. The 1" overhang isn't obstructive and keeps the spa water from splashing out. We haven't set it yet so there is time to alter it, but I'm confident that this is a good set up overall.

I love that he had already considered it in depth before I even asked! The 1" sounds OK so I went ahead with his suggestion. It looks like more in the pics, probably due to the shadows. In the attached pics, the gap for the LED strip is 1/2" and gives some scale for the 1" overhang over the waterline tile in the spa.

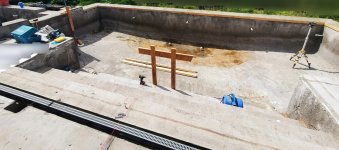
I'm remote for the entire house building project for reasons. I really wish it didn't have to be that way, but it's unavoidable. I can't say enough good things about my GC for staying on top of everything and including me in decisions. The project could have easily been a disaster with someone else.

BTW, the 
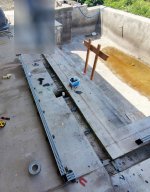
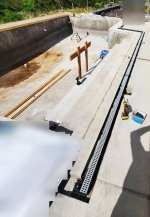
main drain covers as suggested earlier are a go! They'll be the 10" round clear version with Hydrazzo plaster on top. I'm guessing all return jets are somewhat ugly, but at least they are easily changed. The slot drains next to the coping are these aluminum 2" drains that will be powder coated to better match the coping.
 

Attachments

  • 7793-vAkI.jpg
    7793-vAkI.jpg
    241.2 KB · Views: 10
  • 7794-q5wI.jpg
    7794-q5wI.jpg
    256.5 KB · Views: 10
  • 7795-HbuO.jpg
    7795-HbuO.jpg
    469.5 KB · Views: 11
Last edited:
Thread Status
Hello , This thread has been inactive for over 60 days. New postings here are unlikely to be seen or responded to by other members. For better visibility, consider Starting A New Thread.