Pool Construction Tip of the Day/Week/Month

Another Tip for Today

Don't be a dumb @** like me. I got up at 5:45am and drove about 40 minutes to meet the guys at the Material Yard. The Yard would not take back the open bag of color (San Diego Buff), so I had to purchase an additional bag (Sandstone). It turns out that both colors use the same bag of Davis Color (#5237). I was already on my way back home when the guys called to let me know :hammer:

So...Look at the Color Codes on the chart. The Davis Color chart has 40 different sample colors. They only use 16 different color pigments.

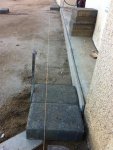
If I had know that, I would have used a heavier mix of a different color on the Coping (4 lbs of Bayou 6130) instead of 4 lbs of Mesquite 677 (Kahlua).

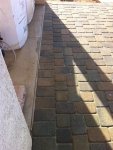
So today we are pouring a "Custom" color :? 1 lb of pigment per bag of concrete. Sandstone is .75lb and San Diego Buff is 1.5lb per bag.
 
Nightmare said:
Tip #2 - Pick out the tile for your skimmer

Pick out a couple 18" tiles that you like. They will become the "lid" of the inside of the skimmers (and other accessories). I watched the guys install the tiles and it just didn't click in my head. They pour the coping over the tile and it isn't comming out.

I asked my PB about this. Here's the email conversation:

Me: What forms the roof of the skimmer?

PB: Piece of aluminum, then brick coping

Me: OK. Will aluminum be covered by plaster?

PB: Its under brick, u will not see it.
 
Hmm. I assume your coping is brick(?). So you won't see it from the top. A metal plate or something similar is probably necessary if there are 4-5 individual bricks that span the opening in the skimmer. What is the finish, if any, for the under side. I don't know how much weight it will take to break a 3" piece of concrete, but I assume more than it will ever see.
 
I waited on this tip to make sure I didn't screw anything up.

Tip-
Don't let your guys put a white drain in the middle of your colored stamped concrete, just because they only sell Black, Green and White drains at HD/Lowes.

My guys were going to install the white drains, but I went out and found some "Sand" color ones from NDS. The round ones come in 4 colors (Black, Green, Grey and Sand) and a bunch of sizes. I wrapped the drain covers in plastic wrap (probably not necessary) and installed them with a wire loop sticking out (so I could pull them out once the concrete set up). I pulled out all 6 today and cleaned up the holes a little. The Sand drain cover looks 10x better than the white in person (and it covers the white edge of the vertical pipe.
 

Attachments

  • Drain 3.JPG
    Drain 3.JPG
    40.8 KB · Views: 82
  • Drain 2.JPG
    Drain 2.JPG
    62.6 KB · Views: 82
  • Drain 1.JPG
    Drain 1.JPG
    68.7 KB · Views: 82
Tip From Last Week:

Nothing is Straight

The home builder didn't put the corner post in line with the house, so the patio guy just floated it out. Everything was fine when the back of the house was concrete, but this is what it looks like when you try to install pavers.
 

Attachments

  • IMG_5228 (Large).JPG
    IMG_5228 (Large).JPG
    99.8 KB · Views: 63
  • Pavers (Large).JPG
    Pavers (Large).JPG
    97.8 KB · Views: 63
So how did they deal with it?
The way I'd do it is to run the string line a little closer to the house, (6 inches at the widest point is what I'd do) and start with the big pavers on the other side of the string. The side of the string closest to the house, you would do a narrow "soldiers course" with either 6x12's or 6x6's and make cuts as need to follow the conture of the house. Everything would be square but you would have narrower 6x12's in places.
 
The house is faily straight. They put a full size border tile down the back side of the house. As they moved down the concrete patio area they cut down the full size tiles as necessary to form a straight line for the rest of the paver patio.

We got a little lucky on the layout, there are no cuts on two whole sides of the patio (the side closest to the pool and the side opposite the house).

The final product looks like this.
 

Attachments

  • Paver Final (Large).JPG
    Paver Final (Large).JPG
    86.7 KB · Views: 49
Thread Status
Hello , This thread has been inactive for over 60 days. New postings here are unlikely to be seen or responded to by other members. For better visibility, consider Starting A New Thread.