Hey everyone,
I spent my holiday weekend rebuilding my Pentair IntelliFlo pump (PN: 011018). I figured I'd share some takeaways as it was not hard to do and these pumps are not the cheapest, so I think repair should be the way to go (if possible). My pump was manufactured in 2014, I do not know how many years was it in use, it came with the house. It does not appear much service was put into it.
Disclaimer
I went all the way to disassembling the motor, cleaning it and repainting. You might need some not quite common tools along the way, so read the whole thing before you start.
Also, if you want to ask about how to not get shocked by electricity or not lose your fingers to the motor magnets, you might want to rethink if you want to do this.
I will be glad to answer questions but please do not come to me with "I followed your post and ruined my pump, I somehow think it is your fault"
You might as well follow Pentair's video here for the gasket/seal replacement, if that is the only thing you are about to be doing, you can check some images below for IntelliFlo as their pump is WhisperFlo I think (definitely not the same as my IntelliFlo). I am mostly posting it as "it's not that hard" post so people can see what a difference a bit of care can make. The video provides a bit more detail though.
I personally used this kit: Amazon.com: BadAss Pool Supply O-Ring Rebuild Repair Kit for Pentair WhisperFlo/IntelliFlo, Black Gasket, fits Years 2/08 and Later, Go kit 32.: Garden & Outdoor, there are cheaper ones but they had it nicely marked based on Pump's manufacture date. I am in no way associated with the vendor and only share this for reference because this worked for my specific pump model/year.
Assessing damage
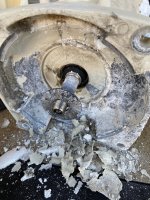
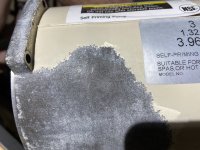
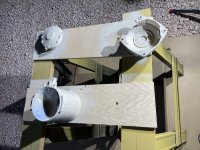
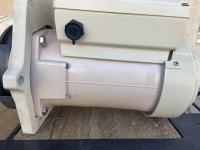
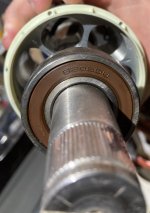
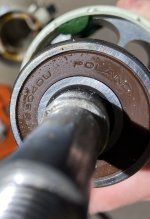
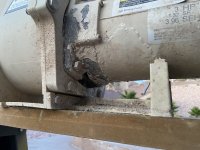
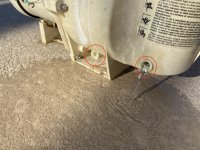
As you can see on the photos, the pump definitely is/has been leaking, there is a ton of calcium build up, paint if flaking off, this will need some serious TLC.

Disconnecting the pump
First, verify you have a way of disconnecting and reconnecting the pump from both inlet and outlet plumbing, while some repairs can probably be done in-place I would recommend against this, it would be a horrible experience at best
I had to first install 2" unions on both inlet and outlet of the pump (not displayed in all pictures, some pre-date the union install). There is nothing worse than realizing you have no way of re-installing the pump without parts that might take some days to get.
1. Turn the pump off at the control panel
2. Turn the breaker to the pump off
3. Disconnect inlet/outlet plumbing
4. Disconnect the electrical wiring
The pump should now be free to take to your bench or somewhere where you can comfortably work on it.
Before you take it anywhere, do not forget to drain the pump completely. Give it time, you really do not want a gallon of water all around your table/shop.
Disassembly
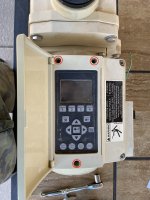
Start by removing the control panel, this will make it quite a bit easier to maneuver around. If the pump was running recently the control board heatsink and the motor will likely be hot, so keep that in mind.
Once the 3 screws are out pull upward as straight as possible.
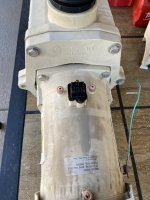
Now proceed to remove the 6 bolts (9/16") that hold the basket assembly to the pump assembly. 2 of them have nuts - keep those together as they are longer. Mark your parts, there are other bolts of different lengths, you do not want to mix them up. Also remove the motor fan cover, it has 3 screws, the photo only shows 2, last one is on the very bottom. Be careful not to break the fan during the whole process!
Once the basket assembly is removed, remove the 2 hex screws to release the diffuser, you'll have to guess, I do not remember the hex key size

While holding the motor fan (or use a big flat head screwdriver to hold the shaft itself) unscrew the set screw that holds the impeller, this screw is reverse threaded so righty-loosey, lefty-tighty. Once the screw is removed you can unscrew the impeller off the shaft while still holding the motor fan (regular thread, lefty-loosy). This is the removed impeller and its seal:
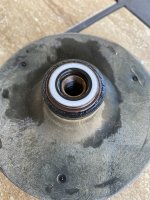
Now you can remove the seal plate held by the 4 screws.
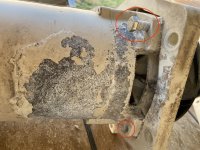
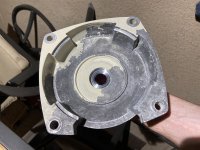
As you can see the motor has a LOT of calcium deposits and paint that has started flaking off all over the place.
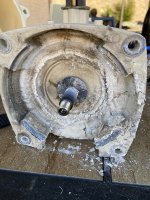
At this point you are done disassembling the pump and can replace all the seals. Do not forget about the little one that is under the impeller set screw, it is pretty well hidden (ask me how I know ).
).
The PS-1000 seal (two-part seal separating the impeller and the seal plate) is trickier than just a gasket, I recommend referring to the video, it has nice and detailed instructions. You want to use silicone sealant (NOT lubricant) on the metal part of the seal that is pressed into the seal plate. The impeller seal can be pushed in just using soapy water. I used some pool silicone-based lube on the rest of the o-rings and gaskets just to be sure.
Then just reverse the steps to re-assemble. You should clean everything well and remove calcium buildup, at least I recommend that to prevent it from building further.
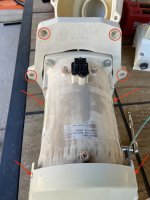
I went ahead and disassembled the motor as my pump was pretty bad and it needed some TLC as well. There are 4 torx screws on the back cover and 4 torx screws holding the front cover, you might need an extension to actually unscrew the ones holding the front cover because they are really close to the motor body.
Continues below (unable to attach more files).
I spent my holiday weekend rebuilding my Pentair IntelliFlo pump (PN: 011018). I figured I'd share some takeaways as it was not hard to do and these pumps are not the cheapest, so I think repair should be the way to go (if possible). My pump was manufactured in 2014, I do not know how many years was it in use, it came with the house. It does not appear much service was put into it.
Disclaimer
I went all the way to disassembling the motor, cleaning it and repainting. You might need some not quite common tools along the way, so read the whole thing before you start.
Also, if you want to ask about how to not get shocked by electricity or not lose your fingers to the motor magnets, you might want to rethink if you want to do this.
I will be glad to answer questions but please do not come to me with "I followed your post and ruined my pump, I somehow think it is your fault"
You might as well follow Pentair's video here for the gasket/seal replacement, if that is the only thing you are about to be doing, you can check some images below for IntelliFlo as their pump is WhisperFlo I think (definitely not the same as my IntelliFlo). I am mostly posting it as "it's not that hard" post so people can see what a difference a bit of care can make. The video provides a bit more detail though.
I personally used this kit: Amazon.com: BadAss Pool Supply O-Ring Rebuild Repair Kit for Pentair WhisperFlo/IntelliFlo, Black Gasket, fits Years 2/08 and Later, Go kit 32.: Garden & Outdoor, there are cheaper ones but they had it nicely marked based on Pump's manufacture date. I am in no way associated with the vendor and only share this for reference because this worked for my specific pump model/year.
Assessing damage
As you can see on the photos, the pump definitely is/has been leaking, there is a ton of calcium build up, paint if flaking off, this will need some serious TLC.


Disconnecting the pump
First, verify you have a way of disconnecting and reconnecting the pump from both inlet and outlet plumbing, while some repairs can probably be done in-place I would recommend against this, it would be a horrible experience at best
I had to first install 2" unions on both inlet and outlet of the pump (not displayed in all pictures, some pre-date the union install). There is nothing worse than realizing you have no way of re-installing the pump without parts that might take some days to get.
1. Turn the pump off at the control panel
2. Turn the breaker to the pump off
3. Disconnect inlet/outlet plumbing
4. Disconnect the electrical wiring
The pump should now be free to take to your bench or somewhere where you can comfortably work on it.
Before you take it anywhere, do not forget to drain the pump completely. Give it time, you really do not want a gallon of water all around your table/shop.

Disassembly
Start by removing the control panel, this will make it quite a bit easier to maneuver around. If the pump was running recently the control board heatsink and the motor will likely be hot, so keep that in mind.
Once the 3 screws are out pull upward as straight as possible.


Now proceed to remove the 6 bolts (9/16") that hold the basket assembly to the pump assembly. 2 of them have nuts - keep those together as they are longer. Mark your parts, there are other bolts of different lengths, you do not want to mix them up. Also remove the motor fan cover, it has 3 screws, the photo only shows 2, last one is on the very bottom. Be careful not to break the fan during the whole process!
Once the basket assembly is removed, remove the 2 hex screws to release the diffuser, you'll have to guess, I do not remember the hex key size


While holding the motor fan (or use a big flat head screwdriver to hold the shaft itself) unscrew the set screw that holds the impeller, this screw is reverse threaded so righty-loosey, lefty-tighty. Once the screw is removed you can unscrew the impeller off the shaft while still holding the motor fan (regular thread, lefty-loosy). This is the removed impeller and its seal:

Now you can remove the seal plate held by the 4 screws.

As you can see the motor has a LOT of calcium deposits and paint that has started flaking off all over the place.

At this point you are done disassembling the pump and can replace all the seals. Do not forget about the little one that is under the impeller set screw, it is pretty well hidden (ask me how I know
The PS-1000 seal (two-part seal separating the impeller and the seal plate) is trickier than just a gasket, I recommend referring to the video, it has nice and detailed instructions. You want to use silicone sealant (NOT lubricant) on the metal part of the seal that is pressed into the seal plate. The impeller seal can be pushed in just using soapy water. I used some pool silicone-based lube on the rest of the o-rings and gaskets just to be sure.
Then just reverse the steps to re-assemble. You should clean everything well and remove calcium buildup, at least I recommend that to prevent it from building further.
I went ahead and disassembled the motor as my pump was pretty bad and it needed some TLC as well. There are 4 torx screws on the back cover and 4 torx screws holding the front cover, you might need an extension to actually unscrew the ones holding the front cover because they are really close to the motor body.
Continues below (unable to attach more files).
Last edited:


