- Aug 23, 2017
- 109
- Pool Size
- 17700
- Surface
- Plaster
- Chlorine
- Salt Water Generator
- SWG Type
- Hayward Aqua Rite (T-15)
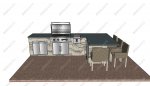
After spending enough time poolside, wife and I decided we needed an outdoor kitchen to facilitate spending even more time outdoors. All I originally wanted was a place for my BGE and some storage. My dad convinced me I needed a sink too, but he’s the type you either go all out or go home. I wanted it against the house next to the pool, and seemed simple enough. Just one long bank of cabinets with my BGE, storage, and... a sink.
I started doing research last fall and was going down the path of building the cabinets out of king starboard and having a custom stainless top made. After costing it out, I found a cheaper option with premade stainless cabinets that were 100% all stainless... and I kind of fell in love with the look. So I called the company, got some dimensions and did some planning and placed my order.
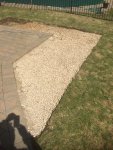
I also knew I wanted to run water from the closest hose bib, sink would drain through the clean out in the wall already there and I’d run my electrical from an unused outlet on that side of the deck. Below is what it looked like before starting anything.

So with the cabinets coming premade I decided to just build out a 4” deep “back splash” to route my water lines and electrical.

Here you can see my treated lumber and cement board backer for my tile, my pex water line for sink and another hose bib on side nearest fence too. I added three electrical outlets and three lights on a waterproof switch next to the sink. All the lights and electrical outlets plug in to a gfci outlet I installed in the sink cabinet so was no need to have any permitting done. The cabinet layout has a space for an outdoor fridge, but I put an outlet in the space, tiled it, and use it to house my electric smoker.

After the backsplash was built out, it was time to tile. I didn’t have much tile to buy so I went expensive and bought some travertine stacked stone to match the pool coping. My pool builder also gave me his account info so I could go to his coping supplier and buy matching travertine coping to use as the cap on my backsplash.

I didn’t take as many build out pics as I thought, as I did must of the tiling over the winter when it was cooler. The above is the finished part before I realized I wanted an awning over it. I added black marine starboard skirting around the bottom to hide the legs and keep debris from blowing under the cabinets. I also forgot to mention the fun job of trying to level cabinets on the edge of the pool deck that slopes a lot to facilitate drainage.
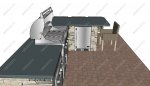
I found a dealer who makes prefab aluminum and steel awnings and ordered a custom one in silver to match the kitchen area.

That’s my mounting the awning above the kitchen. You also get a good feel for the nice silver color of the steel standing seam panels. All in all it went together pretty quick.

I kept it shorter on the grill side so smoke wouldn’t collect underneath it.


All in all it turned out quite nice and we pretty much cook everything outdoors now. For non grilled things we use a plug in portable induction burner which we keep stored in the cabinet when not in use.
The cabinets have more storage then I thought when I ordered them. The space under the sink is large and I keep my cleaners, some chemicals, and pool testing kit there. The cabinet next to it has pull out trash bins, and ice bins and wine racks for entertaining pool side. The three drawer cabinet keeps all my grilling stuff, and bottom drawer holds a bin for charcoal.
It turned out quite nice, and probably last for many years to come. It nicely extends pool days into nice pool evenings. And just for fun here’s a pic of my TFP method pool that’s been crystal clear since start up in 2017 looking at it from the outdoor kitchen area.

I started doing research last fall and was going down the path of building the cabinets out of king starboard and having a custom stainless top made. After costing it out, I found a cheaper option with premade stainless cabinets that were 100% all stainless... and I kind of fell in love with the look. So I called the company, got some dimensions and did some planning and placed my order.
I also knew I wanted to run water from the closest hose bib, sink would drain through the clean out in the wall already there and I’d run my electrical from an unused outlet on that side of the deck. Below is what it looked like before starting anything.
So with the cabinets coming premade I decided to just build out a 4” deep “back splash” to route my water lines and electrical.
Here you can see my treated lumber and cement board backer for my tile, my pex water line for sink and another hose bib on side nearest fence too. I added three electrical outlets and three lights on a waterproof switch next to the sink. All the lights and electrical outlets plug in to a gfci outlet I installed in the sink cabinet so was no need to have any permitting done. The cabinet layout has a space for an outdoor fridge, but I put an outlet in the space, tiled it, and use it to house my electric smoker.
After the backsplash was built out, it was time to tile. I didn’t have much tile to buy so I went expensive and bought some travertine stacked stone to match the pool coping. My pool builder also gave me his account info so I could go to his coping supplier and buy matching travertine coping to use as the cap on my backsplash.
I didn’t take as many build out pics as I thought, as I did must of the tiling over the winter when it was cooler. The above is the finished part before I realized I wanted an awning over it. I added black marine starboard skirting around the bottom to hide the legs and keep debris from blowing under the cabinets. I also forgot to mention the fun job of trying to level cabinets on the edge of the pool deck that slopes a lot to facilitate drainage.
I found a dealer who makes prefab aluminum and steel awnings and ordered a custom one in silver to match the kitchen area.
That’s my mounting the awning above the kitchen. You also get a good feel for the nice silver color of the steel standing seam panels. All in all it went together pretty quick.
I kept it shorter on the grill side so smoke wouldn’t collect underneath it.
All in all it turned out quite nice and we pretty much cook everything outdoors now. For non grilled things we use a plug in portable induction burner which we keep stored in the cabinet when not in use.
The cabinets have more storage then I thought when I ordered them. The space under the sink is large and I keep my cleaners, some chemicals, and pool testing kit there. The cabinet next to it has pull out trash bins, and ice bins and wine racks for entertaining pool side. The three drawer cabinet keeps all my grilling stuff, and bottom drawer holds a bin for charcoal.
It turned out quite nice, and probably last for many years to come. It nicely extends pool days into nice pool evenings. And just for fun here’s a pic of my TFP method pool that’s been crystal clear since start up in 2017 looking at it from the outdoor kitchen area.