New to TFP from Central Florida

Apr 9, 2024
4
Sanford, FL
Pool Size
11500
Surface
Plaster
Chlorine
Liquid Chlorine
Hi folks, just wanted to introduce myself here as a new convert. Bought a home with a pool 2 years ago in central Florida and am running and maintaining on my own. Originally was testing with "strips" and sanitizing with tri-chlor tablets and liquid bleach for shock, until I discovered an issue with stabilizer levels. Learned a bit more about tri-chlor + sanitizer and how useless my strips were and got myself a Taylor K-2006 and entered a whole new world. Recovering from 130 ppm CYA levels to about 70-80 ppm as I write this. Used a local pool service to help achieve this albeit with a somewhat skeptical aluminum process (also involved significant draining / refill will admittedly probably did most the work) and he also helped to fully clean out my Hayward DE3620 and put in fresh new grids. The pool is really sparkling now (thanks to the flocculant service) and I will do all i can to keep it that way even as I have to run with higher FC levels due to still modestly higher CYA level.

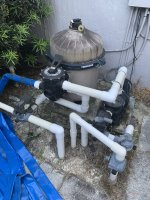
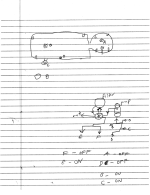
Anyways, trying to learn even more about my pool in this forum as it did not come with an instruction manual and as a software engineer, i like documentation :). I recently embarked on mapping out all the intakes and returns, and what pipe goes where, hoping for a little help in that arena going forward. For example, my vacuum port doesn't seem to be pulling so was going to experiment with opening up intake D in my attached diagram.

Anyways, thank you for all the knowlege in this forum, i've already learned tons.

Best,
Eric
 

Attachments

  • 20240426_232221549_iOS.jpg
    20240426_232221549_iOS.jpg
    713.6 KB · Views: 9
  • pool-diagram.png
    pool-diagram.png
    76.8 KB · Views: 8
Welcome to TFP.
Thanks for the equipment pad photo and drawings.
My assumption is that D is the suction vacuum. It is noted as OFF on the drawing and valve is OFF to that suction line. When you want to run the vacuum, it works best when both the drain and skimmer lines are CLOSED and only the vacuum line is OPEN. Have you tried that?
 
Hi Herman - Yes D in the drawing was my assumption for the vac port. When i was trying earlier with the filter off i was having a tough time getting the valve to even budge. The handle feels a little flimsy like it's going to snap off if I apply too much force. It likely hasn't been moved in years. Is there any trick? Does the pump have to be on? When I have needed to vacuum anything off the floor when not using my Dolphin robot, i've simply fed the tube into the bottom of the skimmer. It works but would be nice to have this other option during normal filtering and overnight vacuuming.
 
When i was trying earlier with the filter off i was having a tough time getting the valve to even budge. The handle feels a little flimsy like it's going to snap off if I apply too much force. It likely hasn't been moved in years. Is there any trick? Does the pump have to be on?
The valve looks like an older Jandy type diverter valve as it is gray (not black). I see that black knob on the side which is not on the newer style valves and is the lubrication inlet. The valve is easy to disassemble. One option, with the pump off, unscrew the top knob and remove the handle. Then unscrew the screws that hold the top on. The whole diverter valve should be able to be removed with the top cover. You can check if there is debris holding the valve from moving. The stem of the diverter valve slips through the top and there are either 1 or 2 orings that may need lubrication.
Asking @1poolman1 if he has any additional knowledge to shed on this valve.

See this link
Just the original Jandy grey-body valves. Your instructions are right on. Many don't know that the knob locks the handle in place. Sometimes takes some "persuading" to get the lid off. With the handle attached and all screws removed, lifting while trying to turn the locked handle helps. A strong knife under the lid, not the loops for the screws, helps to pry as well.
Get some silicone lube for the stem and lid O rings and diverter. As they are old, a new set of O rings is the better choice.
 
  • Like
Reactions: HermanTX
Thanks for the pointers. I will definitely try this tomorrow and also see what size o-rings they are, I might have one handy. The black knob on right actually says to turn to “grease”. Strange instruction, I almost want to plug in my grease gun like how I service my ride on mower. :LOL:
 
Thanks for the pointers. I will definitely try this tomorrow and also see what size o-rings they are, I might have one handy. The black knob on right actually says to turn to “grease”. Strange instruction, I almost want to plug in my grease gun like how I service my ride on mower. :LOL:
That "knob' is actually a grease cup. If you can get the knob off, fill it with pool lube, have the valve handle face directly away from the knob, screw the knob back on. It will force the lube into the valve.
The O rings are not brand-specific. Just get O rings for a Jandy-type valve. All of those type valves use the same O rings. Amazon is a great source for them (ignore the description, they will work):
 
When I unscrewed the knob I noticed the grease there and made the eureka to what you are saying. I got some grease in there screwed down and was able to start to coax the handles to move on all my valves. Still takes some elbow grease but better than before. When I don’t have so much on the honey-do list I’ll take the valves apart to replace the o-rings, but this simple step got me in business and was able to drive my sweeping vac head. Thanks all!
 
  • Like
Reactions: HermanTX