New Build - Mesa, AZ

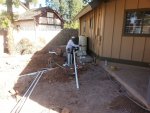
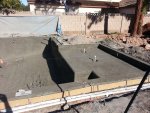
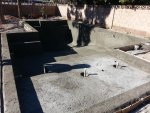
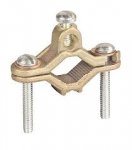
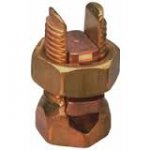
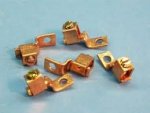
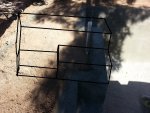
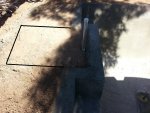
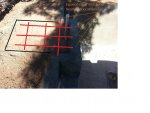
Plumbing is happening today

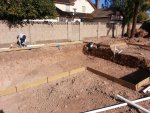
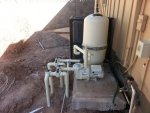
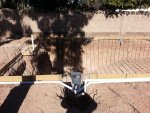
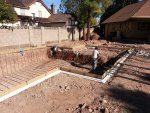
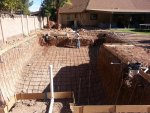
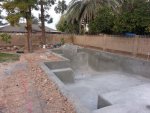
I wanted to design an efficient pool. The information on this board was a great help. There are 3 supply lines (2 skimmer and main drain) that are 2". All the other lines are 2". I chose a cartridge filter to eliminate the head losses in the backwash valve (and because I hated dealing with the DE on my last pool). I also oversized the filter to make time between cleanings longer. I chose a variable speed pump so I can run it slowly the majority of the time for filtering. It will ramp up to power the pool cleaner, or run the sheer decent and bubblers.

I am hoping all this will keep the electric bills low. They are already high enough! On my last pool I had a single speed pump plus a booster for the cleaner. I ended up running the booster a lot because I had a lot of trees around the pool. Anyway, my electric bill from the pool was high.

[attachment=2:qrqz5muf]20131216_123315.jpg[/attachment:qrqz5muf]

[attachment=1:qrqz5muf]20131216_123339.jpg[/attachment:qrqz5muf]

[attachment=0:qrqz5muf]20131216_123341.jpg[/attachment:qrqz5muf]
 

Attachments

  • 20131216_123315.jpg
    20131216_123315.jpg
    300.2 KB · Views: 323
  • 20131216_123339.jpg
    20131216_123339.jpg
    310.4 KB · Views: 323
  • 20131216_123341.jpg
    20131216_123341.jpg
    279.9 KB · Views: 322
[attachment=1:2tmikhrg]20131216_123345.jpg[/attachment:2tmikhrg]

[attachment=0:2tmikhrg]20131216_123401.jpg[/attachment:2tmikhrg]
 

Attachments

  • 20131216_123345.jpg
    20131216_123345.jpg
    313.4 KB · Views: 323
  • 20131216_123401.jpg
    20131216_123401.jpg
    229.6 KB · Views: 321
Pics of finished plumbing and steel work

[attachment=2:2rxfizqe]20131217_125321.jpg[/attachment:2rxfizqe]

[attachment=1:2rxfizqe]20131217_125333.jpg[/attachment:2rxfizqe]

[attachment=0:2rxfizqe]20131217_125222.jpg[/attachment:2rxfizqe]
 

Attachments

  • 20131217_125321.jpg
    20131217_125321.jpg
    212.8 KB · Views: 281
  • 20131217_125333.jpg
    20131217_125333.jpg
    323.9 KB · Views: 282
  • 20131217_125222.jpg
    20131217_125222.jpg
    280.9 KB · Views: 280
More steel work

[attachment=1:mez2coow]20131217_125227.jpg[/attachment:mez2coow]

[attachment=0:mez2coow]20131217_125245.jpg[/attachment:mez2coow]
 

Attachments

  • 20131217_125227.jpg
    20131217_125227.jpg
    328.4 KB · Views: 283
  • 20131217_125245.jpg
    20131217_125245.jpg
    294 KB · Views: 284
Gunite went in today. I did the electrical work myself in the evenings last week and had the pre-gunite inspection on Friday.

[attachment=1:3mzom5ib]20131223_081922.jpg[/attachment:3mzom5ib]

[attachment=0:3mzom5ib]20131223_112039.jpg[/attachment:3mzom5ib]
 

Attachments

  • 20131223_081922.jpg
    20131223_081922.jpg
    257.1 KB · Views: 284
  • 20131223_112039.jpg
    20131223_112039.jpg
    274.9 KB · Views: 282
More gunite

[attachment=1:382ns03o]20131223_112127.jpg[/attachment:382ns03o]

[attachment=0:382ns03o]20131223_135505.jpg[/attachment:382ns03o]
 

Attachments

  • 20131223_112127.jpg
    20131223_112127.jpg
    336.4 KB · Views: 281
  • 20131223_135505.jpg
    20131223_135505.jpg
    267.1 KB · Views: 281
Here are some things I have learned so far that may be helpful if others are searching for answers.

1. Don't assume your yard is level. Mine slopes more than a foot from the patio to the fence. I had planned on making my pool deck even with the patio, but when the excavators came out they informed me the bond beam would be about 20" above the bottom of the fence. So I had to change my elevation so that there is now a step between the pool deck and the patio.

2. Keep an eye on the water pressure after the plumbing is done. They will pressurize the pipes with water. Keep an eye out for leaks or dropping pressure. I had a leak in one of the skimmers the first day. The other crews coming after the plumbers can cause a leak too so it is important to keep an eye on it.

3. As far as pool bonding goes. To connect the bonding wire to the rebar steel, use a ground clamp like this.

[attachment=2:hz1ozdug]groundClamp.jpg[/attachment:hz1ozdug]

To slice the grounding wire to itself, use a split bolt, like this.

[attachment=1:hz1ozdug]split bolt.jpg[/attachment:hz1ozdug]

To attach the bonding wire to equipment, use this:

[attachment=0:hz1ozdug]bondClamp.jpg[/attachment:hz1ozdug]

4. The pool water is normally bonded using the metal in the light niche. If you do not have a light niche, then for a gunite pool, the gunite and steel shell is considered the bond for the water. For a vinyl or fiberglass pool you would need to use a separate bonding device for the pool water.

5. If you are putting umbrella sleeves in the tanning shelf or bond beam the gunite people need to know where they are goings so they can leave a hole in the gunite.

6. If you are putting coping around the pool (instead of poured concrete acting as the coping), there needs to be a notch put in the gunite where the aerators are. This is so the aerators can be piped under the coping. If the deck is poured concrete, then the aerators are piped out the edge of the deck.

I think that is all for now.
 

Attachments

  • groundClamp.jpg
    groundClamp.jpg
    5.5 KB · Views: 277
  • split bolt.jpg
    split bolt.jpg
    3 KB · Views: 277
  • bondClamp.jpg
    bondClamp.jpg
    5.5 KB · Views: 277
These pictures show the difference of where the aerator exits depending on the deck material. For a poured concrete deck, the aerator exits from the side of the deck.

[attachment=1:1h1cn058]aeratorPoured.jpg[/attachment:1h1cn058]

For a deck with coping, the aerator exits a the top of the bond beam, just below the coping. So the bond beam needs a little niche or channel scooped out at that spot to allow the pipe to go there.

[attachment=0:1h1cn058]aeratorCoping.jpg[/attachment:1h1cn058]
 

Attachments

  • aeratorPoured.jpg
    aeratorPoured.jpg
    85.7 KB · Views: 278
  • aeratorCoping.jpg
    aeratorCoping.jpg
    75.7 KB · Views: 280

Enjoying this content?

Support TFP with a donation.

Give Support
I need some advice or opinions

In the deep end of the pools I am building a raised jumping platform. You can see it in the first couple of renderings in this thread. Here is a picture of the bond beam with some sketching on top to show the idea.

[attachment=1:30bu62p5]20131230_122831.jpg[/attachment:30bu62p5]

I need to make a foundation for this platform to sit on. I probably should have had it done as part of the steel/gunite. My concern is that the bond beam will pull away from the rest of the foundation and cause cracks in the platform. Here is a picture of how I am planning on forming the foundation and pouring 4-6 inches of concrete. Then the block will be placed on top.

[attachment=0:30bu62p5]20131230_122841.jpg[/attachment:30bu62p5]

I am planning on drilling some holes in the bond beam and setting rebar horizontally with epoxy. Then tie this into a rebar grid in the foundation so that the whole thing will move together.

Is this a sound plan? Any other ideas?

Thanks,
Justin
 

Attachments

  • 20131230_122831.jpg
    20131230_122831.jpg
    246.6 KB · Views: 264
  • 20131230_122841.jpg
    20131230_122841.jpg
    238.1 KB · Views: 263
I feel like I am talking to myself a little, but I hope the things I am posting will be useful to someone in the future. I have learned a lot just reading and searching on the forum.

So what I decided to do for the raised platform area was drill some holes into the bond beam and epoxy rebar into the beam. Then I tied that rebar into a grid for the pad. Like this:

[attachment=0:1tlnl3j6]platformRebar.jpg[/attachment:1tlnl3j6]

Time will tell if this does the trick, but I think it should keep the raised platform and bond beam moving together so no cracks will form.

Also, I finally received a bid for Artistic Pavers and it was withing $100 of my Travertine bids. So that is a data point for anyone interested in using them. I still have not decided on which deck material to use. I will probably just go with Acrylic Lace because then I can get a pad for my hot tub and some walkway poured at the same time and for the same money as just the deck in Travertine.
 

Attachments

  • platformRebar.jpg
    platformRebar.jpg
    130.2 KB · Views: 232
Sorry, I am no expert in drilling into gunite (that may be why the responses have been limited), but the idea seems solid in concept. I assume there is no concern with this impacting the structural integrity of the gunite by drilling after the fact?
 
bhargraves said:
Sorry, I am no expert in drilling into gunite (that may be why the responses have been limited), but the idea seems solid in concept. I assume there is no concern with this impacting the structural integrity of the gunite by drilling after the fact?


I hope it is fine because I have seen examples on the internet of bond beam repair, or adding raised bond beams where they drilled into the beam and epoxied rebar in. Also, the gunite guys made a couple of holes in the bond beam so I can put in sleeves later. So based on that I think it is OK. I drilled about 4" into the 12" wide beam.
 
This platform is more like a raised bond beam in that it is flush with the beam and will be tiled all the way up. I considered having it done as part of the gunite, but the platform is 3 levels and 4x6 ft so I decided to do it out of block instead.
 
Very nice so far - can't wait to see it finished

jmhjgh said:
Do you know the color and brand of the paint that was used on your PVC pipe near your equipment pad? Very nice looking build.
Looks to me like it was painted afterwards (check out the picture above the one of the pad close up where the pipes are all colored - you can see them working on the pipes at the pad and they look like they're still white.)
 
jmhjgh said:
Do you know the color and brand of the paint that was used on your PVC pipe near your equipment pad? Very nice looking build.

Sorry I don't know. The plumbers painted it after install and it perfectly matches the Pentair equipment. I wish I was there to see them paint it cause there is no overspray or anything. I am assuming they taped off the values and other parts to make it that clean.
 
The pool is starting to progress again. The deck goes in on Monday, so I have been working on the raised jumping platform this week.

[attachment=2:134fzyhj]20140124_082632.jpg[/attachment:134fzyhj]

[attachment=1:134fzyhj]20140124_082739.jpg[/attachment:134fzyhj]

[attachment=0:134fzyhj]20140124_082755.jpg[/attachment:134fzyhj]
 

Attachments

  • 20140124_082632.jpg
    20140124_082632.jpg
    268.5 KB · Views: 127
  • 20140124_082739.jpg
    20140124_082739.jpg
    252.6 KB · Views: 124
  • 20140124_082755.jpg
    20140124_082755.jpg
    272 KB · Views: 125

Enjoying this content?

Support TFP with a donation.

Give Support
Thread Status
Hello , This thread has been inactive for over 60 days. New postings here are unlikely to be seen or responded to by other members. For better visibility, consider Starting A New Thread.