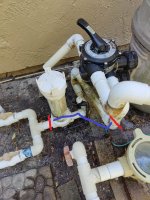
my inline chlorine tab holder just broke. What to do?

FlaPoolGuy

Gold Supporter
Oct 5, 2019
118
Florida
Hey everyone, when it rains it pours... I recently opened my DE filter and am in the process of replacing the grids. Since the pump is off for the time being until the new DE filter grids arrived, I decided now was a good time to replace my spider valve gasket, which was also leaking somewhat.

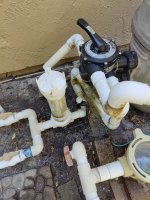
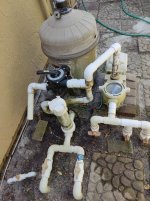
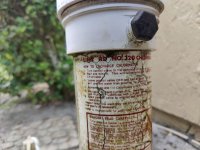
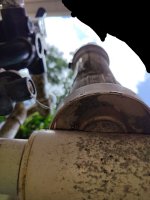
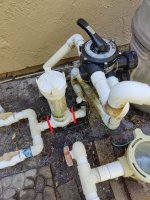
The good news is the spider gasket change seems to have gone well. I only have the tiniest of leaks coming out of the "waste" tube. The pump was running in "recirculate" mode to bypass the DE filter which has no manifold, no DE, and no DE grids in it. All was well, and I was monitoring the spider valve to make sure there were no leaks. Well, I have an old in-line chlorine tab chlorinator that decided to bite the dust. There is a black flexible device which extends off the side and wraps around to the bottom of the chlorinator which has disconnected from the upper connection point. Here are the pictures:
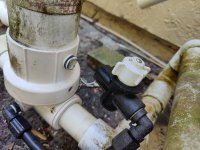
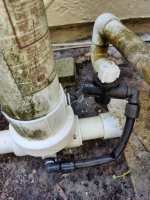
broken-chlorinator-1.jpg
broken-chlorinator-2.jpg
broken-chlorinator-3.jpg
broken-chlorinator-4.jpg

As a side note, you can also see there is no collar holding the halves of the DE filter together since I'm still waiting for the DE filter grids. What do y'all think I should do? Is there a way to bypass the chlorinator (which I don't use) without cutting PVC? If not, how realistic is it to install a salt water chlorine generator? I've been thinking about doing that for some time, so maybe now is the time?

Thanks for your help and guidance in advance!

-Jonathan
 
Looks like a simple matter to put a PVC patch and remove the puck feeder. It's always a good time to go with a SWG though!
Do you mean method 3 depicted here, or some other kind of patch? Thanks.

 
Ok so I was able to get it 180 degrees (1/2 turn) and now it's frozen. Won't go either direction. My channel lock isn't big enough to get around it. I guess it's time for a trip to big box store to get bigger channel lock!
 
This looks a bit similar.
Edit: The bottom tee (part 7) is given as a “TEE, DIVERTER 1 1/2"NPTX2" SXS” so you’ll need a 1 1/2” threaded cap to seal it off.

9B04BCBD-64F6-4BA9-8CAE-12389F90F64F.jpeg
 
Last edited:

Enjoying this content?

Support TFP with a donation.

Give Support
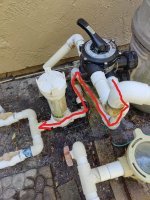
So here is the pipe that I'm looking at doing a partial cut/patch/replace. Here is the pipe, with overlay in red. It seems excessively complex.

broken-chlorinator-3-annotated.jpg

the simplest thing would be to cut here and here (see red lines)

broken-chlorinator-3-annotated2.jpg

and do a straight 2-coupling fix, but is there a benefit to getting a few 135 degree elbows and simplify the setup like so? (red lines = cuts, blue line = proposed simplified PVC route. The pipes do not currently leak.

broken-chlorinator-3-annotated3.jpg
I feel like the KISS principle wins out here (meaning do the simple, straight fix), but I've not had the best experience doing the "file down" of the stop inside the coupling to do the straight fix when working with smaller sprinkler piping. Maybe the file down is easier in the big pipe?

Thanks again.

-Jonathan
 
So here is the pipe that I'm looking at doing a partial cut/patch/replace. Here is the pipe, with overlay in red. It seems excessively complex.

the simplest thing would be to cut here and here (see red lines)

and do a straight 2-coupling fix, but is there a benefit to getting a few 135 degree elbows and simplify the setup like so? (red lines = cuts, blue line = proposed simplified PVC route. The pipes do not currently leak.

I feel like the KISS principle wins out here (meaning do the simple, straight fix), but I've not had the best experience doing the "file down" of the stop inside the coupling to do the straight fix when working with smaller sprinkler piping. Maybe the file down is easier in the big pipe?

Thanks again.

-Jonathan
You might be able to find a coupling without the ridge. I like the simpler setup. You could put a union on each end of the simpler blue fix...would make it way easier to construct.
 
The easiest solution may be to get that Brocken nipple out and replace it with a plug. Replace the elbow at the bottom with a plug and run it as an empty feeder. The next would be to cut only the feeder out and replace that short section with a union, a short piece of pipe and a coupling.
 
You might be able to find a coupling without the ridge. I like the simpler setup. You could put a union on each end of the simpler blue fix...would make it way easier to construct.
This ^ (the union part not the coupler) filing the couplers is even harder on larger pipe.
 
Ok so I was able to get it 180 degrees (1/2 turn) and now it's frozen. Won't go either direction. My channel lock isn't big enough to get around it. I guess it's time for a trip to big box store to get bigger channel lock!
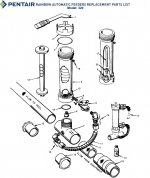
That's an old Rainbow chlorinator It unscrews but there is a lockscrew In the bottom! You have to take the screw out. The tank will then unscrew and a 1/2 or a 3/4cap will close it off
 
  • Like
Reactions: PoolStored
Look at the diagram in post #10 - look for part #5, the screw. Remove it and see if you can now unscrew the tab feeder.
 
I found the screw... after I cut the PVC and removed the whole chlorinator. If it's any consolation, I couldn't remove the chlorinator from the pipe even after removing the lockscrew. I installed a short straight pipe with 2 couplers to bridge the gap. My local big box store sells the coupler without the ridge (for 2.5x the price of the one with the ridge) so I got one of each. It's technically already dry (it says 2 hours until dry at > 60F ambient temp), but given the permanent high humidity/moisture here in FL, I'm waiting until the morning to do a test run.

Interesting aside- my piping I was able to rotate due to screw-type connection into the hayward spider valve, so I didn't need the "ridgeless" coupler after all.
 
Thread Status
Hello , This thread has been inactive for over 60 days. New postings here are unlikely to be seen or responded to by other members. For better visibility, consider Starting A New Thread.