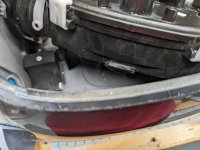
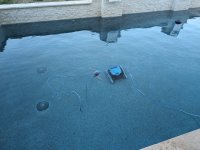
My Dolphin CC Rebuild.

I believe all those motors are basically the same. The ones they use to drive the Nautilus are also the ones they drive the S series and other bots with. The trick is not damaging the transmission assembly that’s bolted on to the motor as that is how they achieve the torque needed to run the treads and the brushes. Those spares used to be readily available but I was told Maytronics stopped shipping them to retail stores because they didn’t want the motor assemblies being repaired, just replaced. I assume there’s probably a small stock of them floating around out on the Interwebz. There’s also a seller on eBay out in Israel that would ship those motors to customers in the US. Israel is where the motor assemblies are built and so the parts are readily available there.
We do warranty work for Maytronics(if purchased through us)and you are correct they no longer offer anything but the motor assembly,if they fail in the warranty time they just ship it no questions asked you’re totally correct they cost them very little to make( or purchase from another company) also the cords,they will send those no problem either- you are smart to stick with suction side cleaners the lifetime cost is alot less than a robotic and easier to repair or troubleshoot
 
  • Like
Reactions: Mdragger88
Well I'm back and Maisie the Maytronics Dolphin is back in the pool.

The whole fiasco cost about $260.00 to bring the robot back up to par which included the following parts;

From Poolweb.com
Both front drive wheels
Both rear wheels
4 wheel bushings
2 active brush bushings
1 pair of new treads

From Marinapoolsandpatios.com
2 active brush pinion gears

From discountpoolmart.com
1 drive motor

From Amazon
3 sets of impeller motor brushes (more on this below)
2 sets of impeller motor bearings


Honestly, getting the robot open is very easy and doesn't require much knowledge or skill. I don't have many pics as I was in the heat of getting this done and kinda forgot. I will attach what pics I do have.

1. Take the basket out.

2. Remove the 2 screws holding the cover on over the black motor box.

3. Remove the 2 screws that pinch the grommet in place on the cover.

4. Remove the 2 black motor box screws on either side.

5. Slide the motor box to the right (when the front of the robot is against your stomach) and lift it out. Note there is a slot in the chassis of the robot that a tab on the motor box fits under in the front of the robot.
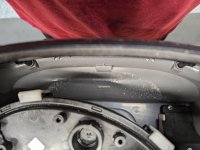
1704662672320.jpeg
1704662694954.jpeg
6. Remove the front drive wheel covers (the pry off easily but be gentle they may break).

7. Remove the screw holding the front drive wheel hub caps in place on both sides and remove the wheels and treads. Keep the hub caps.
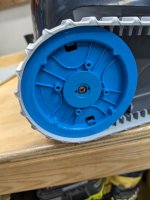
1704662720001.jpeg
8. Remove the small plastic center caps on the rear wheels.

9. Remove the screws holding the rear wheel hub caps in place. Keep the hub caps. Note the location of the weight inside one of the rear wheels. It needs to go back in the same wheel.

10. Remove the screws holding the active brush pinion gears, the active brush bushings should just fall out with them along with the brush. Note, there are 2 gray plastic end caps on the active brush. They will fall out, find a safe place to put them to reuse later.

11. Gently pry the wheel bushings off of the chassis with a flat head screw driver. Once it gets started you can typically twist and pull them off. Note, there are notches on the bushings the line up with tabs on the chassis, these need to line up on re-installation.
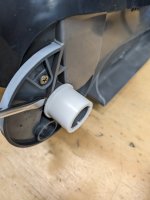
1704662743430.jpeg
12. Once the bushings are removed the chassis is now fully stripped. Give it a good cleaning and set it aside.

13. The motor box. Remove the impeller volute and what I assume is a debris shield in front of the box.

14. Remove the impeller blade. Be careful, its very sharp.

15. Unfasten the clips holding the top of the motor box on and remove the top and toss the desiccant bag.

16. Disconnect the drive motor and impeller motor from the circuit board.

17. Unfasten the clips holding the drive motor in place and remove it. If the drive motor is malfunctioning, replace it. I wouldn't try to disassemble it. Give it a good inspection, check for corrosion and proper functionality. Again, replace it don't fix it. Or if you do fix it, let us know how it turned out.

18. Remove the clip at the top of the motor box holding the impeller motor in place.

19. Remove the motor from the top of the box .

The tear down is complete (minus rebuilding the impeller motor), and its time to re-assemble. For the most part putting the robot back together is the reverse of disassembly. I will go over some key points that may not be obvious or were not the exact reverse order of disassembly a little further down. I will first address the "rebuild" of the impeller motor.

At this point you need to decide if you want to attempt to replace the bearings and brushes of the impeller motor. Neither are hard to do if you are handy with a soldering iron and there are videos online on how to get it done. If you do decide to open up the motor, mark with permanent ink or paint the location of the wires in relation to the motor can. Getting them incorrect upon reassembly will cause the motor to spin the wrong direction.

1. Mark the location of where the wires exit the motor on the motor can. DO NOT SKIP THIS STEP. Putting the brushes in the wrong orientation will cause the motor to spin backwards. The correct direction of rotation is counter clockwise for this robot.

2. Remove the 2 screws at the bottom of the impeller motor can, gently remove the bottom bearing housing, and slide the armature out. Be careful as there is a wavy thrust washer in the bottom of the bearing bore of the silver bearing housing, don't lose it and make sure it goes back in place when reassembling.

3. To remove the impeller motor top bearing I used a screw driver and a hammer. I put the armature in a vise using soft jaws and gently tapped the bearing off of the shaft.

4. The bottom bearing requires you to find a thin forked object to place in-between the armature and the bearing. I used a wrench for a die grinder collet. Once you have the right tool and the armature secured, use a punch to gently tap the armature out of the bearing.

5. I installed the new top bearing using a 10mm 3/8ths drive deepwell socket and a soft faced hammer. Slide the socket over the shaft of the armature and gently tap the bearing home. This bearing was a 608 2RS.

6. The bottom bearing was able to be pressed on by hand needing no additional tools. This bearing is a 626 2RS.

7. I replaced my brushes, this involved a little bit of soldering. Its not hard, but it does take a little bit of technique and skill. I went through three different types of brushes from amazon until I found a set that worked. In the end, I bought over sized (6mm x 6mm) brushes and sanded them down to the required 6mm Tall by 5mm wide. Be sure that if you replace the brushes, the lead either comes out of the back or the top of the brush (6mm goes up). Leads that come out of the side of the brush will interfere with the spring and bind up the brush.

8. Once the brushes are soldered in place adjust their length by sanding them down to the desired length (just shorter than the brush housing when the armature is seated) using a dremmel 60 grit sanding drum. Take your time on this and make multiple checks of the length during this process to get it right.

9. These three videos go over most of the steps that I listed above for the brush and bearing replacement. Your model may vary a bit but overall the steps are the same. Remember to mark the orientation of the motor power supply wires on the motor can.


10. CLEAN EVERYTHING! I used electric motor cleaner for this and that is all I would recommend. Be sure to remove as much of the carbon and old grease as possible prior to reassembly.

11. Reassembling the motor is the same as taking it apart. I did find it helpful to mark on the brass top cap of the motor the location of the threaded holes to make it easier to line up the bolt holes in the bottom bearing housing.

12. Add some high quality marine grade grease into the seal cavity on the top cap of the impeller motor.

13. Slide the armature into the bottom bearing housing making sure its fully seated and the brushes are making good contact. This is a finicky step and will take some time to get right so be patient. The above videos to a good job of detailing this out.

14. Once the armature is seated, slide the assembly into the motor can. The magnets in the can will draw the armature up into it so be cautious as you go so it doesn't pull the armature out of the brushes.

15. Align the marks you made for the wires on the motor can with the wires.

16. Line up the marks on the brass cap to the bolt holes in the bottom bearing housing.

17. Re-install the screws.

18. Check the rotation of the motor by applying power to it.

Tips for re-assembly,

1. Keep in mind the slot the motor box tab slides into. Set the box in the chassis just to the right of center with robot facing you. Then slid it into place.

2. Make sure the wheel bushings are fully seated with the notches lined u with the tabs on the axles.

3. LUBE ALL ORINGS. I used jacks magic lube. It seems to work well.

4. Replace the desiccant bag.

5. Once the wheels are on putting the tracks on is like putting a chain on a bike. Get the track completely installed on the rear wheel, then partially install it on the front. with the track partially installed on the front, rotate the front wheel in away from the installed section of track.

That is all there really is to it. The robot only goes together one way and is easy to see when something is not quite right. If you are looking to try to prolong the life of your robot, try rebuilding it.
 
Last edited:
  • Like
Reactions: JoyfulNoise
I suppose this is a good reason why Maytronics simply sells the motor assembly as a replaceable unit. No shop in their right might would waste that much time on a robot repair nor would they likely have someone with enough skills to be detail oriented about it. So they just charge you for the motor assembly and a minimal labor charge. If they would only sell the individual motors as spare parts, that would help out the customer a lot. But that also doesn’t make them any money. So either buy a new motor assembly or buy a new robot, those are the only real world options …
 
  • Like
Reactions: 98Poolmaster
I suppose this is a good reason why Maytronics simply sells the motor assembly as a replaceable unit. No shop in their right might would waste that much time on a robot repair nor would they likely have someone with enough skills to be detail oriented about it. So they just charge you for the motor assembly and a minimal labor charge. If they would only sell the individual motors as spare parts, that would help out the customer a lot. But that also doesn’t make them any money. So either buy a new motor assembly or buy a new robot, those are the only real world options …
I am the only manager in our three stores that works on them we don’t have to fix too many thank the lord,we don’t even fix or diagnose ones not bought through us anymore.Its a little time consuming in winter sometimes I will tinker with ones people brought in and gave us because they just bought new ones.I usually put new cords on them and change the brushes.We have 5 pools in our yard at the store I am at,we use the S50 and S100 for our yard pools(all above ground except one semi inground)they are both over 5 years old.I have changed the cord on both that seems to be the only thing that needs replaced is the cord gets major memory in them and stay in one part of the pool once that is changed it works good again.The baskets are still in good shape also,the M series are not as good as the S series in my opinion
 
  • Like
Reactions: Mdragger88

I suppose this is a good reason why Maytronics simply sells the motor assembly as a replaceable unit. No shop in their right might would waste that much time on a robot repair nor would they likely have someone with enough skills to be detail oriented about it. So they just charge you for the motor assembly and a minimal labor charge. If they would only sell the individual motors as spare parts, that would help out the customer a lot. But that also doesn’t make them any money. So either buy a new motor assembly or buy a new robot, those are the only real world options …
If I didn't rebuild the impeller motor, the tear down and rebuild would have been about 2 hours max. If I have to do this again, I bet I could do it in 2/3rds the time. Honestly, the motors are plug and play, there is no reason not to sell them seperately aside from money of course.
 
If I didn't rebuild the impeller motor, the tear down and rebuild would have been about 2 hours max. If I have to do this again, I bet I could do it in 2/3rds the time. Honestly, the motors are plug and play, there is no reason not to sell them seperately aside from money of course.

Yep, I remember tearing my motor apart and rebuilding everything a few years back. I rebuilt the impeller motor but couldn’t find a drive motor anywhere. It’s not particularly difficult work. Once I realized how scarce the parts were and that the fix was likely only going to last for a short time, I decided robots weren’t worth it for my pool. A suction side cleaner works just fine and they cost half as much as a robot brand new. Rebuilding them is cheap and rebuilt kits/spare parts are easy to find and cheap. Heck, you can throw out a pump driven cleaner and buy a new one every 2-3 years for over a decade and still spend less than buying one robot. Just not worth it in my book.

Glad you got your cleaner working. Good luck with the repair and I hope you get a few more trouble free seasons out of it.
 
  • Like
Reactions: 98Poolmaster
Yep, I remember tearing my motor apart and rebuilding everything a few years back. I rebuilt the impeller motor but couldn’t find a drive motor anywhere. It’s not particularly difficult work. Once I realized how scarce the parts were and that the fix was likely only going to last for a short time, I decided robots weren’t worth it for my pool. A suction side cleaner works just fine and they cost half as much as a robot brand new. Rebuilding them is cheap and rebuilt kits/spare parts are easy to find and cheap. Heck, you can throw out a pump driven cleaner and buy a new one every 2-3 years for over a decade and still spend less than buying one robot. Just not worth it in my book.

Glad you got your cleaner working. Good luck with the repair and I hope you get a few more trouble free seasons out of it.
This is where I have to disagree with you, of course I would imagine we have two different setups in our pools. My other two options would be to get a pressure side cleaner or to convert my pressure side port to a suction port which is easy enough and rather cheap.

But then comes the cleaner issues. For my area, the major issue I have is dirt, pollen and other fine debris. My yard is effectively treeless and there is not a lot of vegetation around to drop in the pool. When I looked at the repair replace value of the robot vs suction side vs pressure side cleaner, repairing the robot came out on top. For a suction side cleaner that has scrub brushes climbs the walls and is designed to get the small debris I am most interested in it would be about $350.0 to $500 which doesn't include the cost re-plumbing my pool. For a pressure side cleaner, I am looking at about $650 to $1000 for a cleaner with the same capabilities (scrub brushes, climbs walls, catches fine debris) as the robot before we factor in the power required by the pressure pump that is required to run the cleaner. The robot (this time for me anyway) is the better value, however, when it comes time to repair or replace it next time, I may end up with a pressure side cleaner depending on price and availability.
 
Update time, the weather has warmed up and the pool needed cleaned so back in Maisy the Maytronics Robot went. She has veen run three times and spent 2 nights in the pool (she will be removed and placed uner cover after this last run) to get things cleaned up. Pretty much like a new robot now, hopefully ill get another 2 years out of her.
 

Attachments

  • PXL_20240224_145925446.jpg
    PXL_20240224_145925446.jpg
    680.3 KB · Views: 5

Enjoying this content?

Support TFP with a donation.

Give Support
You can find the exact motors, or ones that are pretty close to spec, just by looking up the serial number. Problem is, it’s a mass manufacturer and so they likely only sell them in quantities of 1000 or so.

Ok, I will bite. Where can we find these motors. It seems like there might be a good resale market. Maybe I would be willing to buy a 1000 of them.
 
Ok, I will bite. Where can we find these motors. It seems like there might be a good resale market. Maybe I would be willing to buy a 1000 of them.

They’re overseas Asian manufacturers. You’ll also have to travel to the Port of LA when the cargo ship arrives and wait 4-6 hours while the teamsters figure out which container it’s in and then pay to have it loaded on your pickup … after they’ve had at least 3 contract-mandated smoke breaks …
 
They’re overseas Asian manufacturers. You’ll also have to travel to the Port of LA when the cargo ship arrives and wait 4-6 hours while the teamsters figure out which container it’s in and then pay to have it loaded on your pickup … after they’ve had at least 3 contract-mandated smoke breaks …
Three breaks? I think you underestimated that number @JoyfulNoiseI believe Maytronics makes and assembles the product in Israel.I doubt they make the motors though like you have said.
 
  • Like
Reactions: JoyfulNoise
Three breaks? I think you underestimated that number @JoyfulNoiseI believe Maytronics makes and assembles the product in Israel.I doubt they make the motors though like you have said.

Oh I know. The sub components all come from overseas manufacturers. The raw components go to Israel where they are put together into assemblies. Then the robots are assembled and packed for shipping out to the wholesale distributors. Only a small subset of the raw components (tracks, wheels, etc) are available for resale. Nothing inside the motor subassembly is available for resale.
 
I was actually kind of being serious. I am assuming that someone has looked at trying to find these motors. If I have to buy 1000 of them and they are reasonably priced, I might just do it. I have done worse things before.
 
  • Haha
  • Like
Reactions: Newdude and pjt
I was actually kind of being serious. I am assuming that someone has looked at trying to find these motors. If I have to buy 1000 of them and they are reasonably priced, I might just do it. I have done worse things before.
I am sure you can sell the excess on Fleabay and come out ahead.
 
I am sure you can sell the excess on Fleabay and come out ahead.
Pool wholesale distribution companies like PoolCorp(Superior/SCP)or Heritage are the only companies that buy in that quantity.The manufacturer may not sell that many to you,do to contracts with the major players who sell mass quantities of their units.These bigger companies will sell to independent pool stores through wholesale distribution and manufacturers use warranty or rebates as the reason to not purchase online.Good luck in your search.
 
Thread Status
Hello , This thread has been inactive for over 60 days. New postings here are unlikely to be seen or responded to by other members. For better visibility, consider Starting A New Thread.