Thought I'd post some photos of my part completed concrete pool build here in Portugal.

My build, lots of pictures
- Thread starter solarboy
- Start date
You are using an out of date browser. It may not display this or other websites correctly.
You should upgrade or use an alternative browser.
You should upgrade or use an alternative browser.

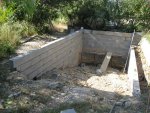
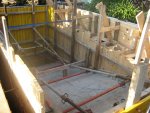
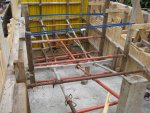
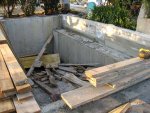
This shot shows the shuttering complete with just the internal bracing to be finished. You can see the shuttering needed to create the bench seat on the other side and the holes (which have lids) so that we can pump concrete into the lower section of that side.
Attachments
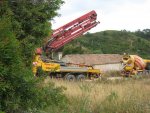

Thats me holding the concrete hose and directing it into the void while a guy who works for me follows with the vibrator. If you vibrate too long and the stone all goes to the bottom, too short and the concrete doesn't fill the void.
You can also see the pump operator with his remote control for the boom. This is the scariest part of a pool for me, hoping your shuttering will hold while shouting over the din of the pump in Portuguese (not my native language).
You can also see the pump operator with his remote control for the boom. This is the scariest part of a pool for me, hoping your shuttering will hold while shouting over the din of the pump in Portuguese (not my native language).
Attachments

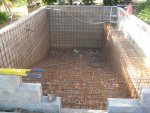
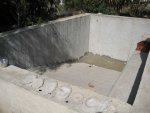
At this point we cleared it out, screeded the floor and filled it with water for the rest of the summer. I also wanted to test the shell at this point for leaks. Many wonderful swimming days followed. After building many pools for other people finally I had one for my children (and me and my wife)
Attachments


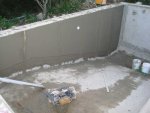
Once the water became too cold to swim, I emptied the pool to prepare it for rendering. This shot shows the scratch coat done. This is a watery sand and cement slurry that helps the mortar bond to the smooth concrete. You can also see the slight leaks I discovered at the bottom. This was expected and was dealt with using waterproof mortars.
Attachments

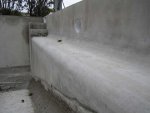
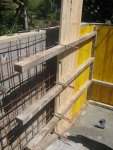
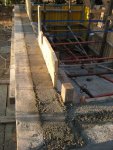
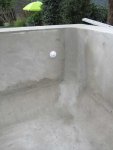
Compound curve in the corner. The radii of the vertical fillet is holf the radii of the floor/wall fillet. Autocad was my pal here. Basically I did the floor fillet 1st , then the corner fillet. When the former was drawn down to the floor, I kept it vertical so that the radii of the corner fillet decreases logarithmically to nothing.
Attachments
Thread Status
Hello , This thread has been inactive for over 60 days. New postings here are unlikely to be seen or responded to by other members. For better visibility, consider Starting A New Thread.
Similar threads
- Replies
- 4
- Views
- 146
- Replies
- 25
- Views
- 325
- Replies
- 7
- Views
- 234