Just bought a used Esther Williams 15x30 Carousel
- Thread starter Wichita Chief
- Start date
You are using an out of date browser. It may not display this or other websites correctly.
You should upgrade or use an alternative browser.
You should upgrade or use an alternative browser.
Amazingly I am using a lot of the hose from last years skimmer upgrade to my Intex pool. That saves a bit of cash. I hope (I think I will) I have enough of the 1 1/2" spa flex PVC to do what I need to do. It already has the ball valves in it so that saves me about $25 up front. Digging through my PVC fittings in bins on the shelf I found some 2" gate valves left over from a previous project. I usually see ball valves used on pools and not gate valves. From my koi pond plumbing research gate valves flow better? For now the ends will be hose clamped to nipples which can be taken apart if needed. I'm using 2" PVC pipe for the long runs with 1 1/2" to connect to the pump,filter,skimmer,return which are all 1 1/2". This fall/winter I may reconfigure if I don't like this. I'm doing it simple and sweet and see how I end up. I think I was shaking like a leaf taking a knife to my liner. But no problems. Anyway, running water will sound good! A longer post with more pics/descriptions of the steps of the journey leading up to liner & water to follow...
So lets play a little catch up here. The wall went up. I figured out we had the wrong liner. Once the RIGHT one came we trudged on. Weather permitting. (usually it didn't) We discovered leveling sand inside of a walled area is not that much fun. Or easy. We gave it the old college try though and tamped it down once smoothed. Next the pink foam went down.
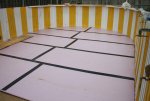
Once we got to the curved ends the fun began! Not really... But plenty of cardboard and tape gave us patterns to follow to cut the foam to fit. We got 2/3's of the floor done and were going to finish it the next evening but the same old story repeated itself. Yep. Rain. With a new complication. The foam installed protected the sand and base under it but now the exposed 1/3 of sand/base had the entire volume of water the whole pool area received funneled onto it. This softened the base under the sand so I decided to give it extra time to dry and firm back up before we finished the foam. Used Gorilla tape tippled on all the joints. Since we could assemble the main rectangular section out of the pool I even single taped the bottom of the joints in that area thinking that that area gets the most traffic and could use the help. I have only used the regular silver duct tape in the past so my experience is limited but I was not as enamored with the Gorilla tape as others seem to be. Thicker yes. Sticks better? Not too different to me. I'm not sure it's worth the extra $$'s.
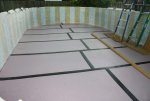
Completed foam base and the wall foam up. Visible are the pair of ladders used to get in and out.
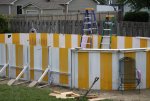
Another shot of the ladders. No falls or visits to the ER from them.
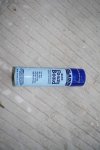
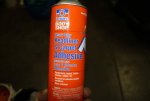
Adhesive used to glue the foam to the wall. Just using it on the wall was so so. Better adhesion was obtained by spraying on the wall and the foam, letting it get tacky, and then adhering it. I ordered 2 cans for our 77' of wall and it came out just right even spraying both the wall and the foam. We made it all the way around just right before the heavens opened up and dumped all the previously mentioned rain.

Since the foam is 48" and the wall is 48" and with the sand and foam on the bottom it overlapped and until we could trim it to clear the top rail bead receiver we put clothes pin and other clips on it to weather the storm. And storm it did. I heard reports of 5"-9" of rain fell that Saturday afternoon. After the realization that the pool wouldn't be ready for the 4th party sunk in it was depressing. 3 months to make it happen and it didn't. I felt like I fumbled on the goal line of the Super Bowl as time ran out. But it was also kinda of freeing. No longer did "the pool" dominate my thoughts for the weekend and holiday. We try to not dwelling on the negatives and instead focus on the positives. Many people were dealing with flooding and friends had wet basements. Not getting this done pales in comparison to that. Also, how much mud and debris would be tracked into the new pool by all the kids? LOL! On Sunday on my way to pick up the trailer I used to haul the mortar tubes and fireworks I crossed a bridge over the Whitewater River. Usually the water level is WAY down there below the bridge but not this day. It was probably about 10' below the bridge and flowing good. This is a day later! The guys at the rental yard said they were up till 4 a.m. that morning helping the city pump water from one side of the levee to the other. Once again, my problems are minor! So like I said before the party wen on without a hitch and my fireworks shoot went good. I had to go out of town for work for training and that was a good break. So it was the next weekend before I could move on with the project. Of course our Kansas winds pretty much pulled a lot of the top of the wall foam loose and needed attention before we could continue. Did I mention we used both can we had ordered? I knew 3M's blue 72? was about the same stuff but before I could begin the search a friend said he had some spray adhesive he had used on a droopy car headliner and had some leftover and I could have it. I knew right away when I tried it that it would work. I stopped by my local O'Reilly auto parts and picked up an extra can to be sure we would be able to stick whatever had come loose.
This what it was.
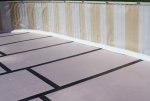
The top rail bead receiver installed and retained by the "clips" which bolt to the uprights. The foam cove stuck on and the bottom given one final sweep before the liner went in.
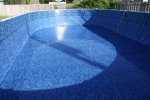
My adhesive friend came by to help with the liner install and we got it in and moved around enough to start filling it with some water. We tried the shop vac trick and it didn't pull down quite like I had seen but it helped keep the wall from blowing around in the wind and let us see how it would lay in. We smoothed out the wrinkles and finally got to splash around in some water however shallow it was. Sorry. Too busy to shoot pictures.
So this catches us up to the "cheat" pictures. Water in the pool. Skimmer and return installed. Spent 3 evenings (2-3 hours per evening) plumbing it. Thursday night about 10:30 I tried to purge the air from the pump/filter with not much luck. I mentally went over the plumbing and knew it was good. It had to be because I got too busy when I arrived and got to work and didn't start filling in water to get it where I knew it had to be and at that hour it just wasn't filling enough. The pump pulls so good only having about an inch of water past the bottom of the skimmer caused it to create a void there and allowed it to suck air and lose prime. So I called it a night and instructed MIL on where to continue to fill it to the next day. I even drew a nice little diagram which I was ribbed about today by my MS. Soooo, the first thing I did when getting there today to mow was to turn on the pump. Voila!! It works!! FINALLY!!! Water in the pool and it is running!!!!!! "Walking on Sunshine!!" ringing in my head. I actually cracked a smile! Tomorrow I'll work on the coping and walkway. Then wrestle the wood stairs over so the ladder can be put in.
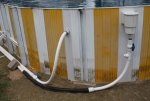
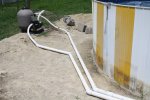
A couple of shots of the simple plumbing. Like I said I reused some of the spa flex hose and valves from last year. Straight 10' sections completed the run to the far end. I'm not positive where the legs to the patio section will be but I think I dodged them. Time will tell. The pipe is on the back side of the pool and probably will be covered mostly by some gravel so beauty is secondary to getting water flowing NOW! Visible under the skimmer is a T where the water bonder will go.
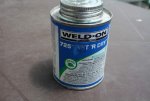
Glue used to glue the flexible PVC to the rigid stuff. Some say regular glue will be OK. I've had good luck on koi pond plumbing using this correct glue so why change now?
My fingers are telling me to close this. Till we type again...............

Once we got to the curved ends the fun began! Not really... But plenty of cardboard and tape gave us patterns to follow to cut the foam to fit. We got 2/3's of the floor done and were going to finish it the next evening but the same old story repeated itself. Yep. Rain. With a new complication. The foam installed protected the sand and base under it but now the exposed 1/3 of sand/base had the entire volume of water the whole pool area received funneled onto it. This softened the base under the sand so I decided to give it extra time to dry and firm back up before we finished the foam. Used Gorilla tape tippled on all the joints. Since we could assemble the main rectangular section out of the pool I even single taped the bottom of the joints in that area thinking that that area gets the most traffic and could use the help. I have only used the regular silver duct tape in the past so my experience is limited but I was not as enamored with the Gorilla tape as others seem to be. Thicker yes. Sticks better? Not too different to me. I'm not sure it's worth the extra $$'s.

Completed foam base and the wall foam up. Visible are the pair of ladders used to get in and out.

Another shot of the ladders. No falls or visits to the ER from them.

Adhesive used to glue the foam to the wall. Just using it on the wall was so so. Better adhesion was obtained by spraying on the wall and the foam, letting it get tacky, and then adhering it. I ordered 2 cans for our 77' of wall and it came out just right even spraying both the wall and the foam. We made it all the way around just right before the heavens opened up and dumped all the previously mentioned rain.

Since the foam is 48" and the wall is 48" and with the sand and foam on the bottom it overlapped and until we could trim it to clear the top rail bead receiver we put clothes pin and other clips on it to weather the storm. And storm it did. I heard reports of 5"-9" of rain fell that Saturday afternoon. After the realization that the pool wouldn't be ready for the 4th party sunk in it was depressing. 3 months to make it happen and it didn't. I felt like I fumbled on the goal line of the Super Bowl as time ran out. But it was also kinda of freeing. No longer did "the pool" dominate my thoughts for the weekend and holiday. We try to not dwelling on the negatives and instead focus on the positives. Many people were dealing with flooding and friends had wet basements. Not getting this done pales in comparison to that. Also, how much mud and debris would be tracked into the new pool by all the kids? LOL! On Sunday on my way to pick up the trailer I used to haul the mortar tubes and fireworks I crossed a bridge over the Whitewater River. Usually the water level is WAY down there below the bridge but not this day. It was probably about 10' below the bridge and flowing good. This is a day later! The guys at the rental yard said they were up till 4 a.m. that morning helping the city pump water from one side of the levee to the other. Once again, my problems are minor! So like I said before the party wen on without a hitch and my fireworks shoot went good. I had to go out of town for work for training and that was a good break. So it was the next weekend before I could move on with the project. Of course our Kansas winds pretty much pulled a lot of the top of the wall foam loose and needed attention before we could continue. Did I mention we used both can we had ordered? I knew 3M's blue 72? was about the same stuff but before I could begin the search a friend said he had some spray adhesive he had used on a droopy car headliner and had some leftover and I could have it. I knew right away when I tried it that it would work. I stopped by my local O'Reilly auto parts and picked up an extra can to be sure we would be able to stick whatever had come loose.

This what it was.

The top rail bead receiver installed and retained by the "clips" which bolt to the uprights. The foam cove stuck on and the bottom given one final sweep before the liner went in.

My adhesive friend came by to help with the liner install and we got it in and moved around enough to start filling it with some water. We tried the shop vac trick and it didn't pull down quite like I had seen but it helped keep the wall from blowing around in the wind and let us see how it would lay in. We smoothed out the wrinkles and finally got to splash around in some water however shallow it was. Sorry. Too busy to shoot pictures.
So this catches us up to the "cheat" pictures. Water in the pool. Skimmer and return installed. Spent 3 evenings (2-3 hours per evening) plumbing it. Thursday night about 10:30 I tried to purge the air from the pump/filter with not much luck. I mentally went over the plumbing and knew it was good. It had to be because I got too busy when I arrived and got to work and didn't start filling in water to get it where I knew it had to be and at that hour it just wasn't filling enough. The pump pulls so good only having about an inch of water past the bottom of the skimmer caused it to create a void there and allowed it to suck air and lose prime. So I called it a night and instructed MIL on where to continue to fill it to the next day. I even drew a nice little diagram which I was ribbed about today by my MS. Soooo, the first thing I did when getting there today to mow was to turn on the pump. Voila!! It works!! FINALLY!!! Water in the pool and it is running!!!!!! "Walking on Sunshine!!" ringing in my head. I actually cracked a smile! Tomorrow I'll work on the coping and walkway. Then wrestle the wood stairs over so the ladder can be put in.


A couple of shots of the simple plumbing. Like I said I reused some of the spa flex hose and valves from last year. Straight 10' sections completed the run to the far end. I'm not positive where the legs to the patio section will be but I think I dodged them. Time will tell. The pipe is on the back side of the pool and probably will be covered mostly by some gravel so beauty is secondary to getting water flowing NOW! Visible under the skimmer is a T where the water bonder will go.

Glue used to glue the flexible PVC to the rigid stuff. Some say regular glue will be OK. I've had good luck on koi pond plumbing using this correct glue so why change now?
My fingers are telling me to close this. Till we type again...............
crokett
Well-known member
Walking on sunshine :sun: for sure! You did it! You really did it! You have the pool up and running! Oh happy day and many more pool filled days where you will get to enjoy your pool!
LOL on the ribbing about the diagram........hey there is NO way anyone could say "well I did not know what you meant" so well done!
Now take your time with the decking. So long as you can get in and out you are good!
Nice of the friend to come over the help wrestle the liner. It looks like you got it purrfect!
Are you loving the foam bottom? I am thinking of doing it when we have to put in a new liner. I so hate the little dips and such on the sand bottom.
Kim:cat:
Not swimming. Yet. Hopefully today. The foam will not eliminate the dips on the bottom. I have sand under the foam to cover the bracing that goes side to side and to even out the minor irregularities in the base material. So unless you get the sand perfect (which mine sure isn't) you will still have dips and hills but it is smooth to the feel.
Of course my multiport valve has a drip which will require me to replace the shaft seal in it. Of course I will get the cover seal and 5 spoke seal also.
Of course my multiport valve has a drip which will require me to replace the shaft seal in it. Of course I will get the cover seal and 5 spoke seal also.
Pool is looking great! Hope you guys get to enjoy all of that work soon!
Sent from my SM-G920V using Tapatalk
Sent from my SM-G920V using Tapatalk
Hi everyone! I'm new here. I was just looking for info on a liner for my pool & came across this thread featuring my exact same pool! I give you lots of credit for all the work you've done assembling & disassembling (or vise versa)! I can't even imagine! We bought our house in '98 & the pool was just a shell that neighborhood cats fought & peed in! We called it the arena. Knowing nothing about pools, but being very excited to finally have one, I used the company that installed this pool many years earlier for a previous owner to get a new liner & have it installed. Needless to say, I overpaid. However, it's now been 18 years & the liner has never leaked but it has some stains from debris that fell into the pool several years ago after I closed it up & a storm tore the winter cover. We replaced the cover but didn't get 100% off the debris out, so it stained the bottom... which is why I'm researching liners.
I see that the liner you've installed looks like the liner from several online vendors which I guess we're not allowed to name. If you're happy with the liner, the bead is correct, the thickness is satisfactory & the warranty is good, would you mind sharing with me their name when you get a chance? My email is my user name + atattdotnet.
Congratulations on a great assembly job!
Rosie
Hi everyone! I'm new here. I was just looking for info on a liner for my pool & came across this thread featuring my exact same pool! I give you lots of credit for all the work you've done assembling & disassembling (or vise versa)! I can't even imagine! We bought our house in '98 & the pool was just a shell that neighborhood cats fought & peed in! We called it the arena. Knowing nothing about pools, but being very excited to finally have one, I used the company that installed this pool many years earlier for a previous owner to get a new liner & have it installed. Needless to say, I overpaid. However, it's now been 18 years & the liner has never leaked but it has some stains from debris that fell into the pool several years ago after I closed it up & a storm tore the winter cover. We replaced the cover but didn't get 100% off the debris out, so it stained the bottom... which is why I'm researching liners.
I see that the liner you've installed looks like the liner from several online vendors which I guess we're not allowed to name. If you're happy with the liner, the bead is correct, the thickness is satisfactory & the warranty is good, would you mind sharing with me their name when you get a chance? My email is my user name + atattdotnet.
Congratulations on a great assembly job!
Rosie
I'm not sure how far you are from Wichita Chief but he's selling a liner that you may be interested in if you're close to him.
New in box 15 x 30 52 Esther Williams liner
I'm not sure how far you are from Wichita Chief but he's selling a liner that you may be interested in if you're close to him.
New in box 15 x 30 52 Esther Williams liner
Thanks, but like him, I have the 48"...the 52" came later I believe. His is literally the exact same pool I have, same color even... Except I painted ours a dark grey a couple of years ago because I got tired of looking at the yellow & white from the early 80s ��. Also, he has the deck that came with the pool, ours has a wood/trex deck only at one end (so the yellow was more exposed).
I'm in CT, btw.
Rosie, PM sent on liner source. Hey everyone!!! 15 weeks (105 days) from starting to disassemble "the pool" to finally swimming in it!!!!! A nice evening at the end of a 103 degree day spent in the pool. IN it. NOT working on it. NOT getting parts for it. IN IT!!! LOL! Ahhhhhhhhh!! Somehow I expected fireworks or something to mark the occasion. I did hear that angelic "Waaaaaaa" sans the bright light though. While it is not complete it is usable. Just in time. We get the niece and nephews back for another week starting Monday. They'll love it. It was funny. I hopped in and swam around underwater. I'm noticing a hazy look to the bottom at the far end. Shoot! Algae? No. Upon further examination it's just a fine silt and detritus. Run for the vac and the pool broom to do a quick touch up before we disturb it all and it just settles back down. After that it was time to admire the nice bottom pattern as I swam around. I just had to update. Of course. Pictures to follow.
OH YEAH! That is what it is all about!!


 unkrock::angel:
I bet the kids will LOVE the pool. How old are they? YOU will love how well they go to sleep after swimming all day! :slidehalo: hehe


I bet the kids will LOVE the pool. How old are they? YOU will love how well they go to sleep after swimming all day! :slidehalo: hehe


Ages 7, 10, 14. I loved swimming today. Afterwards I started cleaning up some of my clutter and tools from the project and loading it in my truck to take back home. Got hot and sweaty. Hoped in pool. Swam. Returned to work. MIL even tried it out today. She loved it! Big smile on my face.
LOVE jumping in when i get hot from working around the property! Best thing ever..............well the swimming when it is raining is neat as it the floating at night under the stars as is...............well everything about having a pool is neat!


I can say I love the feel of the pool bottom. Sooo much better than what we had. As I wondered or thought the minor peaks and valleys I felt just walking around on the foam are barely noticeable. I don't see any detritus pooling up anywhere. Of course I've keep it clean and not had much to clean. Since it's not at my house and I can't just pop out back and give it a quick brush or vac I'd really like to get a automatic cleaner so I could start it up when I do go over and then visit or do the yard work while it is working. I looked at robots but they are certainly pricey. If I hadn't killed our budget buying 2 liners it might be easier to swing. I might just have to get something like the little shark for the remainder of this year and budget for a bot next year. I'll see if the pool get's the seal of approval from the kids tonight!
The answer was a resounding YES!!! They love it. We had a pool party/cook out with friends over. You know you get into stuff that makes you question your sanity and the "what were you thinking??" thoughts. With a drawn out project like this we had plenty of times where we just hated spending another day out in 100 deg heat with a bazillion percent humidity. But nights like tonight make it all come around. "This is what I imagined when we thought a bigger pool would be fun over there." We're spending so much time with them it's late when we get in but I wanted to update.
djthx2
0
Hello, this is my 1st time posting. I also purchased a similar pool (Johnny Weissmuller 15' x 24' Titan with the walk around deck, fence and end deck). I purchased it on the 4th of July weekend, and plan/hope to start installation next week. I have decided to repaint the aluminum walk around deck and coping since it's a little weathered. During my google research into the best method of repainting aluminum, I came across your thread.
I'm also thinking about replacing the carpeting on the end deck. Question: In one of your earlier posts, it looks like you removed the carpeting. Is this the case? If so, why and how did you remove it? Was it relatively easy? Do you plan to re-install the walk around deck, fence, end deck and carpeting? What type of carpeting would I need, and where can I get it from? Thanks.
I'm also thinking about replacing the carpeting on the end deck. Question: In one of your earlier posts, it looks like you removed the carpeting. Is this the case? If so, why and how did you remove it? Was it relatively easy? Do you plan to re-install the walk around deck, fence, end deck and carpeting? What type of carpeting would I need, and where can I get it from? Thanks.
To djthx2 We had to remove the carpet to disassemble the patio portion. The patio portion meets the walk around deck. The patio part is actually 4 pieces and the previous owner had carpeted it as one. But yes we will re-carpet it. Since the rest of it has consumed so much time we have not settled on a carpet yet. We picked up samples at HD, Lowes, Menards so far. I even wondered if pontoon boat carpet might not be a good idea. And yes we're putting it all back up. It's just now it varies from 90's-100's so we are not hitting it quite so hard as we were as it's at least operational now. I would have loved to have repainted various parts of this one including the coping and the walk around decking. Also the vertical fencing uprights. They "chalk" on your hands when handled. But to prep and paint them it would have took way too much time we didn't have. (edit: Rain killed a month of time that could have been used to paint but we didn't know it would turn out to be a month while we were waiting) Plus I'm not so sure if a rattle can paint job would last like it should.
Outdoor carpet with NO padding/underlayment due to water retention and mold/mildew issues. Get samples and see how they feel with bare feet.
dj do you need a liner for you pool? How high are you walls? Chief has a liner for sell!

dj do you need a liner for you pool? How high are you walls? Chief has a liner for sell!

Thread Status
Hello , This thread has been inactive for over 60 days. New postings here are unlikely to be seen or responded to by other members. For better visibility, consider Starting A New Thread.

