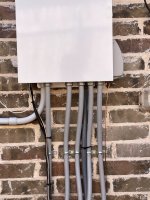
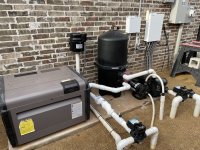
Is this stand pipe for a spa blower and would it be good to install one?
- Thread starter dailygenesis
- Start date
You are using an out of date browser. It may not display this or other websites correctly.
You should upgrade or use an alternative browser.
You should upgrade or use an alternative browser.
Update: debated on sticking with what I had per @JamesW or asking for more punishment, but in the end, I just had to see if I could actually knock out the 1/2 circle, so I went for it on my one remaining knock out and I'm happy to say it worked! It was definitely a lot easier working from the outside of the box. I'm sure anyone with any experience at all would have known this, but I sure didn't. Now I do. As my dad would say -- "that's the cost of higher education." Fortunately, the cost on this one was fairly low. Mostly just my own time and frustration. And the fact that I now have one open 3/4" hole in my box. Per @Turbo1Ton 's suggestion, I sealed it with one of these -> https://www.lowes.com/pd/Sigma-Electric-ProConnex-3-4-in-Knockout-Seal-Conduit-Fitting/1100047 -- I also ordered one of those more expensive liquid tight knockout seals from Amazon. I might use that or maybe I'll return it.
Anyway, I have run my raceway from the control box to the blower. Redid some zip tying along the way to tidy things up.
Now at a stopping place so going to hold here as I need to get to my real job. Next step will be pulling the wires through and wiring everything up. Then, hopefully, the absolute longest spa blower installation process ever will be complete! And at that point, I just hope that we like the spa blower effect!
As always I appreciate everyone's help with my very novice questions.
- Jul 21, 2013
- 52,845
- Pool Size
- 35000
- Surface
- Plaster
- Chlorine
- Salt Water Generator
- SWG Type
- Pentair Intellichlor IC-60
Success! New blower installed and wired up. Below is a video of the spa running first without the blower then with the blower activated. Big difference! Haven't gotten in to try it yet but I think we're going to like it.
For reference, this is the AirSupply Silencer 1HP blower running from the pad about 90 feet away.
I wired it to Aux Relay 2 and set that relay with a 30 minute timer so it will automatically shut off 30 minutes after activation. Like at a hotel!
Thanks again to everyone here for the continued help and guidance. I learned a lot about my system and feel a lot more confident that I could make additions and changes like this in the future.
- Jul 21, 2013
- 52,845
- Pool Size
- 35000
- Surface
- Plaster
- Chlorine
- Salt Water Generator
- SWG Type
- Pentair Intellichlor IC-60
Turn the hump of your Aquarite cell to face down for better cell performance. It keeps the plates covered with water when flow is low.
I saw something about that in the manual. This is how the installer put it in (was just installed a few weeks ago). I thought I might try that after I take it off to clean it the first time. But maybe I'll attempt before. I haven't removed that yet but it seems pretty straightforward.Turn the hump of your Aquarite cell to face down for better cell performance. It keeps the plates covered with water when flow is low.
Turbo1Ton
Gold Supporter
- Dec 26, 2019
- 1,839
- Pool Size
- 14500
- Surface
- Plaster
- Chlorine
- Salt Water Generator
- SWG Type
- Pentair Intellichlor IC-40
Keep your CSI in check and you will never have to clean it. I just finished summer #4 with the pool and checked mine earlier this year for the first time. It was clean as a whistle.I saw something about that in the manual. This is how the installer put it in (was just installed a few weeks ago). I thought I might try that after I take it off to clean it the first time. But maybe I'll attempt before. I haven't removed that yet but it seems pretty straightforward.
--Jeff
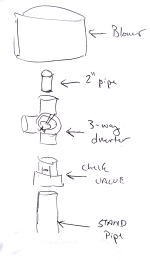
So, I do think I'm going to want to try and reduce the air from the blower to the spa a bit. It's a little overwhelming. I ordered a 3 way diverter valve to use to try bleeding off some air.
Here's a diagram of how I'm thinking I will assemble this (please excuse my crude drawing). Can anyone confirm this is right? Specifically, I am thinking of putting the check valve below the diverter as it seems that if i leave it directly below the blower and above the diverter then it won't really be holding air and/or water in the line (as that would all just escape out the diverter before it got to the check valve.
Am I on the right track here?

- Jul 21, 2013
- 52,845
- Pool Size
- 35000
- Surface
- Plaster
- Chlorine
- Salt Water Generator
- SWG Type
- Pentair Intellichlor IC-60
You will probably want to put a muffler on the air vent as described in Spa Air Blower - Further Reading
Yes, I assume I will probably want this as well. I thought I might just set it up like this first to see if it has the desired effect and see how noisy it is and then add the muffler from there if needed.You will probably want to put a muffler on the air vent as described in Spa Air Blower - Further Reading
Does everything else in the configuration look ok?
Speaking of the mufflers -- something like this? Amazon.comYou will probably want to put a muffler on the air vent as described in Spa Air Blower - Further Reading
1 inch seems to be the largest I can find.
- Jul 21, 2013
- 52,845
- Pool Size
- 35000
- Surface
- Plaster
- Chlorine
- Salt Water Generator
- SWG Type
- Pentair Intellichlor IC-60
Does everything else in the configuration look ok?
Yes.
Maybe use 2 or more.1 inch seems to be the largest I can find.
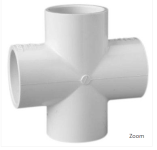
If you get a 2" cross, you can put one one each side.
2" Schedule 40 PVC Cross 420-020
Buy 420-020 2" Schedule 40 PVC Cross at PVC Fittings Online and receive huge savings on all Schedule 80 CPVC, Schedule 80 PVC and Schedule 40 PVC fittings
- Apr 10, 2018
- 5,165
- Pool Size
- 18375
- Surface
- Plaster
- Chlorine
- Salt Water Generator
- SWG Type
- CircuPool RJ-45
Also consider a muffler for a central vacuum system. You can find them set up for 2" plumbing.
This is a little off topic but still spa-related. Let me know if I need to start a new thread.
I've had an issue since the spa was built where two of our jets don't produce bubbles under the normal venturi action (this is all without the blower) (I posted about this once before here) Over time, I have come to believe this is due to a flaw in the construction of the spa where the gunite circle was just a bit off center to the jet nozzles on one side are closer to the spa wall than on the other side. When the jets nozzles are too close to the wall opening, they don't produce bubbles. I think because the venturi effect doesn't work right in this scenario.
So, I thought I might try something. It seems to work but I just wanted to ask if there is any reason I shouldn't do this.
I got one of these 1" inside connectors and put it in the end of the jet pipe. As soon as I did, instant, perfect bubbles. Here's a look at what this looks like (spa is off in this photo so you can see the pipe fitting better).
Other than having a small fitting sticking into the spa, is there any reason this would be a problem? I can't cement it in place because I need to be able to service the jet nozzles, but it seems to fit snugly enough to stay in place without cement. Any thoughts?
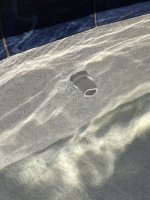

Just wanted to bump the above post and see if anyone could offer any confirmation that my solution is ok and won't mess up anything else in my pool or plumbing. I can't imagine that it would, but I'm such a novice I always feel better if someone with more experience tells me I'm not going to ruin everything 
One thing I did think of is I'll have to be more careful brushing the spa as it would be easy to jam the brush into that pipe sticking out and I'd imagine hitting it too hard could damage something inside.
Anyway, as a bonus, here's a video of the spa jet with the extender added. You can see the bubbles work great. If you take the extender out, it makes no bubbles. This is all with the new blower off.
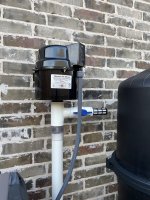
Update again. I added a relief valve to the spa blower line to bring down the intensity of the air flow. See image below. The ball valve actually isn't really necessary since opening it up 100% gives me just about the airflow I want. I might remove it but it's nice to have if I ever want to shut it off or increase the pressure for any reason. If I wanted to bring the air down more, I'd need to add additional relief. This is a 2"-1.5" reducing tee with a 1.5" ball vale and then a reducing bushing to 1" FPT for the muffler. The 1" muffler was the largest I could find. But fortunately this is giving me just about the level of air I want so all is well.
This plus the addition of the two pipe extenders (see above posts) on the non-air-bubble-producing-jets has gotten my spa bubbling situation to where it has needed to be this whole time. Without the blower, I have nice, steady bubbles from all six jets, then you can add the blower for a more intensive, but not overwhelming, effect.
Also, I wanted to note that the noise from the relief valve is negligible with the ball valve fully open like this. It is a bit noisy when the ball valve is mostly closed, but not too bad with the muffler in place.

Thread Status
Hello , This thread has been inactive for over 60 days. New postings here are unlikely to be seen or responded to by other members. For better visibility, consider Starting A New Thread.


