- Jun 14, 2018
- 3
- Pool Size
- 7000
- Surface
- Vinyl
- Chlorine
- Salt Water Generator
- SWG Type
- Intex Krystal Clear
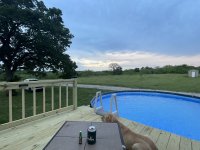
Roughly one month ago, my wife said “let’s get a pool”……………..so here I am. I wanted to share my newly built pool since TFP was so incredibly helpful to guide me, with the hopes that it may be useful to someone else and help them while planning to set up their own DIY AGP. This pool was dreamed up, purchased, and built in one month from scratch.


The foundation - I used free material from my creek banks that is a sandy loam and has great compaction like a select fill, since I have around 7” of fall across the pad. I screeded this down and allowed extra couple of feet beyond the 18’ dia. of my pool to give room to walk around and add a landscaping border. Topped it off with 1CY of masons sand to fine tune the leveling. Sidenote: I debated on the foam insulation sheets and in a rush to save a few $ and move forward I didn’t put them down, in hindsight this is one of my few regrets. Will most likely add them after this season.


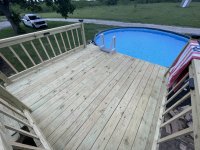
Next I stood the pool up and began filling. I made sure that once I had just enough water to give it some weight I started working the both the inside and the outside from edges to work the wrinkles out...wait too long and you wont be able to move the liner, it doesn't take much. For my foot pads under the legs I used short treated 2x6 blocks. After a lot of back and forth I decided to place them on top of my pad rather than dig them down level with my finished grade. I saw and read tons of projects with it both ways and for me I cant say I've noticed any negative impact. As the pool was filling I used a level on the legs and adjusted my foot pads so that they did not contact the pool did when full. Part 2 will follow soon...

The foundation - I used free material from my creek banks that is a sandy loam and has great compaction like a select fill, since I have around 7” of fall across the pad. I screeded this down and allowed extra couple of feet beyond the 18’ dia. of my pool to give room to walk around and add a landscaping border. Topped it off with 1CY of masons sand to fine tune the leveling. Sidenote: I debated on the foam insulation sheets and in a rush to save a few $ and move forward I didn’t put them down, in hindsight this is one of my few regrets. Will most likely add them after this season.
Next I stood the pool up and began filling. I made sure that once I had just enough water to give it some weight I started working the both the inside and the outside from edges to work the wrinkles out...wait too long and you wont be able to move the liner, it doesn't take much. For my foot pads under the legs I used short treated 2x6 blocks. After a lot of back and forth I decided to place them on top of my pad rather than dig them down level with my finished grade. I saw and read tons of projects with it both ways and for me I cant say I've noticed any negative impact. As the pool was filling I used a level on the legs and adjusted my foot pads so that they did not contact the pool did when full. Part 2 will follow soon...
Last edited: