Does it matter if I put my return water flow to the lower port of the pool? Hubby wants to use the higher port for the new through wall skimmer and use the existing lower port for the return water flow. I feel there was a good reason the water returned at the top of the pool and I had no problem keeping it clean because the water moved constantly. Will it be just as effective if I put the return flow lower in the pool further under the water level?

Installing thru-wall skimmer in Intex - Confused!!
- Thread starter nelson411
- Start date
You are using an out of date browser. It may not display this or other websites correctly.
You should upgrade or use an alternative browser.
You should upgrade or use an alternative browser.
Planning on installing a hayward skimmer thru the wall of my 15' 48" intex the butterfly gasket has me wondering if I could just put the whole 2 piece gasket all on the inside, maybe with a bead of silicone since the outer part of the gasket is obviously made to work with a metal sided pool. I'd like to cut the wall after install of the skimmer.
The above pic is pretty much what I'm shooting for. I have the blue intex frame pool, hoping it will be ok when i make the cut. Would like any tips on parts to use for 1 1/2 return lines thru the wall.
- Jun 10, 2013
- 32
Can somebody tell me what is the connection type on the bottom of the Hayward skimmers? 1-1/4? 1-1/2? Slip or threaded?
Thanks.
Thanks.
It should be 1½" female npt if it's an aboveground skimmer. It'll be 1½" slip if it's an inground skimmer, and there'll eb two of them.
CeeElGee
0
TSTERLING said:Does it matter if I put my return water flow to the lower port of the pool? Hubby wants to use the higher port for the new through wall skimmer and use the existing lower port for the return water flow. I feel there was a good reason the water returned at the top of the pool and I had no problem keeping it clean because the water moved constantly. Will it be just as effective if I put the return flow lower in the pool further under the water level?
I have the same question regarding adding a skimmer to an Intex, but so far no one seems to have an answer. The Intex instructions seem pretty adamant about which port is used for inlet and which for outlet, but I think they are concerned about a dropping water level starving the pump. I know the first year we had an Intex, we didn't even cover the outlet with water because our youngest was too short. I too want to use the lower port/opening for the new outlet to the after I add a skimmer and use the higher port/opening for an additional pump inlet.
There are examples of several different configurations. One is like the photo in this thread where someone added the new skimmer above the old outlet and plumbed both together. I've also seen several with the skimmer between the two ports, which is what I'm leaning toward because my pool is about an inch or so higher right there, and I think it makes sense to keep the skimmer as high as possible with relation to the surface of the water. But I'm like you. I'm still looking for definitive answers. Good luck.
- Jun 10, 2013
- 32
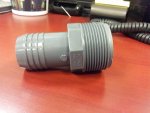
Excellent. Thank you. I went to HD on my lunch break and found this. Grabbed it and will see if the old 1.25 hose goes on the barb okay. I won't have the skimmer until the weekend.Bama Rambler said:It should be 1½" female npt if it's an aboveground skimmer. It'll be 1½" slip if it's an inground skimmer, and there'll eb two of them.
For $3 it's worth a shot. 1-1/2 FPT with 1-1/4 barb. Then just work on the return inlet to the pool. I will likely start out with just hanging something over the edge.
[attachment=0:33b1c0ly]fitting.jpg[/attachment:33b1c0ly]
Attachments
if you install the thru wall skimmer you won't need a second inlet to the pump you will get plenty enough water through the skimmer the both would be returns be returns to the pool is the way I set up mine, I use the lower one to stir up anything on the bottom and the switch to the top one to aireate the surface to raise the ph occasionally, and the fitting in the bottom of the skimmer is 1 1/2 npt
- Jun 10, 2013
- 32
For now, I will operate 2 complete water circuits. First one is the normal filter system that came with the pool (1500gph with paper filter). The second will be the thru-wall skimmer with the older 1000gph paper filter system. I won't be sharing inlets/outlets on the pool itself. Should make for plenty of circulation (2500gph) cleaning, skimming.
I do love the idea of making the second return near the bottom of the pool to help keep things stirred up. When I cut in a second return I will put it there.
I do love the idea of making the second return near the bottom of the pool to help keep things stirred up. When I cut in a second return I will put it there.
- Jun 10, 2013
- 32
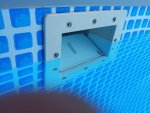
Stopped at the pool place and grabbed a skimmer. Wasn't a Hayward but it seems the fittings are pretty standard. And the kit came with fittings to fit 1-1/4 and also 1-1/2. It came with a return fitting also. Pretty good I guess. Took all of an hour to get it in and working.
It is obvious to me now, but I did the "live" method and installed before cutting so I didn't have to drain any amount of water. I tightened down the screws as much as I could but water was leaking quite a bit. I couldn't tighten screws any further. Then it dawned on me that the liner itself was in the way of the two parts mating properly. After I cut out the liner I could tighten further and voila, no leaks.
Sorry, didn't mean to hijack. Happy camper!
[attachment=1:2bmls81n]skimmer1.jpg[/attachment:2bmls81n]
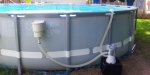
[attachment=0:2bmls81n]skimmer2.jpg[/attachment:2bmls81n]
It is obvious to me now, but I did the "live" method and installed before cutting so I didn't have to drain any amount of water. I tightened down the screws as much as I could but water was leaking quite a bit. I couldn't tighten screws any further. Then it dawned on me that the liner itself was in the way of the two parts mating properly. After I cut out the liner I could tighten further and voila, no leaks.
Sorry, didn't mean to hijack. Happy camper!
[attachment=1:2bmls81n]skimmer1.jpg[/attachment:2bmls81n]
[attachment=0:2bmls81n]skimmer2.jpg[/attachment:2bmls81n]
Attachments
- Jul 15, 2013
- 1

nelson411 said:I'm confused on how to install the butterfly gasket. I get that the gasket opens up to fit on both the outside and the inside of the liner. I'm confused on whether I need to cut the hole first and then put the skimmer. OR put the skimmer on, and then cut the hole, but if I do this, will I be able to place the butterfly gasket on both sides of the liner?
I suppose I can cut the hole, and then open up the butterfly gasket and install it, but the directions on the Hayward skimmer do not mention anything about how to install the gasket.
this is how i installed it without cutting the gasket.
1. positioned face plate where i wanted it.
2. used a small philips head screwdriver to punch out holes.
3. screwed face plate onto liner.
4. cut liner with exacto knife.
5. unscrewed face plate.
7. put butterfly gasket on both sides of liner and screwed everything together.
- Jun 10, 2013
- 32
I sort of followed the same procedure, but my gasket was 2-piece, not butterfly. And I did not drain any water.
I placed the inside frame + 1 gasket piece against the inside of liner, poked small holes for the screws, one at a time, using the frame as a guide, partially screwing the screws thru the liner. Yes, some minor leakage occurred.
Next I placed the exterior piece + remaining gasket piece in place and started tightening the screws. Note that you can screw tight but don't over-tighten and strip the plastic. Some leakage will still occur! It will NOT seat 100% until you cut away the liner. The liner is preventing the proper mating of the 2 halves.
Once all screws at fairly tight, take your knife and cut away the liner. More leakage will occur. Tighten the screws again (you should notice they are no longer tight as the liner is now not blocking the proper mating of parts. Once tightened the leaking should stop.
That's how mine was done (seen in above picture)
Cheers,
John
Thank you soooo much for this picture!!! It helped me decide if I should leave the inlet or not. After seeing this set up I know now how to do it. Great to have pictures with these posts.
Have my thru the wall skimmer and Want to install this so badly my husband is not very handy he's a computer guy and he is terrified. I've read all the threads (you can see what pool and system running on bottom)have the Hayward sp1091lx so not the wide mouth. Pool didn't loose much water over summer so question is how far down do need to empty to safely cut liner. He is worried that if we cut the liner when pool not empty will destroy pool. I know he's over reacting!! He doesn't deal with pool I do. Also is it best to install the plate pieces that go on each side prior to cutting with this model or cut first.
Also when I didn't know any better or about this site had a guy and when he installed our sand filter he screwed up there is a cover with holes that is meant to go over intake and a spout over out going he reversed them so we have no spout doesnt fit in other hole and no filter cover ( thing with lil holes over intake). Live in az no trees no leaves no bugs ran it this was all last year with no issues there was no problems. But I would like them put back they way belong especially spout so that we have more pressure moving water. However we have tried removing the plastic holes cover won't budge? Suggestions ? it would seem need water level below that cover for spillage sake however did see where someone went In pool and covered hole with pool creating enough suction to stop water from pouring out while they changed the cover. Will that work? I know the easy answer is to lower pool water below all of these however az has added restrictions this year along with a large fee is we have to much water waste. So emptying down to those levels will cause us a fee from the town. Any suggestions of where to place the skimmer would also be helpful close to intake our closer to out take? Thanks have a great swim season
Also when I didn't know any better or about this site had a guy and when he installed our sand filter he screwed up there is a cover with holes that is meant to go over intake and a spout over out going he reversed them so we have no spout doesnt fit in other hole and no filter cover ( thing with lil holes over intake). Live in az no trees no leaves no bugs ran it this was all last year with no issues there was no problems. But I would like them put back they way belong especially spout so that we have more pressure moving water. However we have tried removing the plastic holes cover won't budge? Suggestions ? it would seem need water level below that cover for spillage sake however did see where someone went In pool and covered hole with pool creating enough suction to stop water from pouring out while they changed the cover. Will that work? I know the easy answer is to lower pool water below all of these however az has added restrictions this year along with a large fee is we have to much water waste. So emptying down to those levels will cause us a fee from the town. Any suggestions of where to place the skimmer would also be helpful close to intake our closer to out take? Thanks have a great swim season
Barbara this is an old post. You would do better to post a new thread. You would probably receive some answers.
Thread Status
Hello , This thread has been inactive for over 60 days. New postings here are unlikely to be seen or responded to by other members. For better visibility, consider Starting A New Thread.