
Homemade Acid OR Chlorine Injection System
- Thread starter mas985
- Start date
You are using an out of date browser. It may not display this or other websites correctly.
You should upgrade or use an alternative browser.
You should upgrade or use an alternative browser.
- May 3, 2007
- 17,393
- Pool Size
- 20000
- Surface
- Plaster
- Chlorine
- Salt Water Generator
- SWG Type
- Hayward Aqua Rite (T-15)
The buttons will reduce the flow rate by about the same percentage with the pump off as it is on. So if you have a 10:1 ratio now, you should have that same ratio after the buttons.
The buttons won't eliminate the flow with the pump off but it could be slow enough such that the PH in the pump basket is not too but it is hard to say. This whole setup is a bit of trial and error.
There might be a way to estimate about how much will be drawn out with the pump off and with the buttons.
Say you are looking for a 7 gallon draw over 2 weeks and 8 hours per day. That is about 1 oz/hr. So, with the pump off, it will be 0.1 oz/hr. Over 16 hours, that is 1.6 oz. If you wanted 1/2 gallon of acid per week, your dilution ratio is 6:1, so the amount of acid in the pump basket would be about 0.3 oz. Not alot but there is not a lot of water in the pump basket either. Assuming there is a 1/2 gallon of water in the basket, you could put 1 oz of acid in a gallon of water and measure it to see what the PH would be. This is a pretty rough estimate but it might give you an idea if it works. I think though that 128:1 will be below 6.8.
As for the pressure side, I tried a few ideas but they all failed so at this point the only thing that will work on the pressure side is a peristaltic pump. Sometimes you can find cheap ones on ebay but I haven't gone that route yet.
- May 3, 2007
- 17,393
- Pool Size
- 20000
- Surface
- Plaster
- Chlorine
- Salt Water Generator
- SWG Type
- Hayward Aqua Rite (T-15)
There might be another solution although I haven't found the parts for it yet. If you use some sort of adjustable pressure release valve that will only open at a higher pressure, then the valve would open under high suction from the pump but close under the lower pressure without the pump.
I am still looking for a likely candidate for this.
I am still looking for a likely candidate for this.
mas985 said:There might be another solution although I haven't found the parts for it yet. If you use some sort of adjustable pressure release valve that will only open at a higher pressure, then the valve would open under high suction from the pump but close under the lower pressure without the pump.
I am still looking for a likely candidate for this.
I'm not sure where you look for parts like this, but I always look at McMasterCarr first. They pretty much have everything you could imagine.
They have a PVC corrosion resistant needle valve with 1/8" connectors for ~$20 that I thought looked intersting if you just wanted to adjust a valve instead of the buttons. I thought about measuring the flow rate in the hose, then using a marker to mark the distance the mixture needed to travel in the hose to give me my needed flow. I could then use that as a flow meter to adjust the needle valve.
Flow meters to measure this low flow rate were in the $700 range! So I figured I could create my own.
I hope this makes some sense.
- May 3, 2007
- 17,393
- Pool Size
- 20000
- Surface
- Plaster
- Chlorine
- Salt Water Generator
- SWG Type
- Hayward Aqua Rite (T-15)
lovingHDTV said:I'm not sure where you look for parts like this, but I always look at McMasterCarr first. They pretty much have everything you could imagine.
Thanks, I'll take a look at that.
They have a PVC corrosion resistant needle valve with 1/8" connectors for ~$20 that I thought looked intersting if you just wanted to adjust a valve instead of the buttons. I thought about measuring the flow rate in the hose, then using a marker to mark the distance the mixture needed to travel in the hose to give me my needed flow. I could then use that as a flow meter to adjust the needle valve.
That should work fine. The only reason I went with the buttons were that they were easy to find and cheap. They also are not suppose to clog but I don't think that is a real issue with the extremely slow flow rates. Any particulates would not travel very far anyway.
Flow meters to measure this low flow rate were in the $700 range! So I figured I could create my own.
I hope this makes some sense.
Yea, most acid dispensing systems in general are also very expensive which is why I started looking for a cheaper solution. I think that most of the issues can eventually be addressed by the folks on this forum which is why I posted this before I found all of the solutions. I figured others may have ideas that will help with some of these issues.
Another idea I though of was some sort of electronic valve (cheap of course) that would shut off with the pump but again, I haven't found a good solution for that either. Inexpensive non-corrosive parts that do exactly what you want to do can be hard to come by.
Re: Homemade Acid or Chlorine Injection System
Why don't you have a solution that comes out the pressure plug on the pump and drill a hole in the return side PVC. Kinda like a offline rainbow chlorinator. Then you would have to have a pressurizable storage container. That could be pretty expensive. But I am thinking the flow meter would be a better option with that set up.
Luke Pools
- May 3, 2007
- 17,393
- Pool Size
- 20000
- Surface
- Plaster
- Chlorine
- Salt Water Generator
- SWG Type
- Hayward Aqua Rite (T-15)
Re: Homemade Acid or Chlorine Injection System
With acid, I definitely wanted to avoid a pressurized system. Should it rupture in some way, acid could get all over and damage some of the equipment and might even hit someone.
I have been running this configuration for over a year now and so far no issues. I have added a second tank to extend the time between fill ups. I can go several months in the winter and at least one month in the summer without refilling the tanks. Also, it keeps my PH is a range of 7.4-7.6 without having to suppliment so I'm pretty happy with the way it is working.
Re: Homemade Acid or Chlorine Injection System
I know this is not an answer to your question but if within your quest to find an inexpensive valve its nice to know how certain materials hold up to chemicals. Below is an excellent reference. For Muriatic Acid ( Hydrochloric Acid) or even if your doing Bleach (Sodium Hypochlorite) see this link.
http://www.coleparmer.com/techinfo/ChemComp.asp
I was going to gravity feed bleach with a valve to the suction side (similar to this thread) but then after some research to find a valve to handle the chlorine I was better off with the $30 used perstaltic pump I bought on Ebay. Since this type of pump the contents only touch a rubber hose theres nothing to corrode. I use a $20 intermatic electronic timer to dictate what time of day and for how long (it goes to the nearest minute) the pump runs. For a $50 investment its almost cheaper than a valve system and gravity feed.....
- May 3, 2007
- 17,393
- Pool Size
- 20000
- Surface
- Plaster
- Chlorine
- Salt Water Generator
- SWG Type
- Hayward Aqua Rite (T-15)
Re: Homemade Acid or Chlorine Injection System
The point of this experiment was to design something that did not require a peristaltic pump. In fact, I wanted to create something that was entirely passive. The current setup I have been using over the past year is entirely passive.
I currently do not use a valve in my setup but matj6876 was having some problems with extra flow after the pump was turned off. In most cases the flow when a pump is turned off is pretty small so a valve should not be required. For above ground pools, an aquarium check valve should prevent backflow.
Re: Homemade Acid or Chlorine Injection System
I tried this set up yesterday. I put 7x 1/2 GPH buttons in line to the suction side drain on my pump. I didn't see that much of a change in the draw rate when comparing with and without them. My 1 gallon container would have been empty in about 20 minutes.
I also noticed the buttons seem to be "straight through". That is, if I look through them, they look wide open, with no flow pathway. Is this what they should look like?
- May 3, 2007
- 17,393
- Pool Size
- 20000
- Surface
- Plaster
- Chlorine
- Salt Water Generator
- SWG Type
- Hayward Aqua Rite (T-15)
Re: Homemade Acid or Chlorine Injection System
The type I used where 1/2 GPH Raindrip buttons from Home Depot and they use a labyrinth structure in the button so it has a fixed flow rate for a fixed pressure loss. If you cut one open, you can see a rubber insert with a very small zig zag channel. If you can see through it, then it probably isn't the correct type of drip irrigation buttons.
schwim said:I tried this set up yesterday. I put 7x 1/2 GPH buttons in line to the suction side drain on my pump. I didn't see that much of a change in the draw rate when comparing with and without them. My 1 gallon container would have been empty in about 20 minutes.
I also noticed the buttons seem to be "straight through". That is, if I look through them, they look wide open, with no flow pathway. Is this what they should look like?
The type I used where 1/2 GPH Raindrip buttons from Home Depot and they use a labyrinth structure in the button so it has a fixed flow rate for a fixed pressure loss. If you cut one open, you can see a rubber insert with a very small zig zag channel. If you can see through it, then it probably isn't the correct type of drip irrigation buttons.
Re: Homemade Acid or Chlorine Injection System
Hmm, yeah, I thought that was what I bought, but apparently this isn't the case.
I took one apart with a pair of pliers. There is indeed a complex channel structure inside of it, but it appears to me that it is intended for the flow of air through. There is a small inlet hole to the open air, and a barrier for the air to flow through and join the flow of water after it passes through the channel. It looks like it slows the flow by creating a suction of air that holds the water back. Interesting.
I think I've confirmed this as well. I put the drip buttons in the water reservoir I am testing with and it actually speeds the flow of the water being consumed.
<EDIT>
I picked up Rain Bird Pressure Compensation Emitters, 0.5GPH #SW05. These seem to be working so far.
<EDIT 2>
The SW05 work, but 10 in series pulls 8 oz in 30 minutes. Trying with 5 in series to see if there is benefit to running them in series.
It would be so nice if I could find a simple flow control valve that could be adjusted...
mas985 said:The type I used where 1/2 GPH Raindrip buttons from Home Depot and they use a labyrinth structure in the button so it has a fixed flow rate for a fixed pressure loss. If you cut one open, you can see a rubber insert with a very small zig zag channel. If you can see through it, then it probably isn't the correct type of drip irrigation buttons.
Hmm, yeah, I thought that was what I bought, but apparently this isn't the case.
I took one apart with a pair of pliers. There is indeed a complex channel structure inside of it, but it appears to me that it is intended for the flow of air through. There is a small inlet hole to the open air, and a barrier for the air to flow through and join the flow of water after it passes through the channel. It looks like it slows the flow by creating a suction of air that holds the water back. Interesting.
I think I've confirmed this as well. I put the drip buttons in the water reservoir I am testing with and it actually speeds the flow of the water being consumed.
<EDIT>
I picked up Rain Bird Pressure Compensation Emitters, 0.5GPH #SW05. These seem to be working so far.
<EDIT 2>
The SW05 work, but 10 in series pulls 8 oz in 30 minutes. Trying with 5 in series to see if there is benefit to running them in series.
It would be so nice if I could find a simple flow control valve that could be adjusted...
Re: Homemade Acid or Chlorine Injection System
OK, here are my results far:
5 in series - 24 oz/hr
10 in series - 16 oz/hr
15 in series - 12 oz/hr
25 in series - 4 oz/hr
I measured the draw rate by timing exactly 30 minutes and seeing how much water was pulled out of a measuring cup.
I think this will work quite well for me! I'm going to run it connected to a bottle of chlorine tonight to see how well it works.
schwim said:The SW05 work, but 10 in series pulls 8 oz in 30 minutes. Trying with 5 in series to see if there is benefit to running them in series.
OK, here are my results far:
5 in series - 24 oz/hr
10 in series - 16 oz/hr
15 in series - 12 oz/hr
25 in series - 4 oz/hr
I measured the draw rate by timing exactly 30 minutes and seeing how much water was pulled out of a measuring cup.
I think this will work quite well for me! I'm going to run it connected to a bottle of chlorine tonight to see how well it works.
Re: Homemade Acid or Chlorine Injection System
It works! I've run it for about a week now, and it is keeping the pool chlorinated nicely. I suspect when the warmer weather comes I'll have to increase the flow rate by removing some of the drip buttons. Here is exactly how I built it:
Parts:
(1) 1/4" threaded x 1/4" O.D. slip tubing valve
(1) spool of teflon tape
10' of 1/4" irrigation line or poly tubing
(25) Rain Bird SW05 0.5GPH emitter buttons
(1) 5 gallon water bottle
(1) can of exterior grade spray paint for plastics
(1) pack of 4" zip ties
3ft of 1/4" dowel stick
(1) 2" PVC Cap
(1) pack 1/4" irrigation line elbows
(1) pack 1/4" irrigation line couplings
NOTE: I tried using the slip-type connectors with the tubing several times, but they seem to leak air. Using the insert type fittings will give you better results and is less expensive.
Steps:
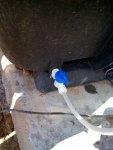
1.) Wrap the teflon tape around the threaded section of the valve. Remove the suction side plug from the pump and screw in the valve.
[attachment=1:3oxxidn0]photo-2.jpg[/attachment:3oxxidn0]
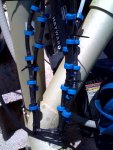
2.) Create the flow control assembly using the irrigation tubing and SW05 buttons. I ran them 5 in a row, then turned created a 180 degree turn and ran 5 more back in the opposite direction. I used about 2" of tubing between each button, and between the elbow fittings. I needed 25 in total. You should run a flow test after ever 5 or so added to the series to get an idea as to how fast your pump will pull the fluid. This can be done with a timer and a measuring cup. Once you have the count you need, you can tie the assembly together using the zip ties. This really helps keep it solid.
[attachment=0:3oxxidn0]photo-3.jpg[/attachment:3oxxidn0]
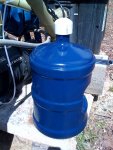
3.) Create the chlorine reservoir. I used a 5 gallon water jug. Spray paint it with exterior paint to protect the plastic and chlorine from the sun. Leave the plastic cap on the bottle. This will help create a seal when the assembly is put together. Take the 2" PVC cap, and drill a 1/4" hole in the top center of it. A little to the side of that hole, create a small vent hole using the smallest drill bit you have. The smaller the better.
Insert the dowel stick into the tank and measure to the top so it sticks out 1/4 inch when it is resting on the bottom corner of the tank. Now, zip tie a length of 1/4" tubing to the stick such that the end of the tubing is co-terminus with the end of the dowel. Place a 45 degree cut at this end of the tubing to prevent it from getting stuck to the bottom of the tank. This length of tubing should be about a foot longer than the dowel. Once this stick and tubing are together, slide the tubing through the hole in the PVC cap so it comes out the top.
[attachment=2:3oxxidn0]photo-1.jpg[/attachment:3oxxidn0]
4.) Now connect the flow restriction assembly to the tank, fill the tank with bleach, and you're done!
It works! I've run it for about a week now, and it is keeping the pool chlorinated nicely. I suspect when the warmer weather comes I'll have to increase the flow rate by removing some of the drip buttons. Here is exactly how I built it:
Parts:
(1) 1/4" threaded x 1/4" O.D. slip tubing valve
(1) spool of teflon tape
10' of 1/4" irrigation line or poly tubing
(25) Rain Bird SW05 0.5GPH emitter buttons
(1) 5 gallon water bottle
(1) can of exterior grade spray paint for plastics
(1) pack of 4" zip ties
3ft of 1/4" dowel stick
(1) 2" PVC Cap
(1) pack 1/4" irrigation line elbows
(1) pack 1/4" irrigation line couplings
NOTE: I tried using the slip-type connectors with the tubing several times, but they seem to leak air. Using the insert type fittings will give you better results and is less expensive.
Steps:
1.) Wrap the teflon tape around the threaded section of the valve. Remove the suction side plug from the pump and screw in the valve.
[attachment=1:3oxxidn0]photo-2.jpg[/attachment:3oxxidn0]
2.) Create the flow control assembly using the irrigation tubing and SW05 buttons. I ran them 5 in a row, then turned created a 180 degree turn and ran 5 more back in the opposite direction. I used about 2" of tubing between each button, and between the elbow fittings. I needed 25 in total. You should run a flow test after ever 5 or so added to the series to get an idea as to how fast your pump will pull the fluid. This can be done with a timer and a measuring cup. Once you have the count you need, you can tie the assembly together using the zip ties. This really helps keep it solid.
[attachment=0:3oxxidn0]photo-3.jpg[/attachment:3oxxidn0]
3.) Create the chlorine reservoir. I used a 5 gallon water jug. Spray paint it with exterior paint to protect the plastic and chlorine from the sun. Leave the plastic cap on the bottle. This will help create a seal when the assembly is put together. Take the 2" PVC cap, and drill a 1/4" hole in the top center of it. A little to the side of that hole, create a small vent hole using the smallest drill bit you have. The smaller the better.
Insert the dowel stick into the tank and measure to the top so it sticks out 1/4 inch when it is resting on the bottom corner of the tank. Now, zip tie a length of 1/4" tubing to the stick such that the end of the tubing is co-terminus with the end of the dowel. Place a 45 degree cut at this end of the tubing to prevent it from getting stuck to the bottom of the tank. This length of tubing should be about a foot longer than the dowel. Once this stick and tubing are together, slide the tubing through the hole in the PVC cap so it comes out the top.
[attachment=2:3oxxidn0]photo-1.jpg[/attachment:3oxxidn0]
4.) Now connect the flow restriction assembly to the tank, fill the tank with bleach, and you're done!
Attachments
Re: Homemade Acid or Chlorine Injection System
schwim,
That looks like a pretty good set-up. What's your trick for filling the "water jug" with chlorine if the lid is still on it with only a small hole for the tube?
schwim,
That looks like a pretty good set-up. What's your trick for filling the "water jug" with chlorine if the lid is still on it with only a small hole for the tube?
Re: Homemade Acid or Chlorine Injection System
This little valve might also offer a solution over the rain bird drip devices. It would give you more control over the amount of acid/chlorine it feeds and it's not actually in the flow so corrosion wouldn't be an issue. It's just a pinch valve to use on the tubing.
One more idea that could help solve the feed back when your pump is turned off might be this tiny check valve although I wonder if you couldn't just screw a 1/4" injection fitting right into the side of your pump? Most of these fittings have a check valve built in.
BTW: Check out that site for some really nice plastic buckets etc for storing your chemicals in. I'm not affiliated with them but I have purchased from them before and they seem great to deal with.
cd
0
Re: Homemade Acid or Chlorine Injection System
Could you give an update on how the set-ups are working?
Could you give an update on how the set-ups are working?
Re: Homemade Acid or Chlorine Injection System
It worked for just under 3 weeks. The drip buttons became clogged with white crystals and the flow just plain stopped. I suspect this is the "white stuff" others have mentioned in the forum.
Back to the drawing board!
cd said:Could you give an update on how the set-ups are working?
It worked for just under 3 weeks. The drip buttons became clogged with white crystals and the flow just plain stopped. I suspect this is the "white stuff" others have mentioned in the forum.
Back to the drawing board!
- May 3, 2007
- 17,393
- Pool Size
- 20000
- Surface
- Plaster
- Chlorine
- Salt Water Generator
- SWG Type
- Hayward Aqua Rite (T-15)
Re: Homemade Acid or Chlorine Injection System
I have been using the concept that I described initially for a little over a year. However, I am using mine for acid dosing rather than chlorine injection.
So far, it has worked quite well. I added a second tank in parallel to increase the time between adding acid to the tanks so now I can go for a month in the summer between refills and several months in the winter. I also added an injection point on the suction side of the pool so acid is not added when in spa mode.
This set up is probably more suitable for acid dosing rather than chlorine dosing because of some of the crystal problems associated with chlorine. This is probably why the liquidator was designed the way it was so the crystals are less of a problem.
Re: Homemade Acid or Chlorine Injection System
Yes, this was my experience. Crystalization of the chlorine breaks it.
mas985 said:This set up is probably more suitable for acid dosing rather than chlorine dosing because of some of the crystal problems associated with chlorine. This is probably why the liquidator was designed the way it was so the crystals are less of a problem.
Yes, this was my experience. Crystalization of the chlorine breaks it.
Thread Status
Hello , This thread has been inactive for over 60 days. New postings here are unlikely to be seen or responded to by other members. For better visibility, consider Starting A New Thread.