Filter/Air Issues on the pump and backwash issues.

Great thoughts Adam.

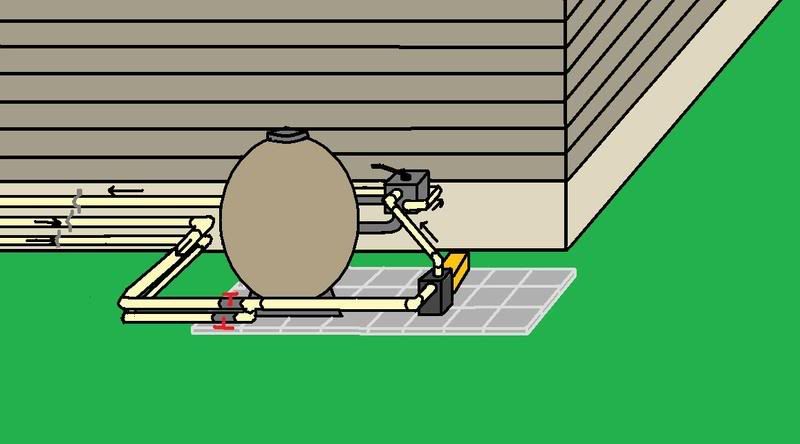
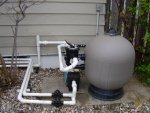
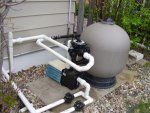
My only thing is I like to have 2 valves. One for the main drain and one for the skimmer. Gives me room to vacuum things better. Your sketch is close to what I was thinking as well. I also thought to leave it as is and just cut out the PVC in the front and just replace it. That way the pipe is mostly already there. The biggest thing I thought of was to take the pipe from the control valve going to the returnes and clean that up so it goes straight back to the house and I can attach it with another clamp. If you look at the pics, you will see how messed up that is.

You definitely gave me some more things to think about. Thanks for your time to this as I do want to maybe clean it up a bit more.

If you come up with anything else, then let me know. I may play with some thoughts later on in the winter and post them as well.

Awesome paint schetch. Where did you do that?
 
Pretty picture Adam :flower: If I tried one it would probably look 'Picasso-esque' at best :p

I was thinking of moving the filter and reorienting the pump and filter :shock: (sand filters can be moved a few feet with a couple helpers - with good backs :wink: ) which is why I was wondering about the space available.

Chad, you can get the same performance out of a good 3-way valve as you can from 2 single valves. [Since you've been so nice to me I'll tell you the 'secret' to optimal vacuum performance :wink: With the valves open hook up the vac to the skimmer... then go to the pump and shut off the drain valve until the pressure gauge drops 1/2 - 1 psi - this will give you excellent suction while not being so much that the vac head sticks to the bottom. Once you figure out how much of a pressure drop your pool gets the best suction off of, use the same drop each time - this removes the 'dirtiness' of the filter from the equation 8) ]

Enjoy those pools while you still can :whip: :cry:
 
I assume you mean to perform that function using only the one 3 way valve correct? That would actually make sence. Never thought to close the one valve a bit so that the suction improves.

Actually Ted, I am not so much concerned about the vacumming as I am with being able to control the skimmer and the drain seperately. I like the fact that I can keep both funtions seperate. In my mind, I think having seperate control valves would make things easier no?
Why would you want to combine those 2 valves? Again, bare with me as I am not the pluming expert by no means. I just want to understand this a bit more so it helps me get a better idea and feel for my pool.

I never thought of moving that heavy beast of a filter. Of course you would remove the sand first. So lets see..... Where the heck would I move that thing without making it an eyesore in the yard or do you mean to just reposition it on the pad? That would maybe make more sense? :hammer:

Take your time on this one guys as we have all winter to try and figure out a better configuration. I plan to not move anything until next April moves around.

I sure appreciate you guys taking the time to help me think this one out.

GOTTA LOVE THIS FORUM MAN! ITS ALL GOOD!
 
I edited the pic a little bit. It's essentially what you have now, just a little nicer looking. This one just has 2 normal valves instead of one 3-way valve.

I drew both of these pictures(and many other diagrams/pictures for this forum) in Microsoft Paint. I took a Computer Aided Drafting class last year in High School. That helped me get more familiar with computer drawing. I'm also pretty good at Google Sketch-Up and one of these days I might post some of the pictures.

NewFilterPlumbingRevised.jpg


Hope you like it,
Adam
 
Looks Great. I like how you did clean the 2 valves up in the front. I planned on doing that myself and get things as streamlined as possible.

We will see what Ted comes up with as well. I know hes got something brewin up in that head of is so that will be interesting to discuss this fall/winter.

Thanks~
 
Hey Ted, :wave:

Thought I would bump this thread again to see if you had any further thoughts on my pad setup. I still plan to go with the 2 valves as I like to control the skimmer seperately from the return lines.

I did decide to probably go online and order a new Multiport valve as well as a couple two-valve jandy pool valves as well as they seem to be more reliable than a simple valve like the ones I have now. I figure if I am going to replace these things including some of the piping, then why not do it all at one crack while I have the pool dudes help. Between him and myself, it should go fairly quick. I think I will decide to buy a pump directly from them as they warranty the pump longer and then if anything goes wrong, they are right there to back up what they install. I have no issues of buying things online, except its more of a hassle then to use someone more local. Plus these guys have been very good to me since I have started using them upon purchasing this home.

Any other ideas you can come up with I will sure think about for sure and if anyone else has any other ideas, then please share them. Thanks a bunch!
 
Things got a bit more interesting this past week. It rained a half inch. Then it snowed. That really sucks and had to pull whatever snow I could with a broom again off the cover. Boy this year has been a PITA for weather!

Anyway, I was reading back on this thread on the thoughts that Adam posted and I decided to keep the 2 valves, and order, the 2 port jandy valves, new multiport, and a few other small items here in March. The valves are made for pools while the valves I have now must be 15 years old and are cracked a bit. Most likely the cause of some air issues this past year. I then am still planning on replacing the pump and a bit of the plumbing/pipes to clean that up as well.

So, if anyone has any thoughts, then please share as I am open to any suggestions to help clean this up a bit.

Thanks for any input! :goodjob:

Hope everyone is having a good year so far!
 
Hey Chad, sorry for the delay :oops:

What I think would help optimize the system would be to remove as many 90's as you can. Your current set up has the pipes coming out from the house, around the filter and then into the pump and the return coming out away from the house and then doubling back towards the house. Also there are 2 extra 90's getting the water from the pump into the mulitiport.

What I suggest is:

#1- Turn the pump and filter around 180* so that the in and out pipes face the wall where the plumbing is run, whave the filter sit as far away from the house as it can while still being on the pad - ok, now you say that you can't get to the pump basket so...

#2 Slide everything to the right so that you have room on the left side to get to the new valves and open the strainer housing.

#3 - loose the base that the pump and filter sit on or at least get the pump off of it so the out port on the pump lines up with the in port on the multi (loosing 2 90's)

Moving the filter would be a real pain however, you are changing the sand anyway- an empty sand filter is very easy to reposition 8) The waste line will have a couple 90's added to it, but that's no problem, it's the waste line. The only other thing is you'll have to rewire the pump, that flex conduit won't be long enough to reach the new pump orientation - I'd suggest installing a twist-lock plug and having unions so that the pump can come inside for the winter (only if the twist-lock plugs are allowed by local code)

One other thing, make sure that schedule 40 fittings are used (I see that some of your current ones are not!) and I hope the glue job on the new stuff is done a lot nicer than what's in the pictures :wink:

If you reposition things as I suggest, you'll take a few feet of pipe out of the system and a bunch of unnecessary 90's. :goodjob:

Good luck with the improvements, if you need me to clarify anything I've said, just ask.

-Ted
 
No problem Ted.

Wow,some good ideas. Never thought of that. :hammer:

OK, then I can get a couple more clamps to support the length of the pipe against the house as well. I would think some stainless steel clamps and then some concrete lag screws should suffice as that is what looks like is there now.

So removing the base pad that everything sits on is OK to do? The pump will be sitting directly on the concrete and when I looked closer, it looks that that would be fine as it currently is just sitting on a plastic pad anyway. I cant really tell as its burried in the snow right now.

I REALLY like the idea of using the unions to unscrew the pump from the pipe and then using the twist lock plug for the hard wired electrical connection. That way the pump would most likely last much longer by being inside during the cold winter months. I then could use plugs on those lines to winterize them as well.

I want to do what works best, and having the pool guys work with me on all of this will give enough people to move that filter I would think. This gives me a month to ponder this a bit more before submitting the work to the Pool dudes for a price quote.

Like I said earlier, this is a big enough Job that I definitely want those guys around, but at least now I have some better ideas.

The only drawback is there is a small tree to the north and I may have to trim it back to move the filter further north (or right in the pics) to get it to the end of the brick pad that its currently on.

I planned to replace the multiport valve anyway so I may as well cut all the pipes, dismantle the thing, clean out the sand, move the filter, and then start on the rebuilding stages including the new multiport, jandy valves, pump, and all the necessary fittings.

I will absolutely make sure the Pool dudes use the schedule 40 fittings. They had mentioned this upon closing this past year to me anyway, and they said that whoever did the plumbing did not know what they were doing as its truely a mess. So at least everyone is on the same page anyway.

If I think of any questions, then I will shoot them to ya, but I think you have it covered. I really like your thoughts here Ted. Simplicity is key here and I hated that round about way the pipes came around the filter anyway.

Once We are done with the improvements in Mid April hopefully (if all this snow melts by then), I will shoot off some pics to show you what it looks like.

Have a great spring.
 
Ted (Waste),

Thought you would like an update. Finally getting my pool updated tomorrow. Pool Dudes are comming in to give me a hand to do a complete makeover of my pool pad. We have had horrible weather all winter and this spring is now causing flooding in the area. Luckily I live in the part of town on top of the hill and not by the river as we have certain parts of town under water due to flooding this year.

Once I get this thing up and running. I plan to post a few pics of it online here for you to see. I also looked under the cover and I can see all the way to the bottom till about 6' deep, then its a bit murcky. I know there is algae in there, but its not too bad. I thought it would be worse so I am pretty happy about that. Maybe a week of shocking will do the trick this year. Last year I had a heck of a time and it took 3 weeks, because I was not using the BBB method yet. This year, I know better.

I will keep in touch and pics to come.


Thanks :goodjob:
 

Enjoying this content?

Support TFP with a donation.

Give Support
Welll, Bad Day. Opened up the filter to start to work on changing the sand and well, I had a broken top diffuser snapped into 2 pieces. The pool dude thought it was running like that most of the summer last year. Not a good day at all.

Ordered the parts. Should be here by weeks end and then hope to get to work again on it on Monday or Tuesday. Pool guy took the whole inside of the assembly out so that we could change the latterals at his shop. Made sense to change those things while I am at it.

So then, this whole system I am doing is brand spakin new except for the big plastic filter itself which is only 4 years old, but at least I know what was causing sand to backwash into my pool and took forever to clean the pool water last season.

Pool dude said he never seen a top diffuser snap in two like that. Most likely due to the previous owner of the house not closing the pool properly and most likely snapped due to freezing temps. Sucks, but I sure did learn a bunch. Never knew how the filter worked till we took the dank thing completely apart. Wow, now much too it actually.

NOTE TO SELF..... I can fix this thing myself and order the parts online next time! Will save me gobs of cash for sure. :hammer:


Live and learn I guess. More to come later..... :goodjob:
 
Re: Filter/Air Issues on the pump and backwash issues.-Pics

Finally got the pool done today. Wow what a pain in the rear this year. I started this 2 weeks ago and the weather has not cooperated with us anyway including today when we opened the pool. Also had broken top difusser assembly in my Hayward Filter and that took time to order as well. So with only the bottom diffuser being reused, this whole pad is brand new! :goodjob:

Ted - Waste,

I took some pics and attached them so you can see how I decided in setting this up. I did add a bit more pipe, but wanted easier acess to the valves and the pump basket. These seemed to work out the best for me. We fired everything up and did not see any air going into the pump basket! Except for a bit of buddles that I think is comming from the gassing of the chemicals that I am dumping in big time. It was fine for a couple hours, and then I started to add the chems and then these tiny little buddles are going into the pool. I dont think that is a big deal, or at least not yet. I do plan to vacuum on waste again tomorrow PM and when I do that, I will add more magic lube around the lid of the pump basket seal. I think it shot a bit out last time through the seal when I shut the pump off today and I forgot to relube it up before I restarted everything. Decided to mess with it tomorrow when it warms up some.

OK now with some questions for you guys.

I found a couple kracked plastic plates that go over the returns. I am not sure what you call them, but they have 4 screws in them, and I noticed that today. The seal is intact and is not leaking water. I ordered 4 of them things, but plan to use some pool caulk to seal up the cracks for now until they arrive. I may then decide to try and change them, but its under water and its 45 degrees! How much water could I loose by doing this?

I would not think much? What are your thoughts? Thanks for everyones help on this! :goodjob:
 

Attachments

  • Pool time 001.jpg
    Pool time 001.jpg
    134.9 KB · Views: 63
  • Pool time 003.jpg
    Pool time 003.jpg
    123.7 KB · Views: 63
Chad, sorry I missed this the other day, but I didn't get home til 10:00 and was so tired, I didn't even THINK about logging on :shock: .

While you've still got some extra 90's in the system, the fittings and glue job looks MUCH better!! :goodjob:

Don't sweat changing out the return faceplates (SP 1408 or 1411) - the water pressure on the liner is almost enough to fully seal the hole, so you'll only loose a few ounces of water in the 3 minutes it takes to replace one 8)

GLAD to hear you are up and running! Now all you need is the weather to get warm enough to go swimming :-D

I'm hoping you have a trouble free pool but, if something comes up, just ask and I and the rest of the great members here will be there to help!

Take care and have a wonderful summer!
 
Ted, Thanks Buddy. What a difference this year has made compared to last year. I should of taken a before and after pic of the pool. When I opened it up, it looked like pea soup. Now in just 30 hours of run time and only 6 gallons of 12.5% LC, this baby is just about completely clean. Vacummed today on waste again for the second time, and thats the way to go when you are doing a spring clean up for sure.

I did lube up the plate and that did help some but the water is 45 degrees so the seal is really cold and shrunk so I have a feeling I am still loossing some air there, but oh well. I will wait till the water starts to warm up and then take the pump plate off again and relube that succer up.

Thanks for the info on the return jet plate. I did stick a little lube on it, but the dang water is so flippin cold that I would get hypothermia if I were to do anything now. Plan to just wait till the water warms up to about 70! Hopefully by memorial day, and then I will bear it and get in for a quick fix.

If I think if it, I will snap a pic of the backyard and show you the water clarity in just 48 hours of having new pad equipment and new sand. Oh yea, I did put that pea gravel in around the laterals and I think that is the way to go for sure. Pool dude agreed.

You also have a fantastic summer. I know with my TF100 kit, I will have total water control. The only thing I will need to do at the pool place is test for metals. Later Man! :cheers:
 
Thread Status
Hello , This thread has been inactive for over 60 days. New postings here are unlikely to be seen or responded to by other members. For better visibility, consider Starting A New Thread.