Easy Touch Issue?

rookies

Silver Supporter
Sep 21, 2022
27
ca
Pool Size
20000
Surface
Plaster
Chlorine
Salt Water Generator
Hello,
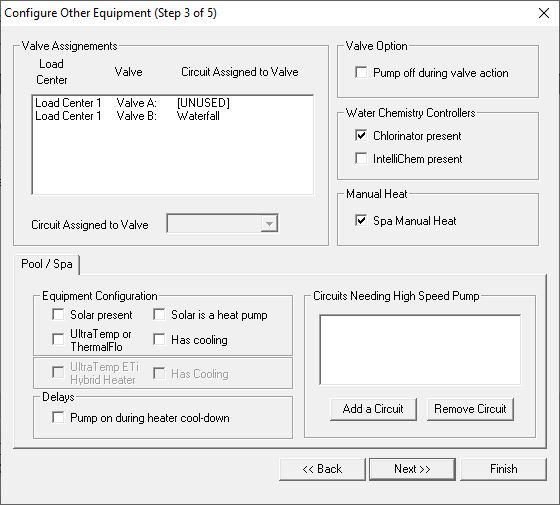
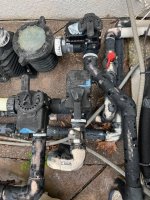
I have a Pentair auto valve that does not move on auto...the motor rpm's ramp up, but no movement on valve. It will move when I manually flip the little toggle switch...This is the valve for the cleaner.

I also noticed when the Spillway is on, the cleaner valve opens, which normally doesnt...so 2 issues....

Does this sound like the control board problem....and can I repair the board, or do I just need to replace. This board was replaced 1 1/2 years ago with a air/water temp issue...After I replaced this board, it has been working perfectly until this issue..
Thanks!
Troy
 
Troy,

Most likely just a bad actuator... The actuator is the small box with the switch on it. The actuator is mounted on top of a standard Jandy valve.

Just because the actuator moves when you flip the little switch, does not mean the actuator is good. You are just doing when the actuator should do by itself. It could be programing, or the circuit card, but I doubt it.

I suspect it is a bad micro-switch inside the actuator.

Thanks,

Jim R.
Jim,
I replaced the 2 micro switches, no luck....are you saying to replace the whole top of the auto valve? or is the actuator a part like the micro switches?

Also, the configuration of this valve in question moves when I turn the spillway on...it used to not move...This made me believe it was a control board issue??

Thanks for the help!
Troy
 
Does your INTAKE and RETURN valves turn properly when you go into SPA mode?

If that valve turns when you turn on SPILLWAY it says it is plugged into the RETURN socket instaed of into VLV A.

Open up your EasyTouch and find which valve actuator socket the cleaner actuator is plugged into.

Show us pics of the board and what actuators are plugged into which sockets?

1711662429657.png
 
Troy,

The actuator and the Jandy valve are two separate units.. If you had no automation, you would just have the Jandy valve. When you add automation, you bolt the actuator on to the top of the Jandy valve..

Not sure why any of the following would have changed, but this is what makes the valve turn..

Actuator's are pretty dumb.. If you apply power to one wire, the actuator moves all the way until it hits a microswitch and stops. If you then apply power to an other wire, the actuator will move all the way the other way, until it stops when it hits the other microswitch.

The automation does not know where the valve is.. It just knows it has to be at one stop or the other. If the actuator is at the wrong stop, then you use the little On - Off - On switch to send the actuator to the other stop.. This switch must be in one of the two On positions.. It can never be in the center Off position, unless you don't want it to move..

Inside the EasyTouch is a relay.. When the relay is turned on, it will move the valve one way.. When the relay is turned off, it will move the valve the other way..

The relay is turned on when a Circuit is linked to the valve.. See below..


You say the spillway circuit is now moving the valve.. I suspect that that when you turn on the spillway it shuts off the cleaner circuit. Are you sure you just don't have the little On-Off-On switch set to the wrong "On"???

What other automated valves do you have?

Thanks,

Jim R.
 
Jim and AJW, Thank you very much for the help, very much appreciated! I was originally going to replace the auto valve, but since it moves on spillway mode, I thought it may be the circuit board. Then I heard that it still may be the board or the valve....so really not sure....

Cleaner Valve is attached to Valve A, Spillway valve is attached to Return, Spa/Skimmer valve is attached to Intake.

--Again, cleaner valve does not auto move...it stays in the Pool mode. But manually switch moves it to correct cleaner position.
--Now, in the Spillway mode, it still works, but the cleaner valve positions itself in the originally correct "cleaner" position.

I assume all this is from a bad valve (hopefully) or bad Circuit board, which is costly and I replaced this 11/2 years ago with a diff issue.8C4E7ED6-F5EC-4C05-8D29-BD7727DC7569.JPGC3335748-F837-484B-88A1-922370D22036.JPGcleaner mode now.JPGvalve position.JPGcircuit board.JPGcircuit connections.JPG
 
Troy,

I am sure it is just me, but I am confused... Do you have a suction side cleaner, or is it connected to your Return (pressure )side???

Looking at your diagram below.. on the "Now not working" side... Tell me what happens to your Cleaner valve if you move the On-Off-On toggle to the opposite On position???

1711749566820.png
Thanks,

Jim R.
 
Troy,

I am sure it is just me, but I am confused... Do you have a suction side cleaner, or is it connected to your Return (pressure )side???

Looking at your diagram below.. on the "Now not working" side... Tell me what happens to your Cleaner valve if you move the On-Off-On toggle to the opposite On position???

View attachment 561275
Thanks,

Jim R.
Hi Jim,
It is a Polaris 360, pressure cleaner. If I toggle the cleaner valve, it will rotate immediately, that moves the cleaner and the cleaner will be on all the time.
 
I don't mean to be another cook in this kitchen, but if you get desperate enough to figure this out, there's a relatively simple (if not easy) troubleshooting step to take.

You've got at least two actuators. Physically swap the funky one with another, and also swap their wires at the circuit board.

If the exact symptom persists, you'll know it has nothing to do with the actuator, so must be the board or its programming.

But if the funky actuator still acts funky, but in its new location, then you'll know its the actuator.
 

Enjoying this content?

Support TFP with a donation.

Give Support
Troy,

Part of the problem is that your diagrams show your valves connecting to the pump... But your Cleaner valve and Spillway valve have nothing to do with the pump??? Just confusing.. :mrgreen:

You show a pic of the "Cleaner mode".. I would expect this to be when you put the automation into the cleaner mode. If the valve position is not correct, moving the little toggle should put the valve in the cleaner position. If you are in the Cleaner mode, you want the valve to be in the cleaner mode position. When you shut off the cleaner mode, the valve should move back to the other position...

Thanks,

Jim R.
 
  • Like
Reactions: rookies
I don't mean to be another cook in this kitchen, but if you get desperate enough to figure this out, there's a relatively simple (if not easy) troubleshooting step to take.

You've got at least two actuators. Physically swap the funky one with another, and also swap their wires at the circuit board.

If the exact symptom persists, you'll know it has nothing to do with the actuator, so must be the board or its programming.

But if the funky actuator still acts funky, but in its new location, then you'll know its the actuator.
Thanks...ill try this in the am!
 
Thanks...ill try this in the am!
If you do, be sure to set the little switch of each correctly. Note the position of each switch before you swap, then matchie-matchie after the swap (hope that makes sense). That's assuming they are the same brand/model.
 
If you do, be sure to set the little switch of each correctly. Note the position of each switch before you swap, then matchie-matchie after the swap (hope that makes sense). That's assuming they are the same brand/model.
I wasnt going to touch the little toggle switches, i was just going to unplug the cleaner and the spillway on the board....and change those two...then turn them on and see what the valves do....that sound correct?
 
Having the toggle switch set right is critical to the actuator working properly and being in synch with the Easy Touch.

Touch the toggles and try them both ways and see what happens.
 
I wasnt going to touch the little toggle switches, i was just going to unplug the cleaner and the spillway on the board....and change those two...then turn them on and see what the valves do....that sound correct?
I didn't suggest just swapping the wires, because I don't know enough about your plumbing schematic to know how much havoc that would create. I suggested you actually swap them physically, simulating installing a brand new actuator (just not paying for one). So, for example:

Let's say, currently:
Actuator One is at location X and its wires go into the board connector VLV-A, and its switch is in position 1.
Actuator Two is at location Y and its wires go into the board connector VLV-B, and its switch is in position 2.

After turning off all your breakers to the pad:

You would unscrew Actuator One and Actuator Two.
And physically swap them, mounting Actuator One onto the valve where Actuator Two was, and vice versa.

You would then expose the motherboard and swap the VLV-A and VLV-B connectors.

And then you would set the little switch of Actuator One to position 2 (how Actuator Two was set).
And, you would set the little switch of Actuator Two to position 1 (how Actuator One was set).

Then turn it all one and see what happens.

You would, of course, substitute your own actual board connections and switch positions.

This will determine if the problem is in the actuator or the board (or its programming).

It's a drastic troubleshooting step, if no one else comes up with a better solution. But it'll tell you a lot. Then, if it reveals that the actuator is fine, then leave it, you don't have to swap everything back.
Perfect...ty, ill do this and report back after the rain stops!
 
  • Like
Reactions: Dirk
I like to take pictures of things before I go monkeying with them. I used to be able to trust my brain to remember how things went, but I can't anymore! And/or I'll label wires with little masking tape tags, and then take a picture of those, too. Take a picture of the little switches. And the orientation the actuators sit, and where their handle stops are positioned, etc. Just takes an extra minute and can save you hours of head scratching later.
 
I should mention... there are limiters inside and outside of the valves and actuators that can be set to control how far the valve will turn in each direction. If the two valves both move all the way they can, each way, then you don't have to consider this. But if one valve only goes so far in either direction, then the swap gets a little more complicated, because you'll have to adjust either the actuator or the valve stops to recreate what each one is supposed to do.

I believe when an actuator is involved, the external valve handle stops are not used, only the internal adjustment inside the actuator is configured. I've done the actuator adjustment, but I've never used the external valve handle stops before, so I'll admit I'm not crystal clear on this aspect of the process.

Just move the valve actuators in each direction to see if they go all the way over, or stop part way over. Then we'll go from there.
 
These guys:

layout.JPG

It looks like the external valve stops for each valve handle are in the exact same positions, so that's good (they might not actually be doing anything, anyway). But you still have to determine what the actuator stops are doing (they're inside the actuator, you can't see them from outside). Again, just move the valves in each direction (electrically, not manually) to determine how far each travels (in both directions). If both valves move to the same positions in each direction, then you're good-to-go.

If the two you're going to swap don't move the same, then you'll have to reconfigure the actuator stops for each, to mimic the other.

That third actuator doesn't have any stops.

If the funky actuator is one of the two with stops, then swap those two and leave the third "odd ball" alone.
 

Enjoying this content?

Support TFP with a donation.

Give Support