Another AGP build thread - a resume from a disatrous pandemic summer

detlion1643

Well-known member
May 14, 2020
75
Erie, PA
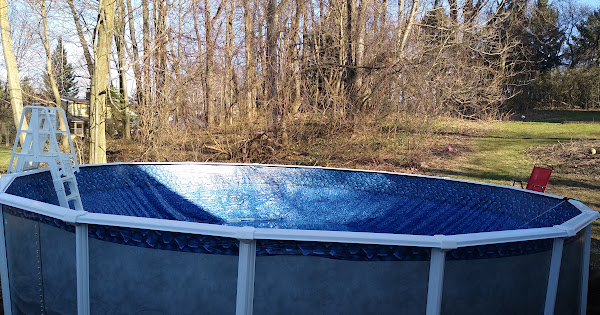
So my threads last year were so much of a letdown, but it ended on a good note. From months of orders/manufacturers not being provided and cancelled, I finally ended up with a 24' x 52" above ground pool end of August/beginning of September. It sat in my garage on a pallet wrapped in tarps all winter long. It's still cold, but all the snow is melted and it's been around 45ish lately. The sun has been out the past few days as well but ambient temps are still chilly. The ground is still too solid to do anything big with yet.

I'm really anxious to get this pool together and enjoy it the most time I can this year (as we lost all summer last year).

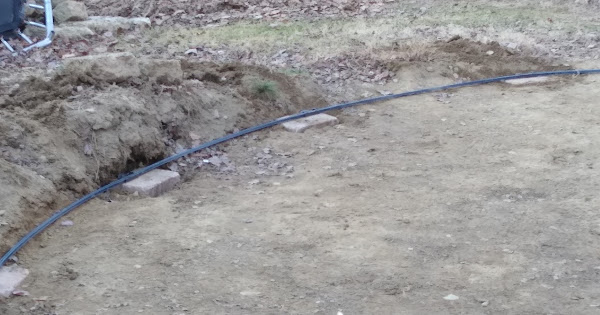
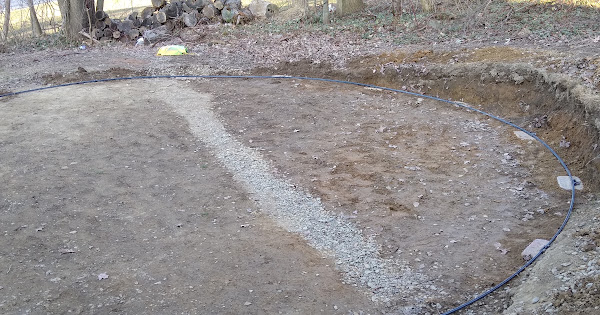
Where I ended up last year was having the ground/location dug out. I found a local company (actually just 1 or 2 guys) that dug the whole thing, used a laser level, and leveled the removed dirt instead of leaving it a pile. It cost me only $265, and that was a total steal for the work they provided. I bought everything needed except for the foam boards last year.

So now, I acquired the foam boards! I'm starting little things that I can without putting the bottom rail and digging in yet. I'd have trouble digging down currently in this weather. Maybe another 10 degrees would be an entirely different story.

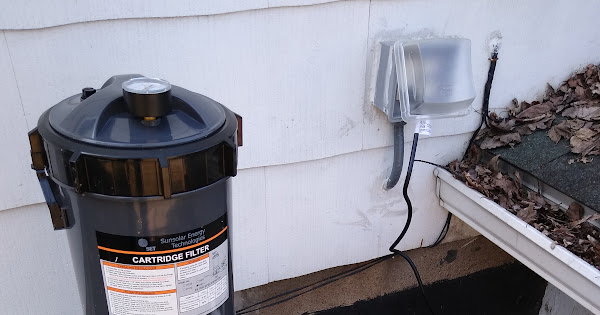
This evening I created a box and platform for the pump and filter. It's not the prettiest, but it works well and supports a lot of weight. Last year, I sunk 6 cinder blocks in this location for the platform, but I don't think they were perfectly aligned, or the winter freeze/thaw moved them some. Either way, the current platform works well. It's just under my gfci outlets too.

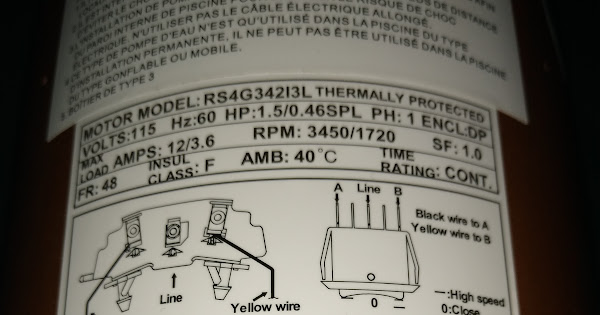
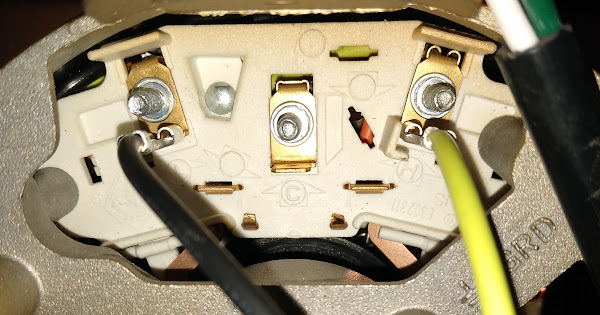
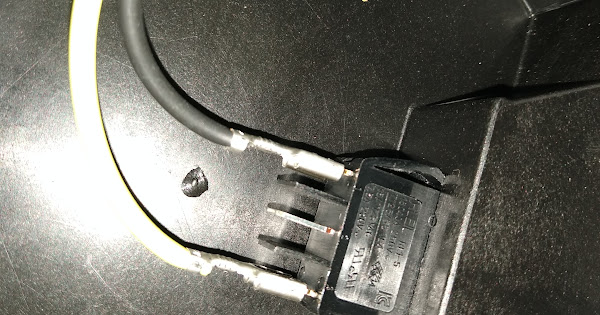
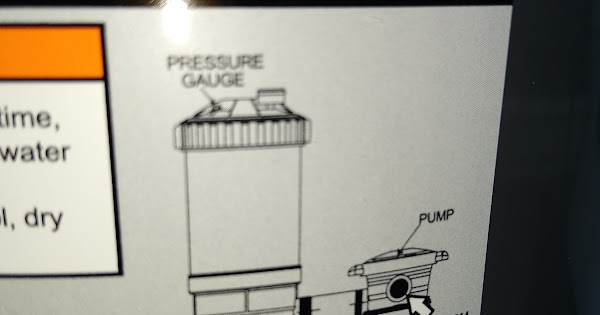
I went to put the pump and filter into location and install the pvc tubing between them. However, I noticed that my pump doesn't have a cord on it. I didn't realize when I bought it that it didn't come with a cord. After some research, apparently that is normal for 2 speed pumps. I just ordered a 14ga 3 wire cord to wire it in (the cord is rated for higher than the pump lists). The pump is listed at 115v, not 115/230, so I think I'll be alright.

Exciting times and updates to this thread will be coming, and lots of pictures! Pictures from my phone are too large to upload here, so I'll get them linked soon.
 
  • Like
Reactions: Casey
Alright, so working on installing the pump. It's a 2 speed pump with hi/off/low positions on the switch. It didn't come with a cord apparently, so I bought a 3 prong cord from the local hardware store. I can't seem to figure out how to hook the new 3 prong cord to the pump. The instructions for the pump say to look at the diagram on the motor, and I can't figure it out. Here are 3 photos if anyone can tell me how to wire this plug in. I am not using a timer.


Once wired up, the pump and filter will be installed this weekend barring any too cold weather.
 
I originally bought a 12 guage cord and since it got "lost" currently at usps, I went to the local store and they sold me one that is 16 guage. They showed me a wiring chart they had with amp/voltage ratings, and said it should be just fine for the pump rating (which is listed as max 12 amps). I'm hoping the "lost" wire gets here, but will still need to know how it hooks up.
 
I'm thinking this might sound right:
Black from plug to middle terminal of the switch
White from plug to middle of pump (labeled C)
Green from plug to ground on pump (where there is currently no screw)

It makes sense, since black is hot from the plug, and will only provide voltage to either L/H (low/hi) terminals depending on the switch selection. I imagine there is not a way to test these before plumping in though?
 
It was a nice day today so I wired the pump and placed it and the filter and plumbed them together.

I placed the filter according to the illustration of the drain plug.

It was only after I was done did I notice that the picture shows the "low side" to the pool and the high side from the pump. If I turned the filter around to do that, the drain is not visible like in the illustration.

Did I do it right or do I have to fix it. It wouldn't be hard since I put in the union, it would just be annoying.


Last edited:
Also was able to put up the bottom rail, and sink the blocks in. It was great weather yesterday (in the 60's). The blocks and rails are level to the best of my ability. Next is to put down the foam boards. And then finally will be the one day of major work (wall, overlap liner, top rail, posts, top rail covers, fill).


I've put down all the foam boards, just over 14 4' x 8' boards. I opted for 1" thick foam boards, triple taped every seam with gorilla tape. I have everything ready to go for hopefully a Friday install (2 days). What's the best way to install the bonding? Does the steel wall get bonded at the seam that bolts together or do the steel outside posts get bonded at 4 points? If the posts get bonded does that bond the steel wall too? I already have everything needed to bond either way, just want to make sure I do this correctly.

The process is to put the wall up, install foam cove, install the liner (pool came with an overlap), install the top rail, and start filling. While filling smooth out wrinkles, install the outside wall posts, and then finally install the top rail coverings. Once completed, wait to water is just below return, cut out skimmer and return and install, finish plumbing.

Am I missing anything?
 

Enjoying this content?

Support TFP with a donation.

Give Support
It was a nice day today so I wired the pump and placed it and the filter and plumbed them together.

I placed the filter according to the illustration of the drain plug.

It was only after I was done did I notice that the picture shows the "low side" to the pool and the high side from the pump. If I turned the filter around to do that, the drain is not visible like in the illustration.

Did I do it right or do I have to fix it. It wouldn't be hard since I put in the union, it would just be annoying.


Hmmmm. I am not a pump expert so I just don’t know if it will make a difference. Calling in @ajw22 for assistance!
 
Also was able to put up the bottom rail, and sink the blocks in. It was great weather yesterday (in the 60's). The blocks and rails are level to the best of my ability. Next is to put down the foam boards. And then finally will be the one day of major work (wall, overlap liner, top rail, posts, top rail covers, fill).


It’s kind of hard to tell in the photo, but if any of the rails are situated close to the edges of a block, you run the risk of any slight movement while you are installing wall causing the rail to slide off the block. I would make sure your rail is in the center of the block, checking shape of circle all the way around.
 
I've put down all the foam boards, just over 14 4' x 8' boards. I opted for 1" thick foam boards, triple taped every seam with gorilla tape. I have everything ready to go for hopefully a Friday install (2 days). What's the best way to install the bonding? Does the steel wall get bonded at the seam that bolts together or do the steel outside posts get bonded at 4 points? If the posts get bonded does that bond the steel wall too? I already have everything needed to bond either way, just want to make sure I do this correctly.

The process is to put the wall up, install foam cove, install the liner (pool came with an overlap), install the top rail, and start filling. While filling smooth out wrinkles, install the outside wall posts, and then finally install the top rail coverings. Once completed, wait to water is just below return, cut out skimmer and return and install, finish plumbing.

Am I missing anything?
I have an all resin pool so my bonding is easier, but I believe you need to bond uprights at 4 equal points around pool, bond your wall, bond your water, and bond your pump. Let’s let someone who knows more about your type of pool chime in here!
 
Hmmmm. I am not a pump expert so I just don’t know if it will make a difference. Calling in @ajw22 for assistance!

TFP had a media server to host pics so that we don’t need to click through to strange links. Please use it for your pics.
 
It turned out to be around 50-55 today, cloudy with some sun. So we got everything rounded up for the install.

At first, we tried to maneuver the steel wall around on a dolly as we unrolled it. That didn't work so well, the wall was to heavy to "unroll" by ourselves (2 people). Then, we took the wall to the center on some cardboard, and walked it around to unroll the entirety of it. This was nerve-racking as that wall is flimsy.

Good things our kids were around to help us. My 2 kids and my cousins 2 kids. They held the wall while we got it placed and inserted into the track. It was off by just 1/4" - 1/2" to bolt up. Easily fixable by playing with the track around each adjoining side of the bolts. Bolts, washers, and bonding lug were put in place.

Next, came foam cove all the way around. I bought a "kit" that was for a 24' round pool (17 pieces). It wasn't enough, like 1 1/2 pieces short. Luckily my cousin had a few spare pieces from his liner replacement a few years ago. Whew!

Before we did the foam cove, we unfolded the liner so it could get some sun. After the cove, we lifted the liner up and over (it's an overlap) and taped the liner to the outside wall with painters tape. All the way around. Then we placed the rubber pieces that go on the top of the wall. And after the rubber pieces, the top metal rail/track bars all the way around.

Before we placed the top metal rail/track bars, we started filling to work out the wrinkles. I've got 2 wrinkles a few feet in length in the very middle, but that's it. It doesn't bother me. By the time I noticed, the water was to heavy to unwork them.

Afterwards, we put on the wall pieces. The instructions have a diagram that shows the wall with a circular hole cutout in the middle of the wall "on the top". So that's how we installed all of them. The next step is to install the bottom of the upper plastic covers. They wouldn't fit. It turns out, the instructions show to screw the plastic covers in using a pre-drilled hole on the wall piece. That pre-drilled hole piece was on the bottom of ours (because we installed the wall according the pictures on the diagram).

Ugggghhhh, we had to "re-install" all the uprights again after flipping them top to bottom. This time the plastic covers lined up perfectly. The upper metal bars and plastic covers were installed.

All in all, it took us from 9am to 3:30 with a break for lunch. For basically 2 people putting the entire thing in (and being the first time for either of us), I think we did well.

Water has been on now for about 10 hours and it's still low. I'm debating on leaving it fill overnight. I have the hose clamped to the upper rail.

I know I could attach the picture here, but I don't have anything currently to reduce the size of the pictures (so for now it's a Google Photo link):
 
My wife insisted the same thing, turn it off and be safe. No worries while sleeping if something happens. I ended up agreeing, woke up and started the water right away. Everything is still in good order. I couldn't believe the cost of water delivery vs just using our hose. Sure, it's faster, but it's also 3-4x the cost.

It's gonna be a bit until I can do the return/skimmer. Probably another day or two at the rate it's filling. Brrrrrr. Still in the 50's but cloudy and rainy today.
 
  • Like
Reactions: kimkats

Enjoying this content?

Support TFP with a donation.

Give Support
Thread Status
Hello , This thread has been inactive for over 60 days. New postings here are unlikely to be seen or responded to by other members. For better visibility, consider Starting A New Thread.