Adding Solar Bear Panels to our AGP- The process with pics

Once something is glued in there is no getting it out. But that might not be required.

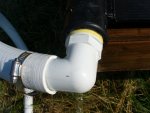
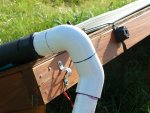
Three way valves like that one are normally designed to take one pipe size slipped inside the valve, or a different pipe size slipped around the outside of the valve. They come either 1.5"/2" or 2"/2.5". It is a little difficult to be sure, but it looks like the fitting that is glued in is small enough around that you can put the next size larger pipe around the outside of the current fitting and glue that to the valve. You would then need to use a reducer to couple that back to your smaller pipe. If it doesn't fit, you should be able to grind down the fitting that is glued in so it is small enough that you can get it to fit.
 
If you know a plumber, they might have a drill bit made for removing the stub left in the fitting after cutting the pipe off. These bits are very expensive, but at least 2 of my plumber friends do have them for when they change stuff around or make a mistake.
 
Latest update on the ongoing plumbing trials. A lesson in heat deformation in different materials: White schedule 40 pvc deforms a little in intense heat (air temps 100degrees plus, solar collector reading 130 degrees). Black solar collector plastic deforms a lot more.
The result-problem 1: the collectors are literally "melting" off the racks. The middle of the collector stays put, but the ends, where the weight of pipe fittings and water pulls more, are sliding down the racks, buckling the panels and collapsing the bottom tubes of the collector against the straps that hold them to the racks. Add in the ground shifting as the clay dries and shrinks after a very wet May going into very dry hot June, and there is a lot of movement going on out there.
Solution:
For the collectors melting off the racks problem: supports on the ground at the ends to push the collectors back up on the racks. Being as this is redneck land, you will see an appropriate redneck solution: old bricks, rebar, and wood scraps. Extra scrap wood shims to be added as more movement occurs.
 

Attachments

  • P1010169redneck solution to panels melting down racks better.JPG
    P1010169redneck solution to panels melting down racks better.JPG
    341.8 KB · Views: 323
  • P1010167panels melting down racks.JPG
    P1010167panels melting down racks.JPG
    304.4 KB · Views: 322
Heat related problem 2. The collectors are threaded onto the pvc elbow fittings provided by Fafco at the outlets. Then hose clamps (Fafco provided and recommended) are tying the elbows onto flex pvc, which also deforms more than non flex pvc. The heat deformation is causing them to lose their seal- even with a special heavy duty plumber's sealant and heavy teflon tape given to us by a friend who is professional plumber (and fascinated with what we are doing).
For the deformation of the threaded areas, we are not having this problem nearly as much at the bottoms (inlets) of the racks. We think because my husband plumbed them using a different type of straight fitting with a glued on elbow. Also, no flex hose at those fittings. The solution for now is to replumb the returns (outlets) where the water is really leaking with the same type of fittings as at the inlets (bottoms) and hope that works. If not, then our helpful friend Vin Bobbit at Blackland plumbing will finally get paid to get his paws on the system (which he has been wanting to do anyways).
 

Attachments

  • IMG_0642bottom inlet fitting handles heat better.jpg
    IMG_0642bottom inlet fitting handles heat better.jpg
    255.9 KB · Views: 321
  • P1010171top outlet manufacturer fitting leaks in heat.JPG
    P1010171top outlet manufacturer fitting leaks in heat.JPG
    124.7 KB · Views: 321
Man, it stinks that you are having all of these problems. Have you called Fafco and asked about the heat deformation issues on the elbows? Also, are you using their roof mounting kit? If you are, then I'd call and complain about that too.

Luckily, my solar on the roof was relatively problem free last year, until the panels and pipe blew off the roof on a windy day. The plastic strapping I used failed. :hammer: I also had the problem of the bottom tubes getting squished, but mine was minor and they returned to their form once taken off the roof. This year I'm screwing 2x2's across the roof where the panels sit so the weight is evenly distributed. I'd encourage you to try this on your panels. I'm also using nylon straps instead of plastic.

One last thing, does your pool reach temp during the day before the sun goes down? I'm guessing it is, which caused the panels to have flow shut off. This is part of the problem as without the water flowing, they get HOT, FAST, that's when they deform. Only one day last summer did I cut flow to my panels, so I think that helps with the deformation issue.

HTH,
Adam
 
We are using our panels AND a big fountain at night to cool the pool. Every degree of cooling counts. Amazing, considering that 2 weeks ago, every degree of heating counted. Now, however, even without the panels, the water would be 94 degrees just from the sun. We have the panels shut off all day, because do not need any heat at all- we need an ice machine. This will go on through early to mid September. We are using the softer nylon straps, not the hard plastic. The bottom tubes will go back to original position in a couple of days once we get the panels back up on the racks and properly braced. One advantage of them being full of hot water- the do not stay squished.
The plumbing has just been one of those things. A true learning experience. Fortunately, our plumber is fascinated by our DIY efforts, and if we end up having to get him involved, we will get an education in the process and know what to do for ourselves next year.
 
on the flex hose...you can use the same fittings as you have on the bottom...just glue the flex pipe...flex pipe doesn't like clamps...it's meant to be glued just like rigid pvc
 
amjohn said:
Heat related problem 2. The collectors are threaded onto the pvc elbow fittings provided by Fafco at the outlets. Then hose clamps (Fafco provided and recommended) are tying the elbows onto flex pvc, which also deforms more than non flex pvc. The heat deformation is causing them to lose their seal- even with a special heavy duty plumber's sealant and heavy teflon tape given to us by a friend who is professional plumber (and fascinated with what we are doing).
For the deformation of the threaded areas, we are not having this problem nearly as much at the bottoms (inlets) of the racks. We think because my husband plumbed them using a different type of straight fitting with a glued on elbow. Also, no flex hose at those fittings. The solution for now is to replumb the returns (outlets) where the water is really leaking with the same type of fittings as at the inlets (bottoms) and hope that works. If not, then our helpful friend Vin Bobbit at Blackland plumbing will finally get paid to get his paws on the system (which he has been wanting to do anyways).

Amjohn,
are the coming completely undone...as in coming off the fitting...I am not using PVC but while I was on vacation I had a hose come off from the top of the solar bear...And lost water all the way to the return jet. My neighbor came and put the hose back on, he said that the clamp seemed to be loosened. I am just wondering if the extreme heat that we had could have caused the hose to become deformed and come fof the heater fitting???
 
The rigid elbow fitting is "barbed" on the flex hose end. The flex hose had to be shoved onto the barbed fitting (with a rubber mallet for help because it was so tight). Then the hose clamp was tightened down. Glue was not part of the directions. Now we know that should have used the glued fittings and are changing over.
Since we are using flex PVC rather than the wimpy corrugated plastic hoses, it is unlikely to come off, but water was definitely spraying out from where the flex hose fit onto the barbed fitting, so it deformed somehow and allowed a small gap. No amount of tightening the clamp would completely stop it. If you are using the corrugated plastic hoses that come with most of these panels, I could definitely see the hose blowing out somewhere. For us, those hoses would have already melted and/or burst in the intense heat and sun.
So we are using the glued fittings that we used on the bottom of the panels. The worst one has been replaced already and is working fine. #2 is not quite as bad and is waiting for my husband to get around to it.
I think part of the problem is that we have back pressure on the panels any time the pump is running, but the panels are not flowing. This is because there is no check valve in the system- my husband put in a ball valve where the check valve should be. When I asked him why- he did not know. Apparently, he had the idea that my life's purpose would be to run out and manually operate the ball valve as a check valve whenever the panels turned on and off (he actually suggested as much this weekend when I insisted that it be changed to a check valve).
When the weather was cooler, and we were running the panels all day with the pump, the back pressure issue was not a problem. Now that it is scorching hot, we run the panels all night, but there are hours during the day when we are running the pump to operate a fountain for cooling, but not running the panels. That is when they are really seeing the back pressure, and when we are really seeing the leaks.
 

Enjoying this content?

Support TFP with a donation.

Give Support
Plumbing REV D (or maybe E- I have lost count)
1st pic:We replaced the hose clamp with a correct glued joint on the return on the first panel. This of course changed the angle on the hose which meant that it had to be redone where it joined the return run to the pool.
2nd pic: The warm water flows into the system, newly done to accommodate the changed angle of the pipe. We also included a "real" check valve to try to reduce the back pressure the system sees when the pump is running, but the panels are not on (which is most of the time right now). I am not wild about the funky angled piece to bring the pipe into the return, but this will all be redone for next year anyways- so it just has to last about 3 more months.
It has been running for 24 hours now, and no major leaks, except for the problem around the 3-way valve (where the DWV fittings are glued into the 3-way.) That is not getting worse, though, so we are going to let that ride for now and see if it can last the season before we redo it.
3rd pic: a less redneck approach on holding the solar panels on the racks- metal angled brackets that support the end caps to replace the chunks of brick and wood we were using. At least they will move with the racks, rather than with the ground. This winter, when it all comes down, we will be moving the racks, and will join each of the three pieces of each rack together into one long (but able to be disconnected) piece. We knew the ground moved a lot here, but it has been even more dramatic than we thought. We now realize we need to join the racks and the panels into a discrete unit that can "ride" the ground as one unit, rather than the pieces moving independently of each other. That is what has cause much of the distortion in the panels. The good thing- we now know the Solar Bear panels are tough and can take a lot of abuse- which they have had.
 

Attachments

  • P1010184panel brace.JPG
    P1010184panel brace.JPG
    187.6 KB · Views: 232
  • P1010179inlet and 3 way area with check valve.JPG
    P1010179inlet and 3 way area with check valve.JPG
    311.4 KB · Views: 233
  • P1010181outlet top first panel.JPG
    P1010181outlet top first panel.JPG
    151.2 KB · Views: 232
Hi Amjohn,

Great thread and great project! Thank you for taking such time to share the details, trials, and triumphs of your endeavor to swim without freezing or simmering.

I might have a solution to your problem with supporting your sagging solar panels. I found light gauge galvanized z channel at Home Depot in the same section as metal roofing supplies. These are perfect for making a metal channel that spans the entire 20' width for the bottom to rest against. If desired you could easily cut them into 5' sections and just use two or three per panel. They easily attach with sheetmetal roofing screws (which I happen to have handy :cool: 
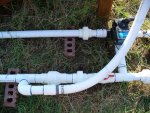
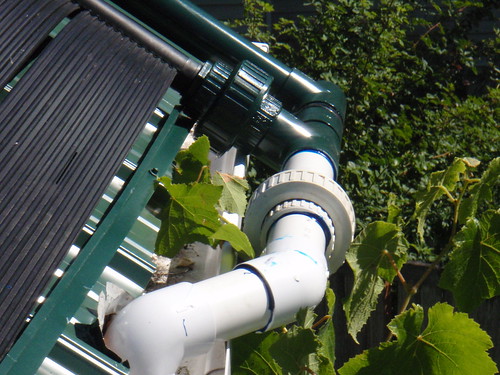
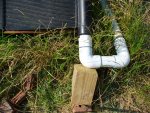
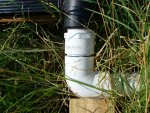
). Here's an image taken from my very recent SHW DIY project:
3856574460_c957ef72b9.jpg

Inflow manifold from pump and filter in SE corner of heater array. Union joint allows entire array to be disconnected and serviced if needed in the future. (White section of piping has already been painted matching hunter green.) Also notice z-channel metal used on roof to support entire width of solar panel. It's a lighter gauge galvanized steel (+painted) than I'd like to have used but hopefully it will stand the test of time.

See my post Solar Heater finished on custom built deck roof for details on my SHW installation.
 
Thread Status
Hello , This thread has been inactive for over 60 days. New postings here are unlikely to be seen or responded to by other members. For better visibility, consider Starting A New Thread.