Newbie needs SLAMing advice, and how much sodium hypochlorite in Clorox Bleach?

Good job! You can help ME when I need to work on my filter!

I had to run next door to help with a horse. I got everything under control so was coming back to you. Glad to see you got it!

I got this one down pat now, after doing it 8 times!! Do you know that not one YouTube video says anything about removing o-rings from the shaft? The pool guy told me to remove washers, spring, and white plastic ring but nothing about the 2 small o-rings on shaft. It wasn't until I called him at closing that he told me this. By this time, I had put the old one back one which worked like a charm with no leaking, and then he explained that the water was gushing through the handle because I didn't transfer the o-rings :brickwall: You would think the part would come with them!! The old ones are on there so tight, so I'm just going to buy new ones tomorrow. They can't be very much. I asked the pool guy whether he still wants me to put the new one on, and he said he wants to rule this out as the source and to try the new part for a couple days and see what happens. Honestly, I don't think this will solve my problem but at least then we've narrowed down the problem.
 
WOW! "oh you have to transfer the o-rings" Really? You think I need THE part that stops the water from coming out? DOH! LOL At least you know now!

No kidding! Come on Hayward, just sell the darn piece with the o-rings already on it!! Each one costs, what?, a buck?? And o-rings wear down and stretch out, and it's a bad idea to transfer them anyways! Better to just buy new ones for the new piece. Kinda ticked that the pool guy didn't just suggest buying new ones at the time he sold it to me! It would have saved me a LOT of time and headache!! Live and learn!
 
Is the pool making any progress?

How far do you want to go when you work on the filter? Do you want to do the plumping fix at the same time or just get it where you can get the filter open?

Both ways have pros and cons. I think you have a good handle on what needs to be done either way. We can/will help either way.

Kim
 
I'm still following. Kim is giving you great advice.

Just as an FYI. You do not need 2 valves for your solar. I only have one. You only need a valve on your outbound to solar from the filter. The other one is nice to have, but not necessary, in case you want to save yourself a valve...
 
I just looked at your pictures again. From what I can tell, you only need to make one cut, in the pipe between the pump and the filter. The rest can be unscrewed as they are clamps... All you need to ensure is that where you cut, there is at least 2 inches of pipe remaining to glue in your connection.
 
Don't forget she also has to stop the water. I THINK she has what she needs to

-stop the water at the pool-plugs

-cut and put in union-pvc cutter and union/glue

Now all she needs is a good stiff drink of courage and she is set.

Kim
 
Right! Stopping the water... Of course. Forgot about that. I hope the plugs do the trick.

As for the drink, I suggest something strong, that will make you partially blind after a sip or two. That way, if it doesn't work out, we won't be the target for ALL the blame! ;)

(of course, I'm kidding about the drink!)
 
Is the pool making any progress?

YES!! Sorry, that I've been MIA for a bit. My cousin is here visiting from Alberta, and he is helping me with the plumbing. We have put a ball-valve from the incoming skimmer line to the pump. We are sure learning a lot as we go!! When I have more time, I will upload pics and give details so that anyone else who needs to do this will learn from my mistakes ;) Oh, that's right...they aren't CALLED mistakes...they are learning opportunities!

How far do you want to go when you work on the filter? Do you want to do the plumping fix at the same time or just get it where you can get the filter open?

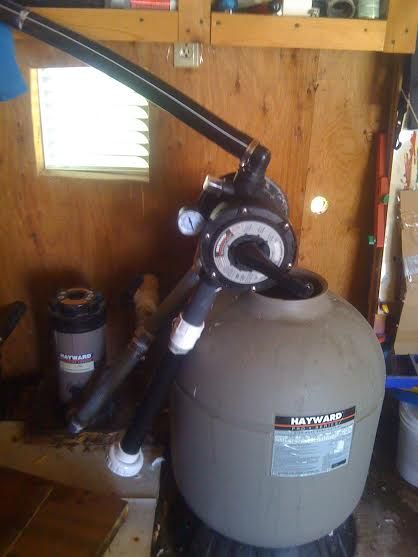
I need to install the 2 shut-off valves (one down, one to go) and 4 unions so that I can get at the sand filter. I need the extra union to be able to lift off the top of the sand filter and get the Jandy valve to come up with it. I don't like the way things are now, and I hate all the gluing mess. When I was at the hardware store yesterday, I lucked out and a plumber overheard me asking why the yellow epoxy came in a blue can. Who was the marketing genius who came up with that?? So, while I was chatting with the man who overheard me talking on the phone and was laughing at what I was saying...because it's TRUE...another guy came over and said he was a plumber and that he also taught the plumbing course at the local community college. He was awesome and got me set up with what I needed and my cousin and I got that shut-off valve done.

Both ways have pros and cons. I think you have a good handle on what needs to be done either way. We can/will help either way.

I do, thanks to all of you!! I might have more questions along the way over the next few days. We're doing one piece at a time and trying not to get too far ahead of ourselves.

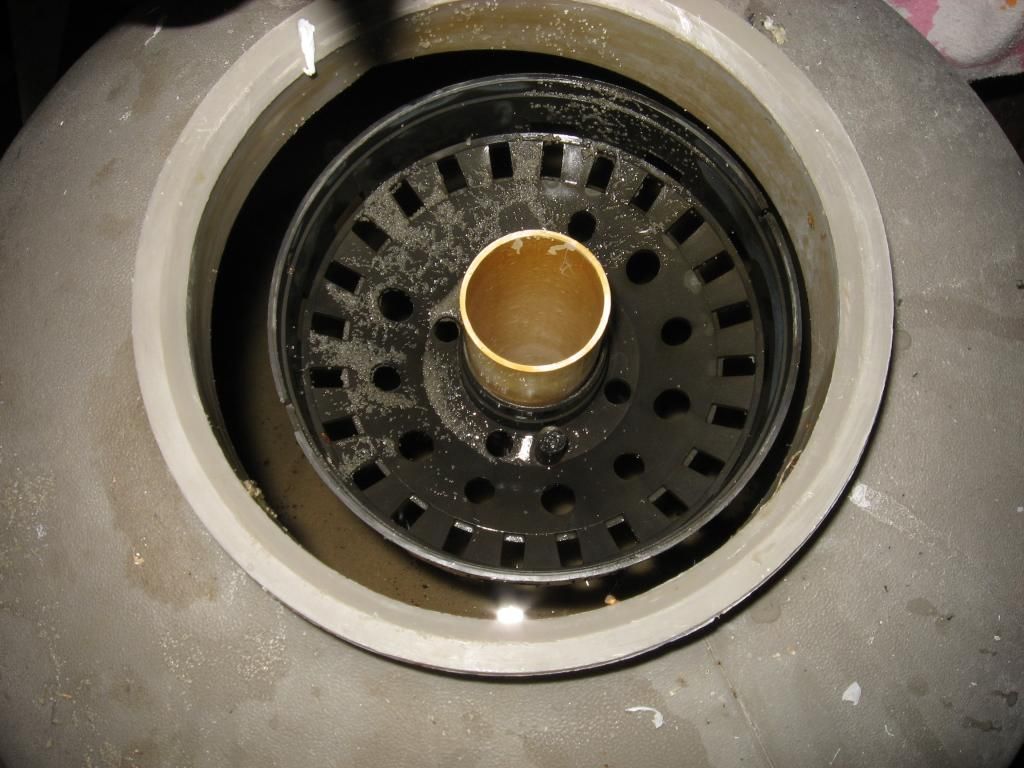
One thing is clear: I bought the extra o-rings for the new adapter/gasket for the multi-port and that is NOT the problem! Still getting large debris and also now getting up some sand. I definitely think there is a broken lateral, but not sure at this point whether it's the type of lateral that can be unscrewed and replaced or whether the laterals fold up and have to be replaced together with the standpipe. Guess we'll find out once we get in there and have a look.

Thanks for hanging in there with me through it all, Kim, and also to everyone else! I promise to post pics and more details soon.

- - - Updated - - -

Just as an FYI. You do not need 2 valves for your solar. I only have one. You only need a valve on your outbound to solar from the filter. The other one is nice to have, but not necessary, in case you want to save yourself a valve...

That's interesting, JFB! Which one do you feel is unnecessary? The black flippy one or the Jandy valve?

- - - Updated - - -

I just looked at your pictures again. From what I can tell, you only need to make one cut, in the pipe between the pump and the filter. The rest can be unscrewed as they are clamps... All you need to ensure is that where you cut, there is at least 2 inches of pipe remaining to glue in your connection.

Well, let's HOPE that I can get them apart with the clamps removed. I can see there is lots of glue and maybe caulking in there. It's a mess!! I'll keep you posted :)

- - - Updated - - -

Don't forget she also has to stop the water. I THINK she has what she needs to

-stop the water at the pool-plugs

-cut and put in union-pvc cutter and union/glue

Actually, I went with putting a shut-off first before the pump. This way, I can block the water while I work on the pipe between the pump and the sand filter.

Now all she needs is a good stiff drink of courage and she is set.

Oh, yeah. Had a couple of those :D
 
I was hoping you were busy with something fun! A visit from family that can help as well?? That is extra good!

Funny about talking on the phone and them laughing at you about something that is VERY true THEN helping you! That is classic! So sweet! Did you happen to get his number???????? "Oh Mr. Plumber (bats eyeslashed) can you come look at my pool stuff? I have beer and pizza!" LOL

I can't wait to see pics and read the details of what you have learned!

Solar system-I would have valves everywhere water can come out so it does not come out unless you want it to. Especially seeing how your equipment is in your garage.

Look forward to seeing from you again soon!

Kim
 

Enjoying this content?

Support TFP with a donation.

Give Support
Did you happen to get his number???????? "Oh Mr. Plumber (bats eyeslashed) can you come look at my pool stuff? I have beer and pizza!" LOL

I thought about that...asking him to come over and look at my plumbing...but I didn't want him to think that was a pick-up line :) I would have loved to have gotten his opinion on a few things. I even had the photos printed in my car!! But he helped me so much, and he wasn't offering, and I didn't want to ask for more. I was just thankful to have gotten his help on THAT issue (I'll explain in more detail when I post the photo, but the hardware store employee didn't exactly give me good advice!).

I can't wait to see pics and read the details of what you have learned!

It definitely is a learning process! I'm thinking after this project, I might get into home repair :lol: I just need to find another forum like this one!!
 
wellllllllll let me tell you that there is only one other forum that I have found that even comes close to this one in helpful people willing to help. It is a corvette forum that my husband reads.

Of course we have not really looked for a house one so.........LOL

I do worry about the tubes with clamps. It is going to be BAD if you get them off/on and they start leaking. I wonder if you would be better off just hard plumbing from the wall with unions and on/off valves where needed.

You have learned SO much and come SO far! I am very proud of you and am glad to I was able to help/support.

I can't wait to read what you have learn/done!

Kim
 
Darlene.

When my solar was installed, there was only one valve on the system. The valve was at the solar "out" after my filter. The solar return didn't have a valve.

Kim brings a good point about being able to isolate your systems independently. I developed a leak earlier this year, and the only way to isolate the solar system was to install a valve on the solar return. Which I did. It wasn't necessary for its normal operation, but to isolate the solar plumbing from the rest of the pool plumbing in order to find the leak, it was.

Now of course I would suggest to you to use the Cadillac of plumbing and have valves everywhere, but I was trying to save you work and money by only doing the essentials. Mind you when you have all that plumbing taken apart, you might as well do everything perfectly because you won't want to take it apart again.

- - - Updated - - -

Oh. I forgot.

You don't NEED a valve on your solar return (as I labeled it on page 7). But if you put one, it may save you work or a headache in the future.

Like I said, I didn't have one, but now I do...
 
Hello Darlene,
After reading your whole thread this morning, I'm sorry your having a hard time getting your pool clear due to mechanical problems and design problems. Your pool is algae free,with the constant shock level that you have going on, its just filtering it clear now that is the issue.

As far as working with pvc pipe, I don't have much to add because the basics have been covered, except that you need to make sure its clean, and to use pvc primer on it. Allow to completely dry before handling or pressurizing.


As far as the clear braided reenforced hose goes. It is perfectly fine in using it, in fact in my business of water purification, my pump manufacture (flojet) REQUIRES it. All warranty claims are void if flexible hose is not used. The reason its used is to take the vibration off plastic fittings from pumps.
When loosening hose clamps, just move them down the hose a little ways and tighten up slightly to keep them in place. It makes it so you don't loose them or forget to put them on the pipe and have to take it apart to install in a rush, after putting the hose on the barb (the fitting the hose slides onto).
I have used this type of hose extensively in my business and a trick to working with it is to use heat ( a blow dryer) to get it warm/very warm, but not to hot so as to melt it. It will make it come apart so much easier. (It will get to the point of being like jelly when it is too hot)
I use boiling water to soften it when putting it back together (Coffee cup and a microwave oven to heat water works well, then just soak the end you are reinstalling in the water to soften). Working quickly after reinstalling hose, tighten clamp while hose is still warm, it will make a leak-proof seal.


Some time back, a poster suggested using your flexible vacuum hose to clear up the pool. I completely agree with this thinking, in as much as i would make the statement that your pool would have cleared, in like a week max (that is not taking into account the filter issue). Reason I feel very strong about that is because you were so diligent in testing every hour and re dosing. I think we need to put your pic in the TFP Dictionary under SLAM Maintenance. Don't get me wrong that was a good thing, excellent in fact. You Rock!!!!!!!
I think your filter is doing something because your pool is getting clearer now that you have moved the eyeball. I think it is working at less than optimum because of some sort of mechanical failure, but it is filtering.
Algae will sink to the bottom of the pool once its dislodged so sucking water off the bottom where the largest algae concentration is will filter it the quickest. My suggestion is to put the hose right into the skimmer and using your vacuum head or a weight tied on, sink it to the bottom of the pool below the skimmer about two feet from the pool wall. I feel you will be pleasantly pleased with the overnight results that will bring. The upper portion of your pool is very clear because the skimmer has been pulling all the algae off the top portion of the water.

As i said before, just hang in there, you have the algae beat its just clearing it now.
 
Hey, everyone!!!

Here we are, it's October, down to single-digits and I'm still working on the pool!!! My cousin helped me install two union fittings...still need to go back and add photos of that...and replaced the flexible hose at the skimmer with poly-pipe which I had on hand and clamps and no more leaks there! Looks so much better! I know it's not PVC, but it's better than it was and finances are extremely tight for me right now.

So, the rain is turning to snowflakes and I need to bite the bullet and crack open the sand filter and see what the heck is going on. The good news is that I CAN see to the bottom of the pool now, so that I can see that there is sand down there :( Will upload a pic of that later. Right now, I need help with the sand filter!

After much cursing and bloody knuckles, I finally was able to get the top off the sand filter by dismantling the waste pipe from the outside of the garage and pulling that hose inside and twisting the whole unit over. See here:

thetopisoff.jpg


Here is the inside, but what is that basket and how do I remove it? I don't recall seeing that in the videos for how to deep-clean a sand filter. I'm trying to turn it to see if it will lift off, but it doesn't seem to be coming. Help!

sandfilterbasket.jpg
 
Well hello you! Good to see you again! When I started reading about the basket I was thinking it would be the tube block off (aka sand shield) for when you add sand to make sure the sand does not get inside the tube. BUT it should have a way for it to sit over the top of the tube to keep the shield up and to cover the tube.

Does it look like someone cut something off of the basket?

Do you have someone that can hold the tube while you pull on the basket? If not I guess you could wiggle, wiggle, wiggle the tube until it starts to come up. Watch for the laterals on the bottom. They will have to fold up or twist off to come out of the filter.

Once you have the tube up and out then you should be able to get the basket off with some with some effort.

I am glad you are able to see the bottom. That is huge!

Kim
 

Enjoying this content?

Support TFP with a donation.

Give Support
Thread Status
Hello , This thread has been inactive for over 60 days. New postings here are unlikely to be seen or responded to by other members. For better visibility, consider Starting A New Thread.