Adding Solar Bear Panels to our AGP- The process with pics

Well, sorry about this. My husband just informed me that he changed the configuration of the valve when he installed it to make port 3 the common port. That means that the 9:00 side is the common port. Originally the common port was port 1- which is the one at 12:00.
How does that change the way the handle and the word "closed" should be oriented.
 
You might want to check what was previously said about some of the fittings being DWV I am pretty sure that all the T's with the long sweeping 90degree are DWV as they are not made in pressure fittings as well as some of what looked like 45degree elbows. The way you can tell is by the length of the glue joint. They are about half as long as a standard pressure fitting. Compare them to the ball valves and unions which I know are pressure since they are not made in a DWV fitting.
 
Well, now my husband is saying that some of the fittings did have shorter glue joints. He wondered why while he was gluing them. They were all in PVC boxes, so he just assumed they were the same when he grabbed bulk amounts of each type fitting. I did not go on the shopping trips, and he does not notice things like that in stores. You can imagine how much "fun" we have when we shop together and have a "discussion" about what he is buying.
So now he has to redo a bunch of this. My original thought was that the large sweeping turns would be done with flex hose and the straight travels and tight turns with rigid schedule 40 PVC. I realize that the flex to rigid connections are a pain, as we have a couple in the system by the pump and return, but does that sound like a better plan?
 
If you use what is called spa-flex hose, it is a flexible pvc that is the same size as hard pvc you can just glue it in to a fitting like hard pipe. Just keep in mind that you have to hold it a little longer until it dries due to the flex fact it will try to walk out of the fitting. I went back and looked at your pictures and I believe it is the same stuff coming to and from your pump/filter. I have used some of it on my system and all I did was use purple primer and glue like regular ould hard PVC with no problems. Good Luck
 
Well, I think I will have to kill my husband. I went out and studied all the pipe joints very carefully, looking at their very hard-to-see raised markings, and about HALF of them are DWV. The large threaded connectors with collars are schedule 80, but he does have some threaded DWV on the solar panels themselves. He even has one on the return joining the spa flex to the return that just started leaking today. He is going to have to completely redo this. I hate, hate, hate learning the hard way. And losing more time of not being able to swim.
I am definitely going to have to kill him, as soon as he finishes fixing all this mess.
Question: How bad off are we with the DVW fittings if they are not leaking? How long until one that is leaking slightly (more like oozing) becomes a serious leak? What are the possible scenarios? I realize that the ones out on the panels that are leaking anyways have to be changed.
Also, a couple parts have PVC-1 on them, but I cannot see whether this is a DWV or -40 marking. Is PVC-1 another class of part? Is it okay to use?
 
Personally I would only fix what is leaking now, unless you have to cut out a fitting that isn't leaking to fix a leak. I know you shouldn't have much more than 20-30lbs pressure on your system, at leat that is what my cartridge filter is rated at. Then if you have more problems later you can fix them as you have to or, next spring when you get the panles out of storage. Good Luck
Keith
 
Thanks for the encouragement. However, it is leaking near every major joint, so he is going have to redo it anyways. That, and I can kill him once it is done and not have to worry about needing him for future plumbing renovations. Oh, except I need him to build me a deck. Darn.
What about the parts that say PVC -1 on them? What sort of PVC is that?
 
PLEASE NOTE: The plumbing shown before has changed due to our first round installation being WRONG- my husband mixed PVC Sched 40, low pressure drainage fittings, and who knows what else. Corrected plumbing pictures will be posted as the plumbing is reworked. (edit 5/3)
We had 4.5 inches of rain over the weekend, so plumbing is going slowly, especially since the drainage field that the panels sit in is full of water! Anyone for plumbing in a pond?
 
amjohn said:
However, it is leaking near every major joint, so he is going have to redo it anyways.

Not to insult your husbands plumbing ability, but they shouldn't all leak, at least not right away. If the joints are cleaned and glued properly it should hold, at least for a while. I have quite a few DWV fittings in my system(every 90* elbow is a sweeping one) and I've not had a single leak yet. You may want him to recheck his cleaning/gluing method.

Good luck with your project,I can't wait until you've got it all completed and can swim in the wamr water. :party: :sun:

HTH,
Adam
 

Enjoying this content?

Support TFP with a donation.

Give Support
He's claiming a bad container of sealant. I watched him cut, de-burr, clean, prime, and seal a couple joints, and I know that process, so I know that he used the right method (at least while I was watching). He was using a clear "super-strong" adhesive at first. Those joints leaked. There were a couple joints that leaked because he forgot to seal them (those things can happen when you have been working for 10 hours straight in a drizzle). He switched to a blue, quick-dry, wet and dry sealant after the initial leak debacle, and those joints have not leaked at all. So, he thinks that he got an old batch of sealant the first time. I think it might also be because he was in water, sometimes in rain, while he was working most of the time. I suspect the "super" sealant may not have cured well in such conditions, whereas the blue sealant was made for those kinds of conditions.
And, as he finally admitted, he just blew it. I will not have to kill him, because admitting to me that he was wrong nearly killed him.
 
So, time for the plumbing, round 2. All DVW fittings were removed from the system, except those on the 3-way valve. Unfortunately, my husband glued those in with a vengeance, and they are not going anywhere. So far, no leaks there, though, so we will just live with those. I plan to buy a back up 3-way valve, because if they do start leaking, there is no way we are going to get that apart without destroying the 3-way.
First picture- the return plumbed correctly- I checked, all fittings are sched 40. It turns out the PVC-1 is also sched 40. You can see the blue glue around the edges of the fittings- that is the glue that finally worked in our wet conditions.
Second photo- first bypass- the one that stays in place year round. The pump is running through it in this picture- no leaks.
Third photo- the three-way valve replumbed using sched 40 fittings, except for the fittings glued directly to the valve openings. Those are the DVW fittings that are in there so tight that we would have to destroy the valve to replace them. Not ready to do that yet.
 

Attachments

  • P1010092 3-way replumbed.JPG
    P1010092 3-way replumbed.JPG
    176.7 KB · Views: 471
  • P1010091first bypass with pump running.JPG
    P1010091first bypass with pump running.JPG
    163.8 KB · Views: 469
  • P1010090return vertical.JPG
    P1010090return vertical.JPG
    295.1 KB · Views: 473
Now we are using Spa-flex hose for all the funky turns- my idea originally. Not cheap, but not leaking.
First picture- the first panel in place.
Second picture- detail of spa flex to scehd 40 attached at top of panel (using the fitting supplied with the Solar Bear panels)
Third picture- detail of spa-flex to sched 40 attachment on the ground.
 

Attachments

  • P1010096flex hose on ground.JPG
    P1010096flex hose on ground.JPG
    152.1 KB · Views: 474
  • P1010095flex hose at panel.JPG
    P1010095flex hose at panel.JPG
    53.4 KB · Views: 473
  • P1010099first panel inplace.JPG
    P1010099first panel inplace.JPG
    208.5 KB · Views: 475
Second panel added to system. Attachments are a little different on the bottom of the second panel, as it is the end of the system, but still sched 40.
First picture, bottom of second panel.
Second picture- the whole shebang- together again, and this time, no leaks. You can see the muck and water that this is sitting in. It is nasty.
And, yes, there is a funky kink in the first hose to make the angle. I am not happy with that, but it is working and not leaking. My husband will be returning to fix that, as I do not think the torque on that hose and those fittings is a good idea in the long term.
Also, Jasonlion, proof that you can lead a husband to correct plumbing, but you cannot make him do it right. I gave him your info and the picture about extending the first hose to equalize the length of the plumbing loops. And you will notice he did not do it. Not much I can say about it that has not already been said.
 

Attachments

  • P1010110panels running- whole system.JPG
    P1010110panels running- whole system.JPG
    361.9 KB · Views: 476
  • P1010102bottom second panel.JPG
    P1010102bottom second panel.JPG
    157.2 KB · Views: 476
So, here is where I have a question. I have the main bypass near the pump that can be open or closed regardless of whether the solar panels are running. Solar bear panels also have valves on each panel in the header that control how open or closed the panel is to the water flow. The disk inside the header that is operated by this valve is not sealed tightly, so some water can go through the header, but it does divert most of the water into the panel. According to the Solar Bear instructions:
"Unblock the inlet and outlet of your pool. Be sure the red handle in the middle of the end-pipe (header) of your solar collector is in line with the end-pipe (‘solar off’ position) prior to starting the system. Turn your pump on and check the hose clamps and plumbing for leaks. After the pump is on and has run for about 5 minutes, slowly turn the red handle
across the end-pipe (‘solar on’ position).Watch the pressure gauge on your filter. When it has increased 5-7 psi you have achieved optimum flow through the panel and should stop turning the handle. In most cases the
handle should never be turned completely across the pipe.
The air that was in the panel will bubble out into your pool for a few minutes--this is normal. When the solar system is running efficiently, the panel will be cool to the touch. If your pool system has a timer, set it to operate from 9 a.m. until 5 p.m. This is the best solar heating period. Using a solar blanket in addition to the solar panel will hold the warmth in the pool and help it heat more quickly. It is particularly important to use the blanket at night or when it's windy. "
We followed these directions to the letter.
We started with the first bypass completely open, thinking that our 1.5 hp pump would blow the panels apart if we did not have the pressure release. There was no change in the psi on the filter gage. Nothing. And, the solar panels stayed hot, except for the bottom few inches.
We opened the red handles on both panels all the way (turned completely across the header pipes). We got a whole 0.5 psi increase on the gage. And the panels were only cool about half way up the panel.
So we closed the first bypass gradually. Finally, the first bypass was closed completely. Now every bit of water coming out of the filter is going through the solar panels. There is no flow bypass anywhere in the system that we added when the solar panels are running, yet we have only an increase of 2 psi. The panels are cool like they should be, the water coming out of the return is slightly warmer than the pool water, and we have gained 10 degrees in water temp in the last 2 days of partly cloudy, windy weather.
Everything seems to be working as it should, except I am worried about the pressure. Why are we not seeing the psi increase like we should? We have two panels plumbed in parallel, and the above instructions are for 1 panel. But even if we say the two panels cut the desired psi reading in half to 2.5-3.5 psi increase, we are still not there. And, we have the header valves full open, which is not supposed to be the case. Are we over-pressurized and don't know it? Underpressurized and actually need more flow to make the psi increase?
Please help with suggestions. I sure do not want this system to blow apart one day (like when I am not here all day and do not know that our pool is ending up in our yard). But I also want to maximize heating as much as possible.
Pictures below show the situation.
First picture: solar bear panel with handle in full ON position- all the water is running through the panel- no bypass.
Second picture: bypass closest to pool completely off- no water bypassing the solar panels, all going to the panels.
Third picture: Pitiful gage pressure reading.
 

Attachments

  • P1010107pressure gage with panels on.JPG
    P1010107pressure gage with panels on.JPG
    100.1 KB · Views: 443
  • P1010108panels running first bypass off.JPG
    P1010108panels running first bypass off.JPG
    198.1 KB · Views: 449
  • solar bear handle.jpg
    solar bear handle.jpg
    51.1 KB · Views: 443
There isn't anything to worry about. Presumably your pump is a little bit smaller than the author of that manual was expecting, which not a big deal. I suppose it is also possible that you have the black three way valve in the wrong position, though you did have it in the correct position in yesterdays photos. Still, as long as the panels are cool and the pool is warm everything is good.
 
just curious...I'm installing a solar bear panel as soon as our deck is done....what is the purpose of that Jandy three way valve?...wondering if I will need the same for a single panel in between the panel and our pump?...thanks
 
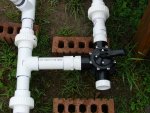
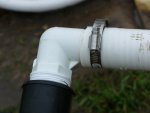
Jasonlion- the three way is still in the same position that it was in the first set of pictures. It stayed in place and everything else was replumbed around it.
dman2b-the three way valve is the main thing that determines whether water is going through your solar panel before it goes back to the pool. You plumb it so that it either allows water to the panels through one outlet, or if you turn the handle, it sends the water back to the pool, bypassing the panels. This is good for weather such as we are having. Today was a solar panel ON day-sunny. Tonight, storms start and we may have torrential rains, hail, wind, and all kinds of nasty weather for the next 3 days. Those are solar panel OFF days, but you certainly don't want to turn off your pump for 3 days just because you have no way of bypassing your solar panel. If you run the panel during cool, rainy, cloudy weather, the panel will cool your pool- not the desired effect.
The next series of pictures coming up (hopefully this weekend) will be of the solar controller that will go on the system, which also involves the 3-way valve, so it is also for that purpose.
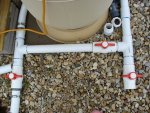
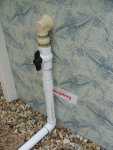
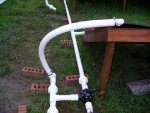
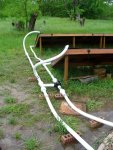
We did do something a little different, in that we have a second separate bypass that does not depend on the 3-way valve, because in the winter, the whole system (panels, 3-way valve, pipes and all) has to come off and go into storage. But, we don't close our pool in winter- we just stop using it and run the pump when the weather gets below freezing. We have to be prepared for all weather types here, sometimes all in one day.
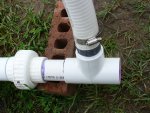
If you are just going to do one panel and control it manually (not above water level- having to lift the water changes everything), I suppose you could use a system of a couple ball valves to plumb a bypass without a 3-way valve. I have to tell you, though, after 3 days of "Oh, the sun is out, time to run out and turn on the panels" followed by "Darn, it's cloudy, time to run out and turn off the panels"..repeat roughly every two hours...it gets mighty old. I am really looking forward to the electronic controller to take that job over for me. I have better things to do with my time.
 
ok thanks... that's what I was wondering...saw the three ball valves which made sense...just didn;t know why the addt'l 3 way. Which valve controller did you guys decide on? Sounds like a good idea...thanks for the help!
 
We are using the AQ-SOL-LV-TC made by Goldline. Most people who are going to use a solar controller just to sense temperature and "sunniness" and actuate the 3-way valve use the GL-235-LV. However, we needed to be able to override our pump, possibly add a booster pump, use it for heating and cooling (that water gets too warm here in mid summer even without solar) and possibly take over for the current Intermatic freeze timer, as we have another job for it in the future. There is a GL-235-LV-HV which will do most of those things, but those are hard to find, and when you do find one, they want some money for them. Many sellers don't even know which one they have, because Hayward bought Goldline and changed the part numbers all around when they did. So in the process of looking for the elusive GL-235-LV-HV, we stumbled across an e-tailer that offered us this unit for not much more. The price was so right, I am still a little nervous. We have not actually put power to it (supposed to happen today) to test and see if we got a deal or dud. I hopefully will have good news later this weekend.
 

Enjoying this content?

Support TFP with a donation.

Give Support
Thread Status
Hello , This thread has been inactive for over 60 days. New postings here are unlikely to be seen or responded to by other members. For better visibility, consider Starting A New Thread.