Vinyl pool remodel in San Diego - Going swimming!

Re: Vinyl pool remodel in San Diego

Good news: pool is done and looks great.

Bad news: I've been too busy to organize my remaining pics since the last set and the completion. And then total disaster - I deleted all of the pics from my phone :( total bone head mistake!! So I've lost all of the build progress pics since the ones above. :(
 
Re: Vinyl pool remodel in San Diego

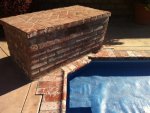
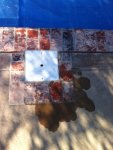
OK, picking back up...the coping work was finished up week 3 on Tuesday 12/20 - 16 days in. Work was done on Saturday, Monday and Tuesday. It ended up taking the full estimate plus 2 days - but we did add some complicated bits with the work around the waterfall and there was a lot of work cutting all of the bricks down. The bricks were intended for replacing coping on an existing in ground gunite pool so the length they came in was much longer than we needed. Cutting down 320+ bricks took a long time.

Meanwhile, the PB finished most of the prep work...the perlite needed to be built up in a few places requiring several coats. Most of this was done by Friday, day 12. What was left was some final work on the skimmer and under the waterfall. I had a lot of pictures of this but don't have a single one now :hammer:

During this time, we had a small scare where we thought the wall nearest the sump and well was going to crumble. Right about at the bottom of the V on that side of the pool a hole opened up - I could reach in up to my elbow, it almost seemed like amole had been back there.

When the coping was finished I called the PB to find out where we were schedule wise, hoping we could get the liner dropped on Thursday or Friday before Christmas (days 18 or 19). He let me know that he ad to rush order the liner to get it in this week but it wouldn't arrive until Thursday, they would finish the prep on Friday but would not be able to drop the liner until Monday the 26th. We had plans to go out of town that day so that really worried us that we wouldn't be here for the liner drop - mainly because I was curious to see it and also because I am pretty hands on supervising to see how things get done and that they meet my expectations etc. Anyway, they did come out on Friday and did some more wall work - they filled the hole with several bags of gravel and then a thick layer of perlite, which was further built up on Monday.

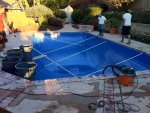
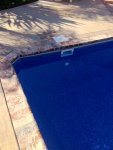
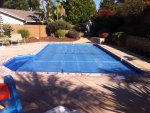
I was able to change our plans to leave late on Monday afternoon so I could see the liner drop. That day they estimated it would be three to four hours of prep and they would drop the liner. It ended up being closer to six hours. They finished the perlite work below the waterfall and around the skimmer and the hole/cave-in in the bottom of the wall. They put up the foam and did a fine comb cleaning of the entire pool. Then they re-trowled the entire floor which was unexpected and the results were fantastic - swimming with goggles and looking at the pool at night with the light on the I don't see any anomalies, lumps, voids, etc. like we had before. Some of that may be masked by the pattern too but so far it looks great.

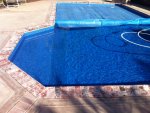
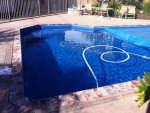
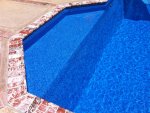
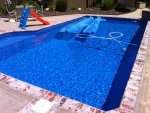
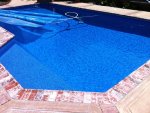
Once they were finally ready I was actually asked if I wanted to help roll out the liner - which of course I accepted! First they laid out the liner rolled up along one of the short ends and after lining up the two corners and put them in the track and added track bead in those spots. Then while I and the owner unrolled the liner, the other two guys pulled it across the pool. and got the two far corners lined up and clipped in. I think the owner and I walked down as this was done and kept the liner up off the edge of the pool as long as possible. My help was done at that point and I started taking pictures - all but one was lost :grrrr: They got to lining everything up and clicking in the bead, and then setting what looked like paint rollers (they were actually some kind of homemade thing) on pool poles across the diagonals of the pool to hold the liner in place. When the pool was being filled they also used these to help set or stretch the liner into place. It was very cool to watch as the water filled the bottom of the pool and the liner dropped into place and stretched the last few inches into the corners, edges etc.
 

Attachments

  • 1.JPG
    1.JPG
    166.6 KB · Views: 334
Re: Vinyl pool remodel in San Diego

For filling the pool we used 4 hoses (we have really good pressure) so it filled the bottom pretty quickly. At this point we were right up against our deadline to hit the road and it was getting dark too. One of the guys stayed late with a flashlight to shut off the water once it got to the base of the pool walls. He apparently was only there a few hours. The next day the owner came back out and turned all the hoses back on and monitored the rest of the fill. Something I really appreciated was that since we weren't home he stayed the entire time to keep an eye on the fill and shut off the water. I'mnot sure if they cut in the skimmer and returns, light etc. on Tuesday or Wednesday, and then turned on the pump and put in some CYA and CL.

We got home on Saturday night and were very excited to check out the pool. It looks great and we are still surprised how much darker and richer the non bleached liner is. The pic I posted earlier of the liner from around one of the returns just doesn't show just how bad the liner was faded and bleached out.

I manually configured the suction to run the cleaner and the skimmer and left the pump running like this for two days to get all the dust out of the water.

We threw a new years day bbq (the weather in San Diego was spectacular) and my daughter had asked me a million times over the week if we could go swimming when we got home. The water was 55 degrees but she dipped her toe and said it wasn't too cold :shock: So we did a polar bear plunge - I couldn't get anyone else to join us, big surprise. But it was great; we jumped in together, she swam right to the edge and jumped out, I did a few laps and then got out. It was cold but I loved it! :party:
 
Re: Vinyl pool remodel in San Diego

Some pics of the new skimmer and lower suction port and the swim out step.

The liner print looks great and we love the borderless style. We did decide to go with the Ultramayd version with the sun and chemical protection additives.
 

Attachments

  • 8.JPG
    8.JPG
    177.1 KB · Views: 324
  • 7.JPG
    7.JPG
    168.5 KB · Views: 324
  • 6.JPG
    6.JPG
    101 KB · Views: 324
Re: Vinyl pool remodel in San Diego

The finished deck around the new skimmer, the changes to the water fall coping and new edge, and the pool covered with the solar blanket.
 

Attachments

  • 9.JPG
    9.JPG
    157.8 KB · Views: 325
  • 4.JPG
    4.JPG
    158.2 KB · Views: 324
  • 2.JPG
    2.JPG
    104 KB · Views: 324
Re: Vinyl pool remodel in San Diego

carlscan26 said:
I never got a response to the question in this post about the float valve assembly and the equalizer check valve assembly for the skimmer. I think if I have the equalizer valve then I can't run suction through both the skimmer and the drain at the same time - it appears to be an all or nothing type valve. Anyone disagree or agree?

So I've had a heck of a time getting the correct float valve assembly for the skimmer. I had the skimmer manual in my hands but put it back in the box which ended up getting taken away by the builder. No big deal because I figured it's a standard Hayward skimmer so it should be easy to get the part right? Wrong! The skimmer I have is for in ground vinyl or fibdrglass pools and is part of a model line with square covers. And trying to find the right part through two different pool stores has just been a waste of tkme even when one of them special ordered one for me.

You would think that I could have gotten the information I need off of Hayward's web site but it is terrible and provided no useful information or even the proper parts list for this series of skimmers. I did finally find a web site with the different skimmers clearly laid out with specs etc. And it turns out I have a Hayward 1084 skimmer. EDIT: It's actually somewhat oval shaped with straight sides as opposed to the other one that is a disk.

The 1082, 1084, and 1085 models are all for inground vinyl or fiberglass pools. They take a special float valve assembly SP1082FV and there is an optional equalizer check valve SP1078. If you don't want the float assembly but still want to balance the main drain vs skimmer then you need part SP1082GV Skimmer-Main Drain Valve Assembly.

The complete owners manual: http://www.propools.com/instructions_ow ... nual56.pdf

As far as I can tell from the diagrams and having tried a "standard" Hayward float valve, this SP1082FV version has the o-ring mounted in the valve body vs. the "standard" FVs where the o-ring goes into a groove in the skimmer body. Also the 1082 version looks to be a little wider than the standard one which was not wide enough to cover both openings completely.

Good times all because I didn't think to keep the manual that came with the skimmer. :hammer:
 
Re: Vinyl pool remodel in San Diego - Need help with Pool Li

So two weeks ago I turned on the light in the pool and it came on but within 10 seconds it started flickering and then died. I thought it just needed a new bulb. I finally got a chance to pull the light out to take a closer look at it for part numbers etc. (I took pictures of it during the remodel but lost those) and when I pulled it out of the water it was clear that there was water in the light. On close inspection, the opening for the cable had been covered with some kind of epoxy, and the bottom of the light was filled with it too. Clearly this failed and allowed the water in.

Here are the pics:
 

Attachments

  • Pool Light - Inside.JPG
    Pool Light - Inside.JPG
    140.7 KB · Views: 268
  • Pool Light1.JPG
    Pool Light1.JPG
    124.2 KB · Views: 270
  • Pool Light - Ring.JPG
    Pool Light - Ring.JPG
    118.3 KB · Views: 269
Re: Vinyl pool remodel in San Diego - Need help with Pool Li

You can clearly see the corrosion and rust inside the light. The bulb is a screw-in type but actually broke as I tried to remove it; I was able to get the base out with pliers.

What I know so far:
-Purex SunLite model 10510
-Replacement lamp: Purex 70517 or 70518 and 250 watts max

Dimensions:
-The overall length is 4.25"
-The tube section is 2.75" long
-The lamp housing is 3.25" wide
-The glass lens is 3-1/8" round
-The face plate is 5.75" wide (may have been 5.5" - I'll need to re-measure tomorrow)

This looks like the lamps on page 460 of this doc:
https://www.pentairpartners.com/productcatalog/pdf/sec19_RP_Lighting_US2012.pdf - Thanks to Quattro1 and his thread for finding this doc! My light matches most of his measurements too.

However, in that document the light is Sta-Rite not a Purex...Was Purex bought by Sta-Rite and then by Pentair?

Does anyone know where I can get a replacement light assembly? Or possibly another light that will fit this niche?
 
Re: Vinyl pool remodel in San Diego - Need help with Pool Li

Pentair is a massive conglomerate that owns many companies. Pentair bought Purex, Pac Fab, Amerlite (American Products?) and Triton (am forgetting any?). I don't know the order of this, but regardless, those are likely the same lights. We had Pentair SAm lights that were designed around the original Amerlite niche. So, it's likely the same product, just rebranded.
 

Enjoying this content?

Support TFP with a donation.

Give Support
Re: Vinyl pool remodel in San Diego - Need help with Pool Li

CraigMW said:
Pentair is a massive conglomerate that owns many companies. Pentair bought Purex, Pac Fab, Amerlite (American Products?) and Triton (am forgetting any?). I don't know the order of this, but regardless, those are likely the same lights. We had Pentair SAm lights that were designed around the original Amerlite niche. So, it's likely the same product, just rebranded.

Thanks CraigMW.

I'm still hoping someone knows a place where I can get these?
 
Re: Vinyl pool remodel in San Diego - Need help with Pool Li

ajones02 said:
your pool make-over is fantastic!!!!!!

congratulations and as some stated before, what a great setting!

Thank you ajones02. The yard really sold us on the house - we just love it! The theme was already there and we've just spruced it up a bit and will continue to add on to it as time and funds allow. The complete remodel was a lot more than expected but we think it came out great. Thanks again for your kind words.
 
Re: Vinyl pool remodel in San Diego - Need help with Pool Li

Thanks Craig - I saw them too but their prices were a bit higher. I'm worried about the small version...didn't see that there are two sizes there - the pentair catalog lists two types but they share all of the same parts. I know I have a spa size light and it's the 250watt 120V version (see the pics above)
 
Re: Vinyl pool remodel in San Diego - Need help with Pool Li

The light has been replaced. The new light was 1/2"-3/4" longer due to the much improved strain relief. So it was a bit tricky to put in as this niche does not have a flat back. Instead it has a protrusion where the bond wire attaches - think of a flat topped cone sticking out of the back of the niche coming towards the pool. Anyway, with a bit of finagling the light fit though it's not centered on the niche face plate - it's about 3/8" off to the right. It still fully covers the inner circle of the face plate and it looks ok. I don't think the old light was ever perfectly centered either.
 
Re: Vinyl pool remodel in San Diego - Need help with Pool Li

Were having a nice heat wave here in San Diego this weekend. I've been running the solar since yesterday. Starting temp was 64 yesterday morning and got to 73. This morning it was at 70 and now it's at 78 and still climbing. We will be getting in as soon as my daughter gets home from a birthday party :)
 
An hour and a half of swimming with my daughter - we had a blast swimming down for rings and racing each other across the pool. It was a bit too windy shortly after we got in to just lounge but it was still great!
 
I was prompted for some pictures of the finished pool and I realized I never posted any. So here you go - more to come at some point but this is all I could grab today.

We spent Sunday in the pool for close to 3 hours - water temp was 86+ and the weather was perfect. It was an absolutely glorious way to spend Easter.

We continue to love the border-less liner. Many times the only way you can see the water level is because the liner has a slight shadow/darker look below the water line. It helps that the water is sparkly clean of course! The new skimmer also works great; it is grabbing all sorts of stuff the old one couldn't and it doesn't empty out if there's a lot of splashing in the pool like the old one would (that would lead to the pump sucking air).

You can also see the deck-o-seal is installed. That was a knee bruising job but I'm pretty happy with my work. I really got to appreciate just how great a job my masonry guys did with leveling the pavers to the inconsistent deck.
 

Attachments

  • Finished3.JPG
    Finished3.JPG
    433.8 KB · Views: 154
  • Finished2.JPG
    Finished2.JPG
    400.4 KB · Views: 154
  • Finished1.JPG
    Finished1.JPG
    353.5 KB · Views: 153

Enjoying this content?

Support TFP with a donation.

Give Support
Thread Status
Hello , This thread has been inactive for over 60 days. New postings here are unlikely to be seen or responded to by other members. For better visibility, consider Starting A New Thread.