UT New Build - Update (start up 5/21)

Keep a VERY close eye on the shelf.

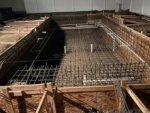
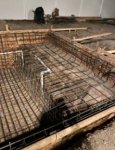
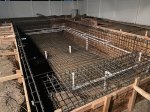
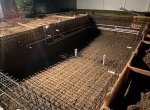
What you can do it measure the pool now. Is it long, wide, deep, etc enough? Add about 8" for the steel, shell, and plaster. So that means 16" from side to side and end to end. The water depth will be from the floor to the middle of the skimmer face so keep that part in mind.

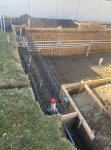
Great catch on the wall and skimmer! Have to ask who would have a wall blocking the view of the pool from the house??? What were they thinking?

Oh and make sure the put the deep end on the correct end! Had one build where they go that wrong :(

Kim:kim:
 
  • Like
Reactions: johnywess
@kimkats Thanks. Yeah, no clue what they were thinking with the wall. Guessing they saw the hole for the skimmer so they just went and put it on the other side. They fixed it this morning.

They are doing plumbing and starting steelwork today. I went and measured the pool last night. The measurements all came out good for length, width, depth, and raised wall but I was adding about 12". The depth was ballparked because it was hard to tell but they installed the skimmer today so I can now check those measurements again later. As you said, I'm most worried about the shelf.

The deep end on the wrong side, that is crazy. Lucky our deep end is in the middle so they didn't have to think about that one too hard.
 
Have to ask who would have a wall blocking the view of the pool from the house???
I do. we had no idea the pool would ever be added when the outdoor kitchen was built so we built the grill lookin out over the backyard. Now that the pool is there I added a 65" TV on the back of the wall for watching football and movies nights and it looks like we did it on purpose.
 
  • Like
Reactions: johnywess
I'm near the finish line with my build and I went with 4 Microbrites on a 40x18. One at each 18' side and 2 spaced out equally on the house side of the pool. PB was just going to do 3 but I thought it might need more and I'm glad I did. I think it has just enough light but I may have done 5 total if I had to do it again.
 
  • Like
Reactions: johnywess
  • Like
Reactions: Nikilyn
@spd500 That is great and yeah it does look like it was meant to be there.

@ImpalaSS Thanks for the feedback. Your pool looks good. Any reason you went with microbrites vs intellibrights? My PB says he did two intellibrights in his personal 50x20 pool and says they light up the whole pool so I figured I would be good with two intellibrights for my 35x15 pool. It looks like you have an automatic cover also, did you know yet if intellicenter can notify you when the cover is open or if you can program the water features to not go on when it closed?
 
@ImpalaSS Thanks for the feedback. Your pool looks good. Any reason you went with microbrites vs intellibrights? My PB says he did two intellibrights in his personal 50x20 pool and says they light up the whole pool so I figured I would be good with two intellibrights for my 35x15 pool. It looks like you have an automatic cover also, did you know yet if intellicenter can notify you when the cover is open or if you can program the water features to not go on when it closed?
[/QUOTE]
The only reason I went Microbrite was based on the feedback I've read in this forum with the reliability issues with the intellibrites and globrites. I didnt have any past experience. The Micro seems like a pretty simple fixture and was very easy to install in a standard 1.5" fitting. The control is a little strange because you have to cycle power to get the color change and light shows but the Intellicenter can control that.
 
  • Like
Reactions: johnywess

Enjoying this content?

Support TFP with a donation.

Give Support
If I knew more about lighting prior to starting on my build I would have gone with several of the nicheless lights instead of the regular niche style that I ended up with. To me it seems like you would get more even lighting around the pool with those and it is great that you are not stuck with a proprietary niche for any future needs.
 
  • Like
Reactions: johnywess
Update - Steel is almost done. I'm amazed at how fast they work. Went and looked at stone options for the raised wall water feature. Number 3 ties in the best but we are still not sure. It's not a big area so we are thinking we could possibly do 1 or 2 but that might blend in with the white plaster. Any thoughts or votes?

@ImpalaSS and @Spd2230 Thanks for sharing your thoughts. This place is amazing with everyone willing to share their experiences and thoughts. I'm a newbie to all of this. Seem like there pros and cons to both. I feel like every day there a new thing I need to research. Read about the reliability issues but hoping maybe Pentair fix them over the last couple year. Read someone they change them to fix the issue. Who knows.
 

Attachments

  • 2020-11-19_1.jpg
    2020-11-19_1.jpg
    24.1 KB · Views: 91
  • 2020-11-19_2.jpg
    2020-11-19_2.jpg
    24.5 KB · Views: 85
  • 2020-11-19_3.jpg
    2020-11-19_3.jpg
    25.8 KB · Views: 88
  • 2020-11-19_4.jpg
    2020-11-19_4.jpg
    22 KB · Views: 110
  • 2020-11-19_5.jpg
    2020-11-19_5.jpg
    48.5 KB · Views: 110
I vote #2. Love the white. I like the texture of that one the best too. Beneath the stone will be the blue tile then the plaster. When there is water in the pool it will be blue, not white. But they will all look good.
 
  • Like
Reactions: johnywess
I vote #2. Love the white. I like the texture of that one the best too. Beneath the stone will be the blue tile then the plaster. When there is water in the pool it will be blue, not white. But they will all look good.

@Nikilyn That's true. I forget the pool will eventually have water in it one day :cool:
 
  • Like
Reactions: Nikilyn
@TampaKathy Yeah I did and the sunshelf is looking good. I feel like they are cruising.

Just barely longer than 6'. Still kind of hard to tell how deep it will be. They actually plumbed the bubblers today and put light holders in. Every time I think they are done with steel they just keep bringing more and more. They were pressure testing the plumbing today also. Still no plumbing for the water feater, deck jets, or slid stub so I'm keeping my eye on those. I tried to ask them but they tell me they don't speak English. They don't mind me being noisy as much now since I put a cooler out full of drinks for them each day :)

Does anyone know if there is a general rule of how much to add on top of the steel for concrete and plaster?
Any clue on how I would know they plumbed the overflow value?
 

Attachments

  • 2020-11-20_2.jpg
    2020-11-20_2.jpg
    122 KB · Views: 41
  • 2020-11-20_3.jpg
    2020-11-20_3.jpg
    122.6 KB · Views: 46
  • 2020-11-20_18-1.jpg
    2020-11-20_18-1.jpg
    113.6 KB · Views: 44
Look good so far!

Add about 6" for the shell and plaster. Remember the side to side you will need to add 6" for each wall so it will be a total of 12". The WATER depth will be to the middle of the skimmer opening.

Overflow-there should be a pipe that will way at the top of the pool wall. It will be just under the coping. So look for the pipe that is higher than the others.

Talking to them=call your project manager and ask him to stop by so you can ask him your questions. If the language barrier continues to be a problem ask for them to make sure there IS someone that you ask questions of. You are spending a LOT of money so you should be able to ask questions.

Good job on the cooler of drinks!

Kim:kim:
 
  • Like
Reactions: johnywess
Thanks @kimkats! I found the overflow pipe. When I inspected the pipe closer today they have labeled them all at the equipment pad area so I just need to look at that (to be fair, it was dark last night :)). Going to go measure now with that 6" rule.
 
BUT the overflow pipe should not be at the pad. It should start at the pool and go to where ever you want the extra water to go to keep from flooding your house or neighbors. It might be tied into your deck drains but that is not often.
 
BUT the overflow pipe should not be at the pad. It should start at the pool and go to where ever you want the extra water to go to keep from flooding your house or neighbors. It might be tied into your deck drains but that is not often.

You are right. Mixing up all my questions in my head. The Autofill is at the pad. I don't have an overflow because of the automatic cover.
 

Enjoying this content?

Support TFP with a donation.

Give Support
Thread Status
Hello , This thread has been inactive for over 60 days. New postings here are unlikely to be seen or responded to by other members. For better visibility, consider Starting A New Thread.